Drimiopsis: dyrkning og pleje derhjemme
Indhold:
Drimiopsis - denne stueplante vil blive elsket af alle, der foretrækker smukke lysegrønne blade frem for spektakulære blomster. Han kræver ikke særlig opmærksomhed, tilgiver fejl begået i plejen og er ikke kræsen med hensyn til de betingelser, den dyrkes under. På trods af at denne plante er hjemmehørende i troperne, føles den fantastisk i mikroklimaet i bylejligheder. Drimiopsis lever i lang tid, formerer sig let, har god udholdenhed og er meget smuk, hvilket sandsynligvis er årsagen til en så stor popularitet blandt gartnere, der dyrker husplanter.
Oprindelse og historie af Drimiopsis:
Drimiopsis er en urteagtig staude, der tilhører Hyacinth -underfamilien og Aspargesfamilien. Planten er hjemmehørende i de sydlige og østlige dele af det afrikanske kontinent. Under naturlige forhold vokser den som en bunddækkende plante og danner et kontinuerligt løvfældende tæppe. Når man vokser derhjemme, dannes der ofte rosetter.
Fra det græske sprog oversættes navnet som ligner drymiya. Dette skyldes sandsynligvis dets lighed med havbuen. Planten har et andet navn - Ledeburgia, kaldet Scylla. Faktum er, at blomsten blev opdaget af Karl Friedrich von Ledebour, som er naturforsker og floraforsker på de afrikanske landes område, og takket være hvem den første blomstervoksende skole blev grundlagt i det russiske imperium. Han stod også i spidsen for den første botaniske have i Rusland. Blomsten blev opkaldt efter ham. Kælenavnet Scylla findes ikke i vores tid, men i 1800 -tallet blev planten kaldt så ret ofte, herunder i botaniske bøger.
Beskrivelse:
Drimiopsis blev et eksempel på en plante, der trods sin afrikanske oprindelse kan vokse i lejligheder overalt i verden uden at kræve særlig opmærksomhed og pleje.
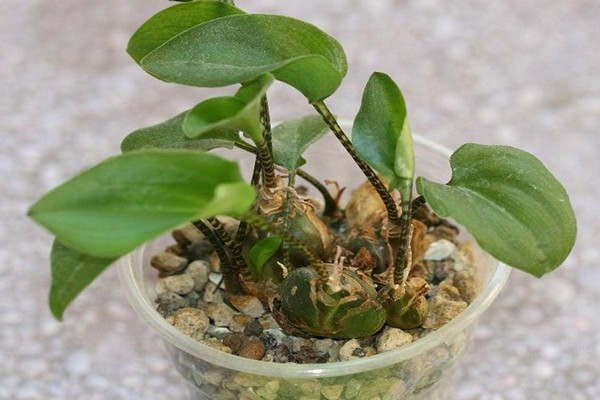
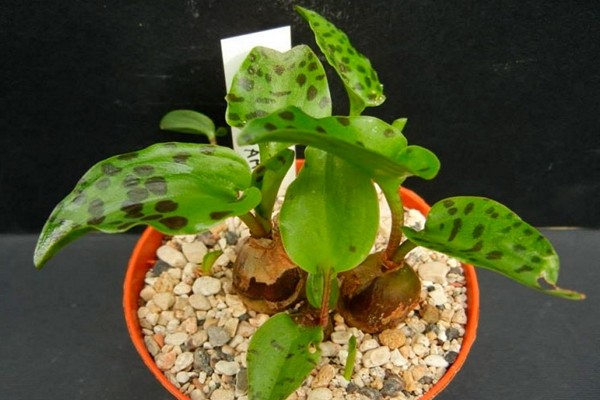
Denne art tilhører en løgplante, hvis løg har en aflang form, dækket med brune skæl. Når den er vokset, er kun en tredjedel af den i jorden, resten er på overfladen.
Dens løg bør holdes adskilt fra dem, der spises, da det er ret let at forvirre dem.
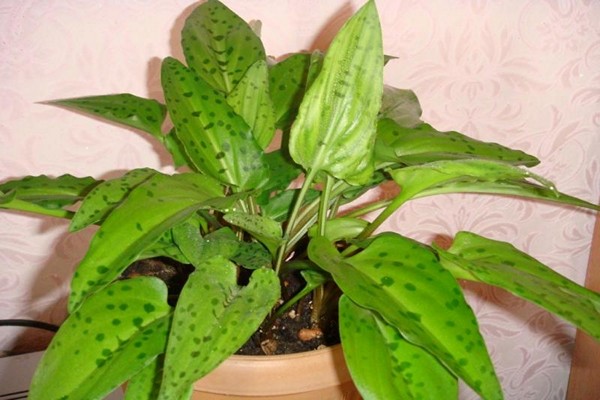
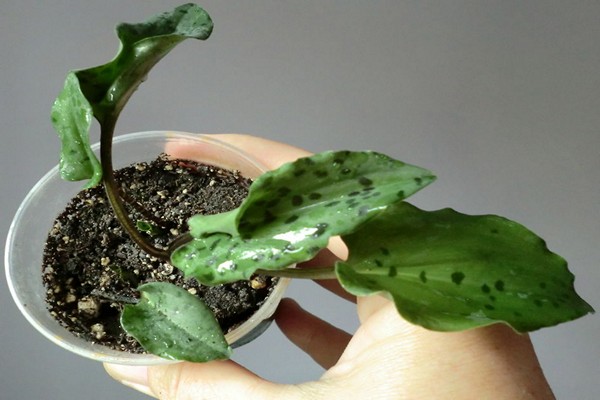
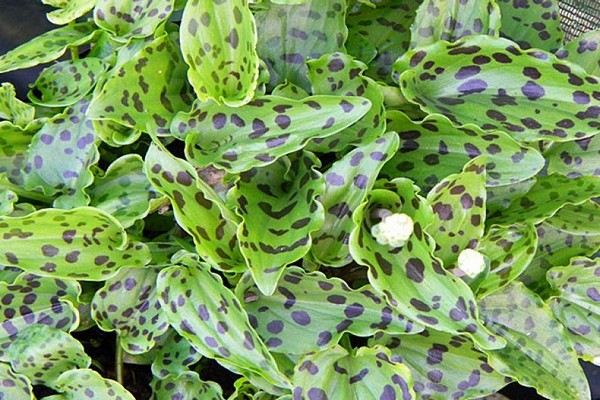
Planten består udelukkende af tætte, tykke, blanke blade, som kan være monokromatiske, eller de kan have forskellige mønstre. Deres form kan ligne oddsen for et hjerte eller en langstrakt oval, hvor spidsen er skarpt spids. Bladoverfladen er olivenfarvet, hvilket er en glimrende baggrund for mørke pletter og uregelmæssige prikker. I kanterne er bladene bølgede, og når de udsættes for sollys, fremstår de som sølvfarvede. Bladene vokser i gennemsnit op til 20 centimeter i længden. Fortsæt med aflange ti centimeter bladstænger.
Drimiopsis blade er, hvad denne plante er så værdsat for blandt elskere af grønne planter.
Udseendet af mønstre på bladpladerne af en blomst afhænger af belysningen i rummet. Hvis det er nok, vil det være klart og smukt, men fra midten af efteråret begynder det at falme og forsvinder gradvist og vises kun igen om foråret.
Kun i stærkt lys kan det opnås, at der vises en broget farve på bladene.
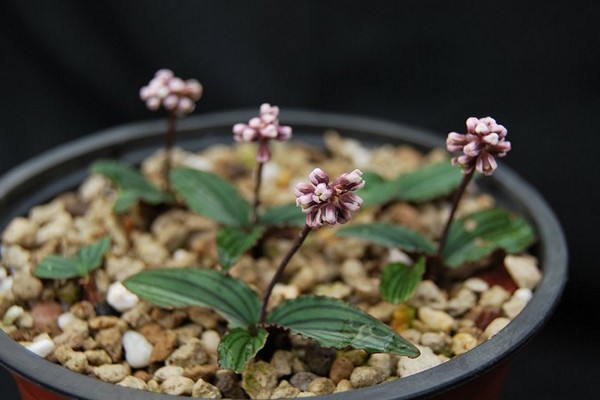
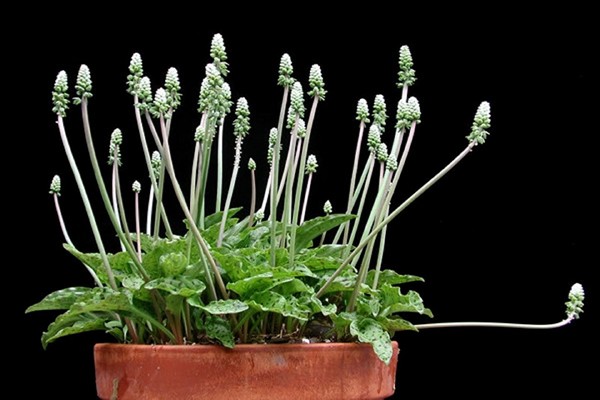
I sit naturlige miljø blomstrer Drimiopsis om foråret eller sommeren.Hvis du vokser hjemme, kan blomstring observeres næsten hele året, den eneste undtagelse er tilstanden af vegetativ hvile. På blomstringstidspunktet er planten dækket af lysegrønne, lyserøde eller cremede blomster af lille størrelse, de samles i 10 eller 30 i racemose eller pigge blomsterstande. Diameteren af blomsterne er omkring 0,5 centimeter. De opløses og omslutter med deres sarte, lette og meget behagelige aroma, der minder om liljekonvalj. De åbner langsomt, starter fra bunden og stiger til toppen, hvilket gør blomstringen lang.
Blomsterne er ret iøjnefaldende og tiltrækker ikke meget opmærksomhed, men i lang tid giver de dig mulighed for at nyde deres diskret aroma.
Efter at have plantet en plante en gang og skabt behagelige betingelser for den, vil det være muligt at dekorere dit hjem i 10 år. Men ikke kun som dekoration kan den tjene, men også som en plante, der opfrisker luften og desinficerer den.
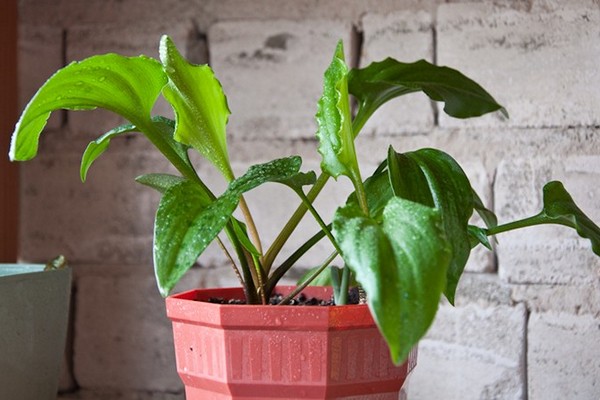
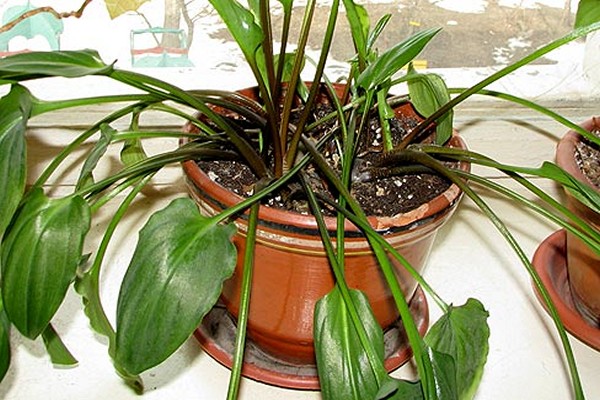
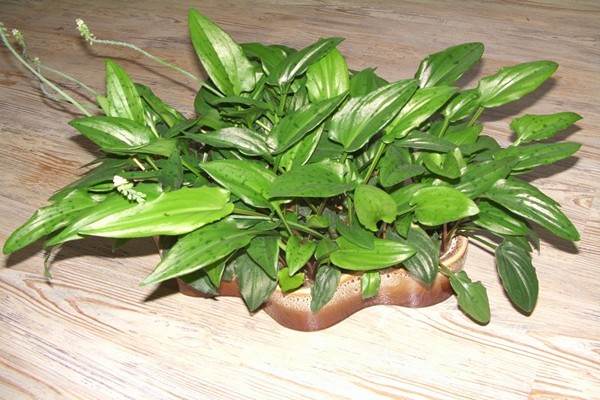
Drimiopsis, når den ikke blomstrer, ligner meget eucharis, men under blomstringen bliver forskellene tydelige. Faktum er, at eucharis har større blade og mere spektakulær blomstring.
Fordelen ved Drimiopsis dyrket i lejligheder er dens størrelse. Dens højde overstiger sjældent en halv meter. Det vokser langsomt. Når der skabes gode betingelser under vågenhed, vises der ikke mere end tre nye blade.
Typer af Drimiopsis:
I dag er der omkring 22 arter af denne smukke plante, men kun 14 har en videnskabelig beskrivelse og officiel registrering. Til dyrkning derhjemme bruges kun to typer.
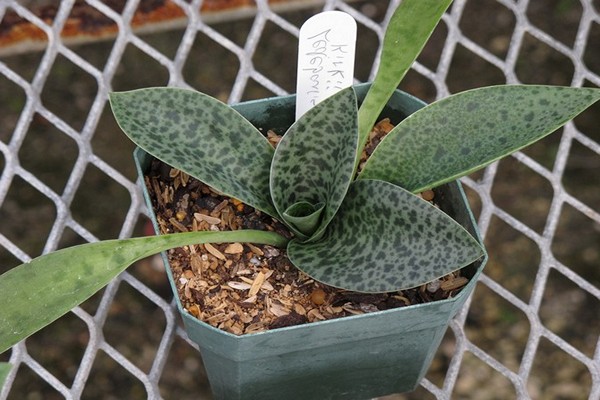
Drimiopsis Kirk, også kaldet Ledeburgia bortiovidny. Plantehøjden er omkring en halv meter. Dens pære ligner meget et almindeligt løg. Hendes farve er hvid og rund. Blade med en læderagtig overflade og lancetformet. De når 40 centimeter i længden og 5 centimeter i bredden. Fra den centrale del begynder bladene at aftage mod deres spids. Bladets overside er lys lysegrøn og er dækket med mørkebrune pletter med en grøn farvetone. Den nederste del er gråtonet.
De prægede vener er tydeligt synlige. Bladene er placeret på meget korte blade. Blomstrende skud 30 centimeter høj. I sit naturlige habitat begynder blomstringen midt i forårssæsonen og slutter kun med begyndelsen af efteråret. På dette tidspunkt er planten dækket af hvidrosa blomster. I den vegetative hviletid vises der ikke nye blade.
Drimiopsis plettet det kaldes også petiolate ledeburgia. I den vegetative hvileperiode mangler løvet fuldstændigt på det og mister først sin brogede farve. Hjerteformede blade bliver op til 12 centimeter lange og 7 centimeter brede. Denne art har et aflangt bladstykke og cirka 20 centimeter. Blomstringen begynder midt på foråret og slutter midt på sommeren. De blomstrende skud, på hvilke beige-gule blomster dannes, har en svag bøjning.
Denne art er fuldt ud i overensstemmelse med sit navn.
Om sommeren vil planten være behagelig i haven eller på balkonen og blive en dekoration.
Oprettelse af optimale forhold:
Uanset at Drimiopsis kommer fra de sydlige lande på det afrikanske kontinent, har det allerede formået fuldt ud at tilpasse sig vores forhold, som er påfaldende forskellige fra dem, hvor de opstod.
Drimiopsis elsker solen og er derfor tiltrukket af den, så den ikke skæver, hver uge skal vasen vendes mod lyset i forskellige retninger.
Der vil blive skabt gode betingelser, hvis anlægget er placeret på sydsiden, sydøst eller sydvest. Om sommeren er det bedst at holde det på en terrasse, loggia eller balkon. Det er vigtigt ikke at udsætte planterne for træk, men samtidig sørge for konstant ventilation.
Belysning:
For at mønstre kan vises på bladene, der øger plantens dekorative virkning, er det nødvendigt at give den en lys diffust belysning.Drimiopsis vil føle sig godt i direkte sollys, men i en periode med intens varme, især i dagtimerne, er det nødvendigt at skabe delvis skygge for det, så forbrændinger ikke vises. Det er vigtigt at huske, at i skyggen bliver planten mindre dekorativ. Også at forlade planten under betingelser med kun kunstig belysning giver ikke behagelige forhold.
Temperaturområde:
Når planten er vågen, skal lufttemperaturen være fra +20 til +25 grader. Når vegetativ hvile kommer, skal termometeret være mellem +12 og +16 grader, et fald til +8 grader er tilladt. Når varmen er mere end +30, vil planten ikke være behagelig, men den vil ikke dø.
Fugtighedsniveau:
Fugtighedsniveauet er ikke vigtigt for Drimiopsis. Hvis du giver ham ordentlig vanding, vil han have det godt, selvom luften er meget tør, især hvis han ikke er det eneste stueplante i dette rum. Sprøjtning, rengøring og aftørring af bladene er kun nødvendig for at opretholde hygiejne og ved ekstrem varme, mens vandet altid skal være varmt.
At udsætte planten for nordsiden, eller hvor planten ikke vil se solen, vil ikke give den de betingelser, hvorunder dens dekorative virkning bevares, men den vil fortsætte med at vokse.
Hvordan og hvornår man skal transplantere:
Indtil treårsalderen har Drimiopsis brug for en årlig transplantation, og hver gang skal krukken være 3 centimeter større i diameter. Dem, der har nået denne alder og under 5 år, transplanteres kun én gang. Ældre voksne bør kun transplanteres, når datterpærerne ikke længere kan passe i gryden, normalt hvert 4. år. Denne procedure bør udføres fra marts til april.
Dannelsen af datterløg er meget aktiv, men udviklingen af rodsystemet er temmelig langsom. Derfor, for Drimiopsis, skal du vælge en sådan beholder, så den er lav og bred, som en skål eller skål. En beholder lavet af naturlig keramik er bedst egnet, da der er bedre luftudveksling i den, som vil beskytte løgene mod forfald. Der skal laves et drænhul på den.
Det er ikke nødvendigt at vælge en gryde, der er dyb og stor i volumen, da dette kan forårsage udvikling af råd, og jorden vil begynde at vokse langsomt.
Blomsten elsker jordbunden løs, let og nærende. For at lave det selv skal du bruge humus, løvjord, kompost og flodsand til madlavning. Alt dette blandes i lige store mængder, og der tilsættes trækul, som vil tjene som et nyttigt tilsætningsstof.
Det er muligt at bruge en universel jord lavet af sand, vermiculit og perlit 3 x 1 x 2, samt en universel jord, som løgplanter kan lide, fra tørvspåner og groft sand 2 x 1.
Ved plantning af planter skal du hver gang omhyggeligt undersøge alle løgene og fjerne de beskadigede områder med en ren og skarp kniv.
Det er ganske enkelt at transplantere denne plante, så selv en nybegynder blomsterhandler kan klare denne opgave. For at gøre dette er det nok at følge enkle regler.
Først skal du lave et tre centimeter drænlag af ekspanderet ler, brudt mursten og kul i bunden af gryden. Dernæst lægges en jordblanding, som lukker gryden med 3/4 og vander den uden at bruge for meget vand.
Derefter skal du få planten fra det oprindelige sted, skræl pæren fra jorden og adskille døtrene for ikke at forårsage skade.
Det næste trin er at rense pærerne for skader og rådne områder. Efter at have gjort dette er det nødvendigt at behandle sårene ved hjælp af aktivt kul, kridt eller træaske. Du kan også sænke løgene med en lyserød kaliumopløsning eller 1% fungicid i 20 minutter og lade tørre i skyggen i en time.
Så snart behandlingen af løgene er udført, er det nødvendigt at lave et hul eller flere på et nyt sted og plante løgene der.Sørg for, at halvdelen af pærerne forbliver på overfladen.
Derefter skal du forsigtigt stramme jorden og vandet. Efterfølgende pleje adskiller sig ikke fra tidligere pleje.
Voksne, tilgroede planter har ofte datterløg, som med deres antal skubber moderløgene til jordoverfladen. På grund af dette er hun frataget den korrekte ernæring, så dannelsen af blade stopper. Hvis dette sker, behøver du ikke slippe af med det, du skal bare transplantere det til et andet sted i en lille beholder. Denne plante mister ikke sin evne til at reproducere og frigive sine blomster.
Plejeregler:
Denne type tropiske planter viser, at selv at dyrke den under helt fremmede forhold, vil det ikke tage meget tid og kræfter at passe en smuk plante. Drimiopsis er uhøjtidelig og meget hårdfør, hvilket bestemt glæder.
Hvornår skal vandes
Fra april til de første dage i oktober skal vanding udføres, efter at jorden er tørret til en dybde på 4 centimeter. Hvis der ikke er stor varme udenfor, er en gang om ugen tilstrækkelig til vanding. Hæld vandet, så det ikke rører pærerne.
Vand skal bruges blødt. Optøet eller vådt. Det skal altid være varmt.
Hvis dette ikke er muligt, skal det undergå filtrering, koges og tappes, som har sat sig i mindst 2 dage. Du kan tilføje citronsyre til vandet, dette hjælper med at rense det for skadelige forbindelser.
På trods af tørkenes tolerance er det ikke nødvendigt at tørre jorden regelmæssigt, da gulheden vil vises på den. Overdreven vanding til en plante er farligst, hvis du regelmæssigt hælder den, vil dette helt sikkert ødelægge blomsten.
Befrugtning
Gødskning er kun nødvendig, når planten er vågen. Til fodring er flydende kompleksgødning egnet, som påføres med to ugers mellemrum. Du kan også bruge gødning, der fodrer kaktusser og sukkulenter. Inden du forbereder løsningen, skal du læse instruktionerne og følge instruktionerne i den.
Da Drimiopsis elsker frugtbar jord, er det ikke værd at fratage planten gødning.
Drimiopsis om vinteren:
Om vinteren går planten i vegetativ hvile. På dette tidspunkt kan det kaste alt løv, eller de stopper simpelthen med at vokse. Det afhænger af, hvilken art der dyrkes. Så snart oktober ruller rundt, bør vandingen gradvist reduceres til en gang hver anden uge. Jo lavere lufttemperaturen i rummet er, desto sjældnere udføres vanding. Jordens koma bør dog ikke få lov til at tørre ud.
Hvad angår lyset, skal alt forblive det samme her. Det er ikke påkrævet at skygge planten i denne periode, da solen ikke længere har den aktivitet, den har om sommeren. Der kræves ingen befrugtning.
Mulige vanskeligheder med at vokse:
Selvfølgelig drimiopsis, en uhøjtidelig blomst, men ikke desto mindre er det umuligt at fratage det sin pleje eller gøre det forkert. Sådanne handlinger vil føre til, at planten mister sin dekorative effekt.
Hvis der sker ændringer i efteråret, skal du ikke være bekymret, grunden er at forberede planten til hvile. Hvis der sker ændringer i foråret-sommerperioden, mangler det sandsynligvis næringsstoffer, eller det er trangt og skal transplanteres.
Ændringer kan være som følger:
Bladene mister deres mønstre, og farven bliver ensformig, falder i størrelse, stilkene bliver tyndere og begynder at strække sig. Dette sker, hvis drimiopsis mangler lys eller kun har kunstig belysning.
Stenbladene og pæren er slimede og begynder at blive sorte. Dette tyder på, at planten er begyndt at rådne. Dette kan skyldes for hyppig og rigelig vanding samt for lave temperaturer.
En hvidlig belægning vises på jordoverfladen. Dette problem opstår på grund af stagnation af væsken i gryden.Dette kan skyldes dårlig luft- og vandgennemtrængelighed i jorden og for tyndt dræningslag.
Hvis der vises lette pletter på bladene, og på dette sted begynder de at tørre, så har planten fået en forbrænding.
Hvis bladene begyndte at rynke, falde og miste deres elasticitet, har det sandsynligvis ikke nok fugt.
Sygdom og skadedyrsresistens:
Drimiopsis har god resistens over for sygdomme, og skadelige insekter kan ikke lide det for meget. Det, der virkelig er en trussel mod planten, er rodrot og skader med en rød forbrænding, som er typisk for alle løg. Det er ikke svært at undgå disse sygdomme; det er nok at udføre forebyggende foranstaltninger.
For det første, når de køber nye planter, skal de sidde i karantæne i 21 dage, og snitblomster i buketter skal være i god afstand fra dem, der dyrkes derhjemme.
For det andet er det nødvendigt regelmæssigt at ventilere rummet, så luftcirkulationen er konstant.
For det tredje er det nødvendigt at inspicere alle indendørs planter hver uge for tilstedeværelse af skadedyr eller forekomsten af skader.
For det fjerde skal planten føle sig fri på vindueskarmen og ikke krølle.
For det femte er det nødvendigt kun at bruge desinficerede værktøjer, god jord og rene krukker, når man arbejder med planter.
Ved arbejde med planter skal alt gøres omhyggeligt uden hastighed for at minimere mulige skader og i tilfælde af et udseende straks behandle sektionerne eller sårene.
Sanitære foranstaltninger er en integreret del af plantebeskyttelsen. Under dem skal du tørre bladene af med en fugtig svamp, sprøjte det og sende det i bad hver tredje uge.
Udfør vandingsaktiviteter uden at overfylde planten.
Påfør gødning i henhold til anbefalingerne og ikke oftere, da dette kan forårsage mere skade end gavn.
Tegn på sygdomme og skadedyr: bekæmpelsesmetoder
Slank, sortfarvning på pærens øvre skalaer, på stilkene, ved deres bund og udseendet af en grim lugt, indikerer en sygdom hos planten med rodrot. Hvis det opdages, skal du straks handle. Transplanter planten, fjern alle beskadigede områder, selv med de mindste tegn på sygdom, skift jordblandingen og potten. Mens du forbereder den nye jord, skal du tilføje et biologisk fungicid der eller dyppe løgene i den.
Når tynde røde eller crimson pletter eller revner vises på pæren, samt buler af disse farver, kan vi tale om sygdommen stangoporose. I dette tilfælde er det nødvendigt at stoppe alle vandingsaktiviteter i 30 dage, fjerne alle skader fra pærerne og behandle sektionerne med jod og aktivt kul.
Udseendet af skalainsekter på planten fremgår af udseendet af gulrøde pletter ved siden af de afrundede vækster af en gråbrun farve samt farven på jorden, der er blevet sort. For at klare dette skadedyr er det nødvendigt at opløse vasketøjssæbe i en lille mængde vand og anvende denne blanding på overfladen af bladene. Lad stå i en time og skyl med et varmt brusebad. Derefter er det nødvendigt at udføre behandlingen med insekticider og lægge den i en plastikpose i tre dage.
Udseende af en edderkoppemide kan bestemmes af et tyndt væv på kronbladene, sorte pletter på bladets inderside og gule på ydersiden. Du kan slippe af med det ved hjælp af en sæbe-alkoholopløsning, der påføres bladene i 30 minutter og derefter vaskes af med et varmt brusebad. Efter proceduren er det nødvendigt at fjerne planten i en pose i tre dage. Du kan bruge acaricidale lægemidler. De påføres fire gange med en uges mellemrum. Det er bedre at skifte medicin hver gang.
Mealybugs kan identificeres ved råhvide klumper, der dannes på selve planten og på løgernes skalaer, samt ved en hvidlig voksagtig belægning på substratet. Til behandling af bladene kan du bruge enhver alkoholisk tinktur fra apoteket. Efter behandling skal du vaske det af efter 20 minutter. Du skal også bruge insekticidbehandling 4 gange med to ugers mellemrum.
Bladlus er ikke svært at få øje på. Det bosætter sig i kolonier på den sømløse side af bladpladen. På grund af dem er bladene dækket med små beige pletter, og klæbrighed vises. Hvis de findes, før de havde tid til at yngle, vil brugen af hvidløgsinfusion være tilstrækkelig. Hvis situationen kører, skal der bruges insekticider, der udfører behandlingen 3 gange med et interval på to uger.
Det er vigtigt at vide, at rodrot kun kan behandles på et tidligt stadium, hvis planten allerede har et stærkt nederlag, skal den fjernes og destrueres.
Bladlus er et skadedyr, der sætter sig på næsten alle planter, herunder Drimiopsis.
Avlsmetoder:
Drimiopsis kan formeres ved hjælp af datterløg, stiklinger og frø. Dette er ikke svært at gøre, det er vigtigt, hvilken metode der er egnet til gartneren selv.
Brug af datterpærer til formering
Denne metode er den mest almindelige, da den betragtes som den enkleste. For at gøre dette er det nok at adskille døtrene fra moderpæren under transplantation og flytte dem til separate potter. Dette kan gøres ikke kun på tidspunktet for transplantation.
Når du udfører disse aktiviteter, er det vigtigt at adskille pærerne for at forårsage så lidt skade som muligt. Hvis der opstår sår, skal de behandles med jod og træaske. Knust kridt, kanel og kolloidt svovl er også velegnede.
Inden du planter dem, skal du forberede små potter ved at fylde dem med humus, bladhumus og groft sand i forholdet 2x1x1 og fugte det.
Efter plantning skal krukkerne flyttes til et sted, hvor der vil være meget lyst og diffust lys. Lufttemperaturen skal være +25 grader og ikke falde under. Vand det hver tredje dag med en moderat mængde varmt vand.
Rooting finder sted om 21 dage. Når de når 4 centimeter i længden, skal de transplanteres i deres sædvanlige jord.
Stiklinger
Kun Drimiopsis Kirk kan formeres på denne måde.
For at gøre dette skal du forsigtigt trække bladet ud og efterlade en hvid bund ved stilken. Du kan opdele plantematerialet, hvis det ikke er nok i dele, hvis længde vil være fra 5 til 7 centimeter.
Inden kronbladene placeres, er det nødvendigt at forberede beholdere med lille dybde og fylde dem med tørv og sand i lige store mængder. Det er ikke nødvendigt at vande planten og fugte jorden. Til rodfæstning kan du bruge rent vand eller et rodvækststimulerende middel, hvor kronbladene er placeret. Hvis der bruges vand til rodfæstelse, skal det skiftes hver tredje dag.
Beholdere skal opbevares i et drivhus eller under plastposer, hvilket skaber drivhusforhold for dem.
Temperaturen bør ikke falde til under +22 grader. Hver dag er det nødvendigt at ventilere beholderne og sprøjte jorden hver 3. dag.
For denne formeringsmetode er det nødvendigt at vælge blade, hvor der ikke er tegn på sygdom eller skadedyr, samt skader.
Hvis du skaber gode betingelser for dem, sker der rodning efter 30 dage, og efter yderligere to uger kan de transplanteres i potter, hvis diameter ikke overstiger 10 centimeter. De skal indeholde græs, bladhumus og sand i lige store mængder.
Senere har du brug for en anden transplantation i en beholder fyldt med en jordblanding, hvor voksne planter skal vokse.
Frøavlsmetode
Blomsterhandlere bruger sjældent frø til dyrkning. Drimiopsis... Dette skyldes det faktum, at frugtindstillingen på planten er temmelig svag, og frøene, hvis de ikke plantes med det samme, ikke spirer.
Resultat:
Drimiopsis - tilhører de mest uhøjtidelige og hårdføre planter, som tilgiver blomsteravlere fejl.Med forbehold af enkle regler kan du dyrke en plante, der vil blive en dekoration af dit hjem i lang tid.