Hortensia pink
Indhold:
Alle blomsterplanter, der vokser i parceller eller blomsterbed, dekorerer altid det sted, hvor de vokser. De gør det hyggeligere og tilføjer smag. Blomster og buske i forskellige kombinationer ser særligt smukke ud. Meget ofte vælges en smuk blomst til at dekorere territoriet, der har interessant, bredt løv, mens bladet er tilstrækkeligt langstrakt på den ene side. Det handler om hortensia. Lyserød hortensia er meget smuk, derfor plantes den ofte for at gøre territoriet mere farverigt.
Beskrivelse
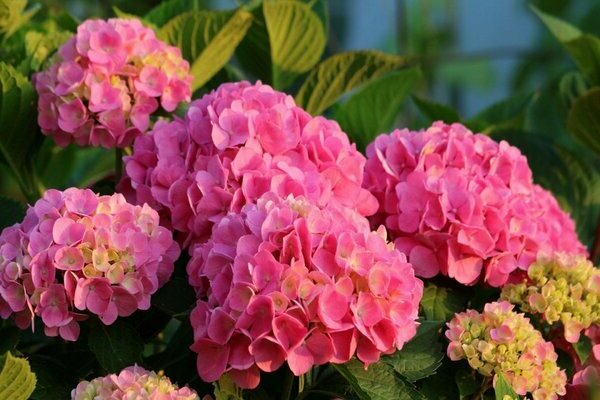
En meget populær art er den rosa hortensia, som blev opdrættet for længe siden. Oprindeligt blev sorten kaldt Anabel, men i Rusland blev navnet ændret.
Denne plante tilhører løvfældende buske. Hortensiaens rødder er ret korte, så de går ikke dybt, men forbliver i tæt afstand fra jorden. Hortensia har tynde og buede stængler, der normalt er omkring 40 centimeter høje. Løvet har en mørk grøn nuance, et separat blad er lille i størrelse, på den ene side er det let aflangt og spids. Hortensia blomster er små, for det meste 15 millimeter brede, men på grund af det faktum, at der dannes blomsterstande fra disse blomster, ser planten meget smuk og harmonisk ud. Blomstringsperioden er i juli og slutter i oktober. Blomsterne har en skarp, udtalt aroma.
Hortensia lyserød plantning

Inden du planter en plante i åbent terræn, skal du forberede et plantested, der fuldt ud vil opfylde alle kriterierne. Du skal også vælge det tidspunkt, hvor landingen skal foretages.
Da hortensia er en plante, der elsker varme og lys, skal området være godt oplyst. I bedste fald vil dette være et halvskraveret område. Men under ingen omstændigheder bør du plante en hortensia i skyggen, da blomsternes farve bliver svagere, og planten vil se sløv ud, blomsterne kan også blive 2 gange mindre og begynde at falde af på grund af mangel på sollys. Der skal være god jord på stedet. Lammet, drænet, sur eller let sur jord er perfekt. Plantning skal udføres strengt om foråret. På dette tidspunkt er jorden godt opvarmet, så blomsten vil hurtigt slå rod på plads.
Plantning skal udføres efter vejret har stabiliseret sig og i vækstsæsonen nær hortensia.
Efter plantning, glem ikke jordfugtighed, dette er et meget vigtigt kriterium, da hortensiafugtighed er nødvendig. På grund af det korte rodsystem er det svært for hende at få fugt, så vanding skal være rigelig og regelmæssig, og vanding må ikke glemmes. Topdressing bør også påføres hyppigt nok til at fremme længere blomstring og afgrødernes velbefindende. Efter hver vanding skal jorden løsnes, så ilt har adgang til rodsystemet. Før frost er det nødvendigt at dække planten for at beskytte den mod frostskader og død. Normalt bruges et tykt lag jord i huslyet.
Reproduktionsmetoder
Denne kultur kan formere sig på 3 måder.
1. brug af stiklinger.
I denne metode bruges stiklinger - det er de øverste dele af busken, der normalt har 2 eller 3 bladknude. Det er nødvendigt at trække et par centimeter tilbage fra den laveste knude og afskære den, altid skråt. Derefter skal alle arkene, der er på den første knude, fjernes helt, og de resterende skal skæres til det halve. Alle blade bør ikke fjernes, da takket være dem begynder stiklingernes funktion i fotosynteseprocessen. I nærvær af blade bruger hortensia alle sine bestræbelser på dannelsen af rodsystemet og ikke på væksten af løv.
Efter forberedelsen af skæringen skal du forberede en gryde, hvor den vil vokse. Gryden skal være fyldt med ufrugtbar jord, normalt hældes en stor mængde sand i gryden. Derefter indsættes stiklinger i dette sand, cirka 5 centimeter dybt og vandes ved bladmetoden. Derefter udstyrer de et lille drivhus, så rodning sker hurtigere. Derefter fjernes gryden til et mørkt og varmt sted.
Bemærk: Vanding af skæringen kan kun foretages med bladmetode, ellers dør den.
Bemærk: I stedet for en gryde kan du bruge en anden praktisk beholder, almindelige plastglas kan tjene til det.
2. brug af lagdeling.
Forplantning ved lagdeling skal man huske på, at skæringen skal danne et rodsystem, før der kommer frost. Heraf følger, at plantning skal udføres om foråret eller forsommeren. Inden du udfører lagdelingen, skal du forberede jorden. Det skal være godt løsnet og gruber omkring 4 centimeter dybt. Inden knopperne begynder at blomstre, er det nødvendigt at begrave lagene i dette hul. Toppen af laget skal efterlades på overfladen; det anbefales at binde det til en lille søjle. Efter at de lodrette skud begynder at vokse, er det nødvendigt at bakke og derefter vente på efterårsperioden, når rodsystemet dannes. Når dit eget rodsystem vises, kan du transplantere planten til sit eget sted.
3. brug af frø.
Frøene fra denne kultur er meget små i størrelse, men i meget store mængder. De vises i flere kasser, som normalt er små, cirka to centimeter. Frøstørrelse er omkring 2 millimeter. Fuld modning af frø opnås om efteråret, så de skal sås med det samme.
Før plantning skal du forberede jorden. Forberedelse består i at indføre løvjord, tørv og flodsand i et forhold på 8: 4: 2 i jorden.
Det er meget svært og tidskrævende at dyrke en hortensia på denne måde, så for at gøre plantningen i det mindste lidt lettere, skal du følge plantningsinstruktionerne.
- Først skal du sænke frøene i jorden.
- Frøene er dækket med forberedt jord.
- Derefter udføres vanding ved bladmetode ved hjælp af en havesprayflaske.
- Derefter skal området, hvor plantningen blev udført, dækkes med en film for at skabe et drivhus.
- Beholderen skal fjernes på et mørkt og varmt sted, indtil de første skud vises.
Bemærk: Jorden skal være godt fugtet, men kun ved hjælp af bladmetoden.
Spirer begynder at dukke op 60 til 80 dage efter plantning.
Efter at bladbladet begynder at danne, er det nødvendigt at dykke. Efter at 5 blade vises, skal du også dykke, normalt sker dette i majperioden. Efter plukning er det bedst at transplantere afgrøderne i forskellige krukker.
Efter to valg skal du begynde at forberede planten til plantning i åbent terræn. Forberedelse består i at hærde kulturen ved at placere den i frisk luft. Hærdning er en temmelig lang proces, der tager lang tid, da hærdning skal ske gradvist. Det tager normalt omkring 25-30 dage at hærde. Til at begynde med udsættes planten for frisk luft i 20 minutter, derefter i længere tid og slutter med 24 timer.
Det er nødvendigt at tage planten ud om aftenen, når der ikke er nogen brændende sol, der kan skade kulturen.
Du bør også fjerne blomster, der begynder at dukke op. Dette er nødvendigt, så planten bruger al sin energi på vækst og ikke på dannelse af blomster. Normalt vokser kulturen hjemme i cirka to år og transplanteres derefter i frisk luft.
Hortensia pink transplantation
Inden transplantation skal du omhyggeligt forberede jordens jord.Forberedelse består i at installere et dræningssystem, der kan være lavet af ekspanderet ler eller brudt mursten, normalt er laget cirka 10 centimeter. Indførelse af superphosphat i mængden af 70 gram, potashdressing i mængden af 30 gram, nitrogengødning i mængden af 30 gram, tørv og humus bør også udføres.
Hortensia pink pleje
Hortensia er en afgrøde, der kun har brug for grundlæggende pleje, men som skal gøres omhyggeligt. Med god grundpleje vil kulturen føles fantastisk og blomstre farverigt og glæde sin ejer.
- For det første er det nødvendigt at udføre vanding i høj kvalitet. Når en plante bliver voksen, og det sker ved 4-5 års vækst i jorden, har den brug for cirka 45 liter vand to gange på 7 dage. Ved vanding bør der kun bruges varmt og dekonstrueret vand. Hvis vanding for eksempel er forkert med koldt vand eller er uregelmæssig og knap, begynder kulturen at lide af klorose og andre sygdomme. Glem heller ikke mulching, som skal udføres hver gang efter tilsætning af fugt til jorden. Det gør det muligt at beholde vand og varme i jorden, hvilket forhindrer dem i at fordampe.
- Det er bydende nødvendigt at løsne jorden, da ilt er godt for plantens udvikling og vækst. Det er nødvendigt at løsne jorden 3-6 gange om sæsonen, dybden på løsningen er normalt omkring 4 centimeter. Da rodsystemet er tæt på jordoverfladen, sker løsningen meget omhyggeligt, så rødderne er intakte.
- Det tredje vigtige trin i vedligeholdelse er sanitær beskæring. Beskæring påvirker i høj grad hortensiaens vækst og udvikling, og især blomstens udseende. Om efteråret er det nødvendigt at udføre beskæringsprocessen, det er nødvendigt at fjerne alle tørre skud, blade samt kviste, der har mindst nogle pauser. Dette vil beskytte anlægget mod store gulve om vinteren.
Om foråret udføres beskæring på samme måde og fjerner overskydende dele af planten. - Det sidste trin i plejen vil være påføring af gødning. Topdressing er nødvendig for at kulturen skal fungere godt. Gødning påføres normalt 2-4 gange pr. Sæson. Før blomstring bruges gødning fra urinstof og vand i et forhold på 2: 1.
Efter kulturens blomstringsproces er slut, er det også nødvendigt at anvende gødning. Kun i denne periode bruges kompleksfodring, som straks indeholder flere komponenter. Hele sommeren kan du udføre to befrugtninger ved hjælp af husdyrgødning.
Bemærk: Organisk gødning skal påføres omhyggeligt og i den korrekte mængde, da stænglerne med et overskud af gødning vil begynde at bryde på grund af overfodrede blomsterstande.