Jordbær senge
Indhold:
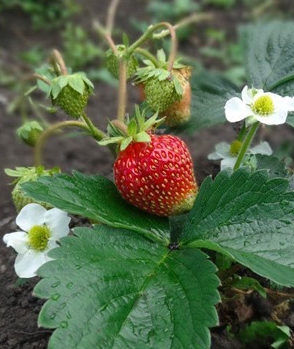
Hver gang du omhyggeligt valgte jordbær på markedet eller i en butik, angav du, hvor de kom fra, undersøgte omhyggeligt bærene for modenhed, eventuelle skader. Og du har altid drømt om, at når et sommerhus dukker op, er det første, du gør, at oprette en stor plantage og endeløse jordbærbede.
Og endelig er drømmen gået i opfyldelse, du har din egen have, og det er tid til at gennemføre din plan - at plante jordbærbuske og vente på høsten. Hvordan gør man det - vælg traditionelle jordbærsenge eller byg en usædvanlig struktur? I denne artikel vil vi bare diskutere forskellige muligheder for at forberede jordbærsenge med egne hænder.
Jordbærsenge: valg af sted
DIY jordbær senge: fotoDet er ligegyldigt, hvilket design af jordbærhaven du vælger i sidste ende, plantning begynder altid med valget af et sted.
Husk reglerne for afgrøderotation, jordbær tilhører den "lyserøde" familie, så den skal placeres væk fra rosenbuske og hyben. I tilfælde af nærhed har de simpelthen ikke nok næringsstoffer, der forbruges fra jorden.
En endnu større fejl ville være at plante jordbær efter roser, da almindelige skadedyr, der har overvintret i jorden, næsten kan ødelægge dine beplantninger om foråret.
Jordbær er heller ikke særlig glad for kvarteret med fuglekirsebær, æbletræer, kirsebær, blommer og andre frugttræer. Og det anbefales ikke at plante det på det sted, hvor hindbær eller brombær voksede før det.
Det foretrækkes at plante jordbær i et godt oplyst område, da bær under påvirkning af sollys akkumulerer mere sukker og er bedre egnet til frisk forbrug.
Men hvis du er interesseret i aroma og dyrker jordbær til kompotter og marmelade, kan du plante dem i halvskygge. Der vil være mindre sukker i bærene, men de viser sig at være mere aromatiske.
Når du vælger mellem solrige og skyggefulde områder, skal du tage højde for faktoren, at jordbær ikke kan plantes i lavlandet - med returfrost om foråret er der stor sandsynlighed for, at jorden på sådanne steder fryser, og planterne dør. Har du besluttet dig for et sted? Lad os nu komme i gang med det forberedende arbejde.
Forberedelse af senge til jordbær
DIY jordbær senge: foto
Jordbær plantes normalt på et nyt sted i sensommeren eller det tidlige efterår, så du har tid nok til at gøre alt klart.
Nu taler vi ikke om at forberede en kompleks struktur, men om traditionelle jordbærsenge. Til at begynde med befri det valgte sted helt fra snavs: der bør ikke være grene, blade og andet planteaffald tilbage, alle kan være en kilde til infektion i fremtiden.
Grav jorden op, dette vil ikke kun løsne det, men også forstyrre nogle skadelige insekter, som du i det mindste delvist kan fjerne med hånden. Og påfør derefter gødning, humus er egnet til dette - til en kvadratmeter jordbærbede kræves en spand gødning.
Når du har forberedt jorden, skal du markere striber i haven for at plante jordbærene. Husk, at buskene vil vokse med tiden, så placer dem ikke for tæt på hinanden, når du prøver at plante flere jordbær. I fremtiden vil for tæt beplantning ikke give et stort udbytte og kan føre til plantens død.
Dybe riller bør lægges mellem buskerækkerne, hvilket hjælper med at fjerne overskydende fugt. Jordbær har brug for nok vand, men hvis der er et overskud af det, kan rådning af rodsystemet begynde, hvilket er meget farligt.
Jordbærbuske skal placeres i en lille forhøjning, og drænfurer skal være cirka 25 cm lavere. Furenes bredde er lavet på en sådan måde, at det er behageligt at bevæge sig langs dem, mens man plejer planter og når man høster.
Regler for dannelse af senge til jordbær
Så du har forberedt jorden, lad os nu danne sengen. Erfarne gartnere rådgiver om at overholde nogle regler, der ikke er aksiomatiske, men hjælper med at opnå de bedste resultater og få en god høst.
For det første anbefales det, at striberne placeres fra øst til vest, så planterne lyser jævnt op hele dagen.
For det andet laves bredden af bakken, hvor jordbærene skal plantes, 20-30 cm i størrelse, rillerne mellem striberne er også 30 cm i størrelse. Dette er minimumsparametrene, hvis du har et stort område, kan de være lidt øget, men ikke reduceret.
Og for det tredje skal jordbærbuske i samme række være adskilt fra hinanden i en afstand på mindst 40 cm, så de kan vokse behageligt og ikke forstyrre hinanden og undgå sygdomme. Når plantningen er for tæt, kan en syg plante ødelægge hele plantagen, jordbærpiskene er sammenflettet, og det er meget vanskeligere at bekæmpe ukrudt under sådanne forhold.
Når du har dannet bedene og lavet huller til planterne, skal du fortsætte med at plante. Vær meget forsigtig med ikke at beskadige plantens rødder. Efter arbejdets afslutning skal du sørge for at vande alle buskene med varmt vand, og prøv ikke at væde løvet under roden, løv.
Brug ikke en haveslange ved vanding - en stærk strøm vil vaske den løse jord væk efter plantning, udsætte rødderne, og planterne kan dø.
Først bliver du nødt til at arbejde hårdt og vanding hver plante omhyggeligt fra en kop eller baby vandkande. Jordbær vil vokse på ét sted i 4-5 år, hvorefter der vil være for lidt nødvendige næringsstoffer i jorden, bærene bliver mindre og mindre, og deres antal falder. Så er det tid til at tænke på at flytte jordbærene til et nyt sted.
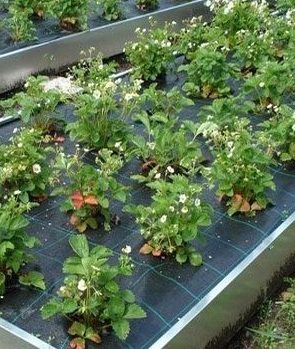
DIY jordbær senge efter tysk teknologi
Vi talte om, hvordan man laver den enkleste jordbærhave; næsten alle gartnere starter med denne mulighed. Men når du på en eller anden måde vil strømline landingen, begynder du at tænke på andre, mere bekvemme muligheder.
Så lad os nu tale om andre måder at plante jordbær på. Nogle af dem giver dig mulighed for at øge udbyttet, mens andre tjener som en dekorativ funktion og hjælper med at spare plads.
Og vi starter med en lav struktur, opfundet i Tyskland. Grundlaget for dette design er fremstilling af en kasse af træ, skifer eller andet materiale. Bredden på en sådan kasse skal være mindst 40 cm - for en række jordbær, 80 cm - for to rækker osv. Højden på væggene i en sådan kasse vil være mindst 60 cm.
Så hvis du beslutter dig for at bygge tyske jordbærsenge med dine egne hænder, skal du først bygge kasser i den nødvendige størrelse og derefter markere det valgte område. Det vil være nødvendigt at fjerne spadestik og et lag jord til en dybde på 40 cm og installere kasser i de resulterende riller (de stikker 20-30 cm over overfladen). Organisk materiale skal hældes i bunden af rillerne, hvilket vil rådne jorden og rådne.
Under organisk materiale kan du lave et drænlag af ekspanderet ler, småsten, grus, brudt mursten - hvem der har det. Og så er det nødvendigt at fylde den frugtbare jord til randen og udjævne overfladen.
Hvis du planlægger at klippe sengene med en film eller spandbond - på dette stadium skal du folde og sikre materialet ud og derefter begynde at plante.
Plant rækker af jordbærbuske afhængigt af kassens bredde, og hold en afstand på mindst 40 cm mellem buske i en række og mindst 50 cm mellem rækker. Efter afslutningen af arbejdet, for at fuldføre det overordnede billede, kan du lægge stier mellem kasserne, dette vil se smukt ud og gøre pleje af jordbær mere behageligt.
Hegn i bedene skaber mere behagelige betingelser for vækst af jordbær: under langvarig regn vil jorden ikke udhules, der vil være meget mindre ukrudt, jordbærpisker vil ikke blive sammenfiltret, og en syg plante i en seng vil ikke true andre - med dette design er sandsynligheden for infektionsspredning minimal.
Og det vil være meget lettere og mere behageligt for dig at passe jordbær, have fri adgang til hver plante til ukrudt, befrugtning eller vanding.
Forresten er det nødvendigt at vande ved roden, meget omhyggeligt, i cirkulære bevægelser og kontrollere hver gang efter vanding, om jorden omkring rødderne er eroderet. Jeg anbefaler kraftigt, at du nægter at vande med en slange, da det ofte fører til skader på buskene og forvirring i bedene og i gangene mellem dem.
Den mest ideelle mulighed for jordbær ville være et drypvandingssystem, som du selv kan bygge af medicinske dråber og improviserede midler. Tro mig, en haveseng, der er skabt ved hjælp af denne teknologi, sikrer, at du får det maksimale udbytte.
Men hvad nu hvis der ikke er meget plads på stedet, der er ingen steder at arrangere sådanne senge, men du vil plante jordbær? Jordbær er ikke kun velsmagende, men også smukke, så de behøver ikke plantes i haven; i korrekt konstruerede strukturer vil de være en glimrende dekoration til gården. Dette sparer plads, mens du stadig høster lækre bær.
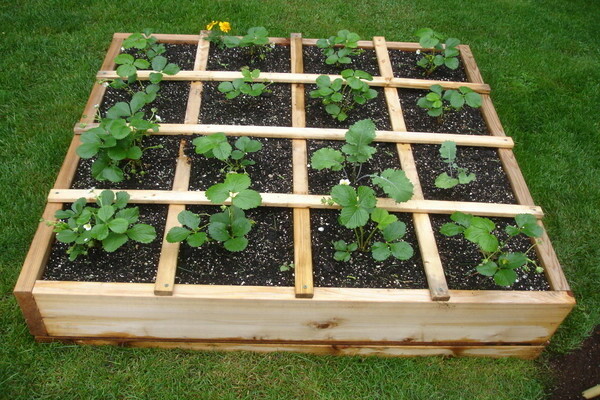
Høj jordbærseng
Navnet "seng" i dette tilfælde er meget betinget, da det allerede ligner mere et blomsterbed. Til dette er alle træ- eller plastkasser samt blomsterpotter egnede. Sørg for at lægge et drænlag i bunden, derefter nærende jord og plante jordbær.
Sådanne kasser kan placeres i gården, omkring et lysthus eller ved siden af bænke, omkring et hus eller en køkkenhave. De kan flyttes efter behov til mere solrige områder.
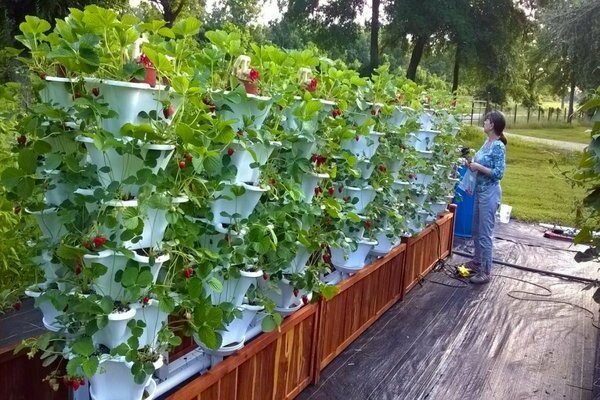
Lodrette senge til jordbær
Dette er også en god mulighed, hvis der ikke er nok plads på stedet. Byg en struktur i menneskelig størrelse fra alle tilgængelige midler: urtepotter, plastflasker, kloakrør. Alt dette skal fastgøres til en slags base (et tørret træ, et hegn, et hjørne af et lysthus eller et skur er egnet), det er dækket med jord, og der er plantet jordbær i hver beholder.
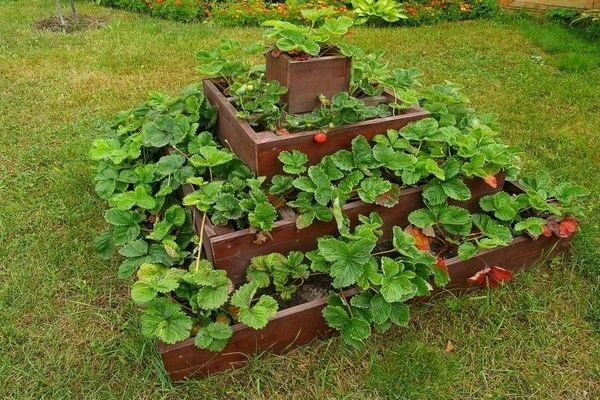
Pyramide
Træpyramiden ser mest attraktiv ud, den er både rummelig og dekorativ. Byg en tre- eller firkantet struktur af planker og bjælker, dæk med imprægnering for at forhindre træ i at rådne, og plant jordbær. Jeg forsikrer dig om, at dette design vil være den bedste dekoration til din have.
Lander i poser
Dette er en slags lodret seng til nålekvinder. Hvis du ikke har noget bygningsrester, kan du bruge burlap, geotextil, presenning og andet holdbart stof. Sy poserne og fastgør dem på en lodret bund (som for et lodret blomsterbed, et tørt træ, væg, hegn vil gøre), fyld jorden og plant jordbær.
Vanding skal udføres omhyggeligt, hver pose separat. Dette design ser ikke mindre dekorativt ud end pyramiden.
DIY jordbær seng
På trods af at nogle gartnere elsker dette materiale, anser jeg det som min pligt at minde dig om, at bildæk ikke er et miljøvenligt materiale. Men hvis du bruger dem, skal du sørge for at ændre dem hvert par år.
Fra dæk med forskellige diametre kan du bygge en seng i form af en pyramide, lægge den efter tur og fylde den med jord. Hvis alle dæk har samme størrelse, skal du bare stable dem oven på hinanden, dække dem med jord, lave huller og plante jordbær i dem.
Vi har overvejet forskellige muligheder for at plante jordbær. Nogle blev undersøgt mere detaljeret, andre blev kun fortalt generelt. I sidste ende bestemmes havbundens form af størrelsen på dit websted, det vigtigste at huske er de grundlæggende regler for plantning og pleje af jordbær: ukrudt og vand omhyggeligt, trim overskæret og fjern tørring af blade, overvåg sundheden for buskene.
Jordbær, der vokser ikke i en havebed, men i en æske, pose eller krukke, skal befrugtes oftere, da jordmængden til rådighed er lille, og den hurtigt vil tømmes. Prøv forskellige muligheder, vælg empirisk det mest passende for dig, pas på jordbærene, og resultatet vil overraske og glæde dig.