Sådan trimmer du med en spiral
Indhold:
Kort om denne procedure
Vi vil fortælle dig, hvordan du korrekt laver tre metoder til at lave buskeskulptur fra thuja. Vi vil være mest opmærksom på, hvordan man klipper håret med en spiral. Gem denne artikel!
Hvert år foretrækker flere og flere mennesker, der arbejder inden for landskabsdesign, thujas. Forskellige former for buske har rodfæstet sig i lang tid og overrasker ikke folk, som de plejer. Men de fleste sommerboere tør stadig ikke udføre proceduren for fremstilling af buskeskulpturer, de tror, at kun fagfolk kan udføre det. Men de tager fejl!
Med de tre mest berømte figurer, nemlig spiralformede, koniske eller pyramideformede eller søjleformede former, kan en person, der gør dette for første gang, også producere uden store vanskeligheder. Vi fortæller dig, hvordan du udfører denne procedure i henhold til detaljerede instruktioner.
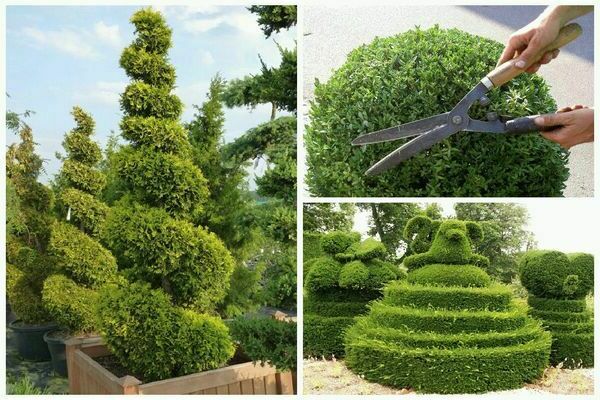
For at oprette buskskulpturer skal du have eller købe:
- skarp saks til arbejde i haven (det er ønskeligt at have to værktøjer, kraftsaks og saks uden kraftdrev).
- tape stencil til at lave en spiralform.
- lameller lavet af træ.
- ringstencil.
Buskskulpturer: alle faldgruberne
For enkle procedurer anbefales det at bruge en skarp, drevet havesaks. De er beregnet til at udføre arbejde med beskæring af tørrede og komprimerede skud. Til sidste handlinger, når det er nødvendigt at afslutte et par slag eller for unge træer med tynde grene, bruges lige skarp saks uden tilstedeværelse af et kraftdrev.
Formen på kronen på en buskskulptur skal vedligeholdes regelmæssigt. Det anbefales ikke at begynde at forme busken, hvis du har tænkt dig at beskære busken en gang og ikke forstyrre planten, før sæsonen er slut. Hvis vi tager dette spørgsmål alvorligt, så uden en regelmæssig ændring af træet ved slutningen af sommersæsonen, vil det primære udsyn vende tilbage - intet vil blive tilbage af buskeskulpturen.
Tiden til beskæring af buske er fra den sidste uge i den sidste forårsmåned til slutningen af den første efterårsmåned. Hvis du starter proceduren for at lave en buskstruktur senere end normalt, vil de ikke være i stand til at få styrke og energi samt erhverve nok løv til en fremragende overførsel af vintersæsonen.
For at udføre arbejde med fremstilling af buskskulpturer bruges ikke unge, rigeligt tilgroede buske. En smuk skulptur kommer ikke ud af et træ, der ikke er vokset.
Klip ikke din plante for kort. Med denne mulighed afklæder du træet.
Beskær busken årligt til en lidt større størrelse end for et år siden (tilføj cirka fem centimeter i diameter, i modsætning til sidste beskæring). Hvis du regelmæssigt skærer træet i samme størrelse, vil træet efter et par år vokse rigeligt fra den centrale del. Lad buskadset vokse i størrelse!
Brune og røde skud skal fjernes på samme tid. Det er bare umuligt at få dem tilbage til livet. Hvis de fleste grene bliver brune og røde, skal du beskære dem, men ikke med det samme.
Og tænk ikke på at lave et gammelt træ om til en meget kompleks buskeskulptur (for eksempel en pattedyrsform).Træer i form af figurer af tigre, kaniner og så videre fremstilles takket være en særlig base fra de første uger af eksistensen, og skæring i denne version vil kun beholde den fremstillede form.
Det er næsten umuligt at omdanne en "levende" hæk til en buskeskulptur! Du skal tænke over, om du vil omdanne træet til en buskeskulptur eller bruge det som en hæk, når du planter.
Sådan trimmer du med en spiral: giver den en pyramide eller kegleform
Hvis det er første gang, du arbejder med fremstilling af buskeskulpturer og er bekymret for, at dine handlinger er korrekte i arbejdet med dine buske, så prøv at starte med en af de enkleste skulpturer, nemlig med en kegleformet form. Dens største fordel er rammens lethed. I form af en ramme bruges lameller lavet af træ, deres højde er lidt større end væksten af et træ.
Hvis du ønsker at have en kegleformet busk, skal du lave tre pinde ved siden af busken. Og hvis du vil have en pyramideformet busk, skal du lave fem pinde ved siden af busken.
Det vigtigste i denne procedure er at placere lamellerne korrekt i en cirkel og justere dem med en blød garn eller tråd nøjagtigt over buskens midterleder.
Så er der ingen problemer: Brug en skarp saks til at klippe træet side om side efter stencilen.
Når skæringsprocessen er afsluttet, fjernes hylderne og frigøres let fra de skud, der vokser i den nederste del af planten.
Derefter justerer de med en skarp saks af mindre dimensioner figuren og forfiner den øverste del.
Bemærk!
Og prøv ikke at lave en kegleformet figur, men på hovedet. Med denne mulighed skaber den øverste del en skygge på buskens nedre del, og sollys passerer simpelthen ikke der.
Sådan trimmer du med en spiral: giver en søjleform
Denne buskskulptur er anderledes ved, at den er lavet meget enkelt og ikke i lang tid, og med et tilsyn kan en søjleform af dårlig kvalitet omdannes til en anden buskskulptur, for eksempel en kegleformet eller spiralformet form . Tværtimod kan en sådan procedure ikke udføres.
Eksperter kan lave dette snit og cirka (med øjet), og begyndere og andre gartnere rådes til at bruge stenciler. Med denne mulighed kan du tage lameller lavet af træ som en stencil.
Busken skal være forsynet med et såkaldt hegn af trælameller omkring omkredsen. For at lave en cirkel, ikke en oval, skal trælamellerne justeres ved hjælp af en ring lavet af metal med en bredde, der er lig med den ønskede søjlebredde. Hvis du ikke har en ring, er det muligt at hamre lameller af træ ned i jorden langs en cirkel trukket på jorden.
Bemærk!
Hovedtræstammen skal placeres midt i cirklen. Hvis du gør det forkerte, bliver kolonnen ikke lige.
Endnu en gang, med fremragende øjenmærker og forståelse af former, er det muligt at lave formen på et træ uden hjælp af en stencil.
Først skal du reducere alle rigeligt fremspringende skud og først derefter begynde mere omhyggeligt arbejde.
Dit vigtigste og vigtigste mål er at have en lige linje rundt om hele buskens omkreds. Træet må ikke vokse eller krympe i størrelse.
I sidste øjeblik skal du lave et ikke-volumetrisk snit på toppen.
Hvis den øverste del har ujævnt voksende grene, skynd dig ikke at skære toppen forkortet for ikke at udsætte grenene. Efter et stykke tid bliver skæreområdet tilgroet, og du kan trimme toppen igen.
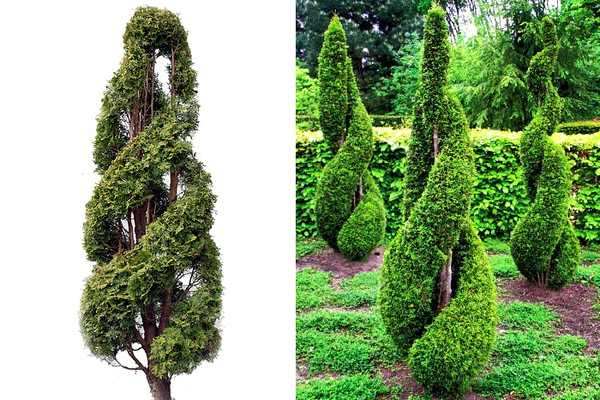
Sådan trimmer du med en spiral: Spiralering
Hvis du tænker over det, er dette den mest berømte og foretrukne kunsthåndværksskulptur. Selvfølgelig har du set spiraler lavet af fyrrenåle flere gange i parkzoner og pladser.
For at opnå en smuk og usædvanlig spiralform skal der laves urteagtige på stammen.
Hvis du har et træ med et par stammer på samme tid, så er det også muligt at omdanne det til en spiralform. Til dette er det imidlertid nødvendigt at binde bagagerummet, så de ikke bliver til en blæser.
Den nemmeste metode er at dække træet med en tyk båndstencil, der viser en spiralform. På denne måde vil du være i stand til at se perfekt, hvor klipningen skal gøres.
Hvis du er god til at lave markeringer med øjet, kan du ikke bruge stenciler.
Først skal du fjerne alle skæve og tørrede skud og derefter begynde at trimme spiralen langs linjen.
På det tidspunkt, hvor du foretager den første sving, skal du ikke gå dybt ind i midten af bushen, se efter en ny linje.
Skær busken jævnt og langsomt mod midten, indtil den ønskede form er opnået.
Vi tror, at denne artikel hjalp dig med at lave buskeskulpturer, arbejde mere omhyggeligt med en skarp saks. Du kan bruge denne vejledning, når du arbejder med andre repræsentanter for urteagtige afgrøder.