Hvad skal man gøre med clematis til vinteren
Indhold:
Clematis er de mest eftertragtede repræsentanter for lianalignende planter i vores haver. De er i stand til at dekorere ethvert grimme hjørne af det højere område, de kan bruges til at danne hække og buer. Med hensyn til blomstringens pragt og skønhed er clematis ikke ringere end selv de anerkendte dronninger i haven, der klatrer på roser. Blomsteravlere nægter dog ofte sig selv fornøjelsen af at overveje al denne skønhed af den simple årsag, at der er stor sandsynlighed for, at alt det arbejde, der investeres i clematispleje, ikke vil blive kronet med succes med ankomsten af vinterperioden, som clematis simpelthen ikke vil overleve. I denne artikel vil vi forsøge at fjerne denne frygt og fortælle dig om, hvilke foranstaltninger du skal tage, så denne smukke klematis overvintrer roligt i dit sommerhus og det næste år igen glæder sig med et voldsomt farvespil.
Forberedende aktiviteter
Den største vanskelighed ved at dyrke clematis er, at clematis i det meste af vores land (herunder regioner med et tempereret klima) ikke kan overleve vinteren i jorden uden specialiseret husly. Desuden har forskellige typer clematis brug for forskellige former for husly.
Men forberedelsen til den hvilende periode bør begynde længe før begyndelsen af koldt vejr, eller rettere i slutningen af sommeren.
Så hvad skal der gøres, så dine storslåede kæledyr korrekt kan forberede sig på den kolde årstid.
- Allerede i slutningen af sommeren bør du ikke fodre planterne med nitrogenholdig gødning. Selvom clematis fortsætter med at blomstre, eller slet ikke har blomstret (dette gælder også kompleks gødning, som indeholder nitrogen).
- I begyndelsen af efteråret har planter brug for kalium-fosfor fodring. Dette vil give planten mere energi til modning af skudene og også danne en reserve af styrke til overvintring.
- Selv en måned før begyndelsen af den første frost (i ekstreme tilfælde 2-3 uger), når lufttemperaturen falder til under + 10 ° C, skal clematis afbrydes.
Det sidste punkt fortjener særlig opmærksomhed, da handlingsplanen vil variere for en bestemt type clematis for vinterperioden.
Efterårsbeskæring af clematis
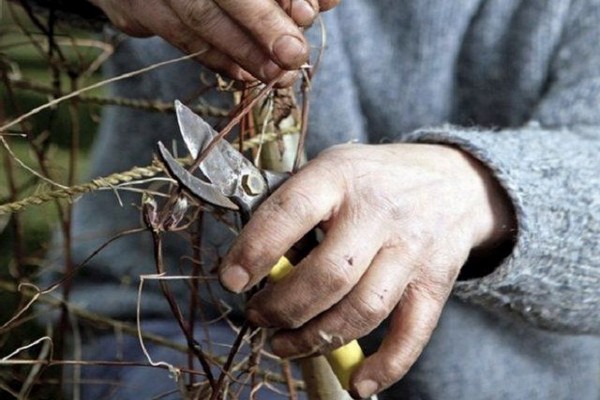
Afhængigt af hvilke skud der dannes blomster i clematis, er det sædvanligt at skelne mellem tre grupper af plantebeskæring.
Den første gruppe omfatter klematis, der danner blomster på vinstokke det foregående år. Denne gruppe omfatter høje clematis samt bjerg-, alpine, store kopper, gyldne typer af clematis. Denne gruppe kræver ikke beskæring i efteråret, kun sanitær beskæring udføres for at forhindre fortykkelse og plantesygdomme.
Den anden gruppe omfatter clematis, som er i stand til at give os deres blomstring to gange om sæsonen. Sådanne klematis inkluderer det overvældende flertal af Lanuginosa -grupper, Patens, Florida. Disse vinstokke har brug for delvis beskæring.
Og den tredje beskæringsgruppe omfatter clematis, der udelukkende blomstrer på skudene i det aktuelle år. Disse er gruppens clematis Zhakman, Viticella, Integrifolia. De har brug for fuldstændig beskæring i forventning om vinterhvile.
Retfærdigvis skal det bemærkes, at der undertiden ikke skelnes mellem den første og anden gruppe af klematisbeskæring. Dette skyldes, at der for det første i begge grupper er sorter, der er undtagelser fra de generelle regler med hensyn til beskæringsgraden. Og for det andet kan clematis, der blomstrer på skudene i den sidste sæson, også danne blomster på vinstokke i det første leveår, efter at have været igennem en periode med deres modning (i slutningen af sommersæsonen). Denne blomstring er ikke så rigelig som på gamle skud, men den er der stadig.
Sådan beskæres clematis baseret på beskæringsgruppen
Vi gentager, at clematiserne i den første beskæringsgruppe ikke behøver beskæringsplanter i efteråret for at bevare de skud og knopper, der vil blomstre i den kommende sæson. Ellers er du måske ikke så heldig at se buskene blomstre, eller blomstringen kommer ikke på det rigtige tidspunkt og bliver ikke så rigeligt, som du gerne vil.
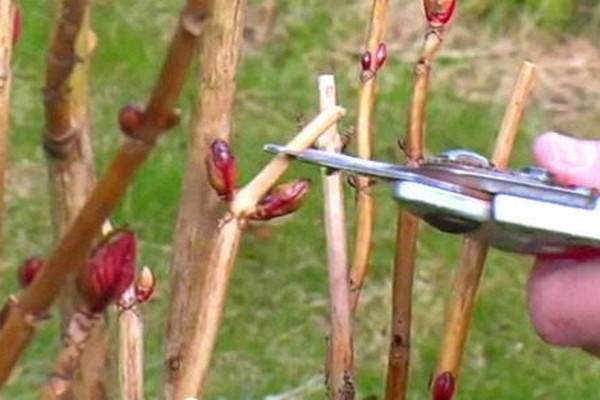
En vis forkortelse af skud er dog stadig nødvendig for repræsentanter for denne gruppe, men det udføres efter blomstringsperioden og ikke på tærsklen til koldt vejr. Under denne beskæring skæres de dele af vinstokke, der allerede har givet blomster, af. Dette vil stimulere dannelsen af yderligere skud, hvor knopper blomstrer igen næste sommer.
Clematiserne i den anden beskæringsgruppe (to gange blomstrende), som altid er populære hos blomsteravlere, beskæres normalt i en højde på 1-1,5 m. Efterlader 2/3 af vinstokkenes længde. Men nogle gange kan du også finde anbefalinger til den såkaldte bølgebeskæringsmetode, når busken beskæres efter hver bølge med 1/3 af rankens størrelse.
Clematis, der danner blomster på friske skud, beskæres til næsten hele vinlængden. Husk, at clematis fra Viticell- og Jacqueman -grupperne er forkortet til det første sande blad, et par knopper forbliver på vinstokken. Hvad angår clematis fra Integrifolia-gruppen, Texas, seks-kronblade, lige og Manchurian, de forkortes til to par knopper.
Baseret på dette er det helt naturligt, at hvis du køber clematis til plantning i en specialbutik, så bør du helt klart præcisere, hvilken gruppe af clematis dette eller det plantemateriale tilhører. Det er endnu bedre at få klare anbefalinger om beskæringsgraden for hver enkelt sort, for som du allerede kan se, er der nogle forskelle, selv blandt repræsentanter for den samme gruppe.
Men der er tidspunkter, hvor det ikke er muligt at finde ud af sorttilknytningen til en plante plantet i dit område. Så ville den bedste løsning være slet ikke at beskære clematis om efteråret. Med forårets begyndelse vil du se tilstanden af skuddene på din plante, uanset om der er "friske" vinstokke med levende knopper synlige, eller hvis alle skud er tørre. Derefter vil det være muligt at træffe beslutning om den videre handlingsplan.
En anden populær beskæringsmetode til clematis fra den første og anden gruppe er delvis beskæring mod ældning, den kaldes også universel. I løbet af implementeringen skæres skuddene en efter en i en højde på op til 1,5 m og den anden til et par knopper, og dette gøres med hele busken.
Uanset hvilken beskæringsgruppe clematis tilhører, udfører de forebyggende rengøring af busken om efteråret.
Det betyder:
- fjernelse af tørre blade både fra busken selv og fra buskområdet, og deres yderligere ødelæggelse (brænding);
- Fjernelse af tørrede, syge, svækkede og deformerede skud;
- Afskæring af overskydende skud for at forhindre fortykning af busken.
Forebyggende behandling af sygdomme inden vinterperioden
Som en profylakse mod forskellige former for sygdomme er det tilrådeligt at behandle jorden i busteområdet med et fungicid i begyndelsen af de første frost, men selv før starten af stabile negative temperaturer (cirka i oktober) løsning. For eksempel bruges et fundament med en hastighed på 20 g af stoffet pr. 10 liter vand, og derefter drysses jorden med aske. Disse enkle aktiviteter hjælper med at undgå risikoen for spredning af svampeinfektioner og vil i høj grad forenkle din omsorg for clematis i fremtiden.
Et par tips til valg af plantemateriale
Nu på markedet er der et stort antal forskellige sorter af clematis. De adskiller sig især i graden af modstandsdygtighed over for frysning om vinteren og i den type husly, de har brug for for at overleve kulden.
Når du køber en bestemt sort, bør du afklare, hvilken type vinterhårdhed denne plante tilhører, og hvilken slags isolering den har brug for om vinteren.
Også vigtig er betingelsen for erhvervelse af plantemateriale i den region, hvor det er planlagt at dyrke planten. Dette vil blive en slags garanti for, at planten er tilpasset de klimatiske forhold i et givet område og vil gennemgå processen med tilpasning til et nyt vækststed uden problemer.
Husk på, at jo mere "dyrket" clematis-sorten er, jo mere lunefuld og mindre frostbestandig er den. Clematis af arter er mest modstandsdygtige over for lave temperaturer, og sorterne er tværtimod mindre hårdføre. Også gamle sorter er som regel mere frostbestandige end nye.
I de områder af vores store moderland, hvor vintrene er meget kolde, er det bedst at dyrke tidligt blomstrende clematis, og til dyrkning i regioner med et tempereret klima er clematis fra den tredje beskæringsgruppe bedst egnet: repræsentanter for Viticella , Zhakmana og Integrifolia -gruppen. Sorter med dobbelte blomster, det er bedre ikke at plante. Selvfølgelig, i tilfælde af at organisere optimale forhold og et pålideligt, tørt vinterskur, vil flere "sydlige" repræsentanter for denne vinstok kunne vokse sikkert, men når du vælger sådanne sorter, skal du være opmærksom på graden af akklimatisering af planter.
Typer af vinterskur til klematis
Typen vinterskur til klematis står i direkte forhold til, hvilken type beskæring de tilhører.
Så for clematis fra den tredje beskæringsgruppe kræves der ikke et specielt husly, kun høj bakke er nødvendig. Ligeledes er der ikke behov for husly til artklematis.
Til clematis af den første og anden beskæringsgruppe har du brug for et fuldt udbygget tørrum, der ligner læ for klatreroser.
I sidste ende er læ for klematis designet ikke så meget til at beskytte plantens rødder mod lave temperaturer, men for at beskytte dem mod overdreven fugt, podoprevanie, grund- og smeltevand, kondens og isdannelse som følge af hyppige ændringer i positivt og negativt temperaturer. Hvis der ved uagtsomhed kom fugt ind i rødderne og i midten af jordbearbejdning og derefter frøs, er planten sandsynligvis dødsdømt. Så bryder det bogstaveligt talt fra indersiden.
Det specifikke tidspunkt, hvor du skal dække clematis, afhænger af omgivelsestemperaturen. Forberedende procedurer for husly begynder umiddelbart efter, at natlufttemperaturen for første gang er faldet til under 0 ° C. På dette tidspunkt sprudler buskene 10-15 cm. Når temperaturen falder til omkring -5 ° C, og jorden begynder at fryse, er clematis yderligere dækket. I standard efterårsvejr begynder planterne først at dække til november. Det skal huskes på, at læ for clematis udelukkende bør udføres i tørt vejr.
Hvis clematis er udstyret med behagelige, tørre overvintringsforhold, kan planterne overleve temperaturfaldet til -45 ° C. Og hvis dine planter efter vinterperioden ikke viser tegn på liv, skal du ikke skynde dig at grave dem op. Der er tilfælde, hvor sovende vegetative knopper på clematis kommer til live, selv år efter skade eller frysning.
Sådan forbereder du clematis fra den tredje beskæringsgruppe til vinteren
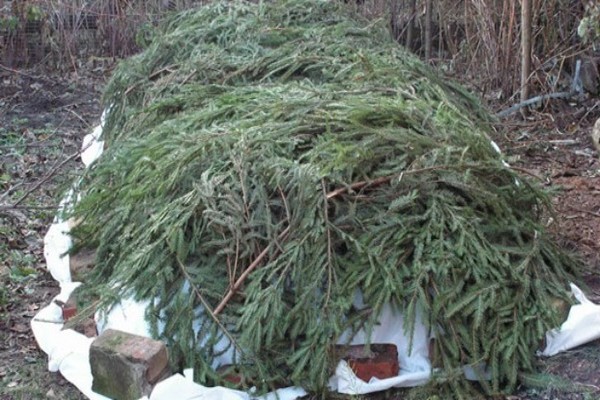
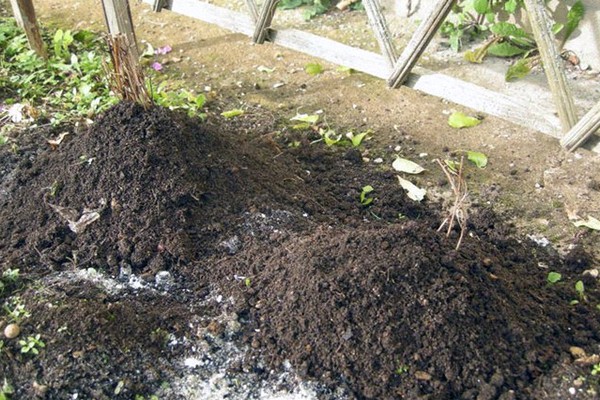
Et par ord om, at denne gruppe af klematis ikke har brug for husly, men de har brug for bakker, er allerede blevet sagt tidligere. Lad os nu tale om, hvordan præcis denne hilling skal udføres. Faktum er, at det ikke bare skal bakke, som at tilføje jord til kartofler, men at skabe en hel minipyramide fra jorden. Højden på denne pyramide skal være mindst 60 cm.Derfor hældes der omkring 4 spande havejord eller tørv, altid tørt, på hver plante. Med henblik på "tilbagefyldning" kan du bruge humus eller kompost, men den bedste løsning ville være et temmelig løst stof, som er mindst sandsynligt for at få podoprevat.
Med vinterens begyndelse, på et sådant "jordet" husly i fravær af en tilstrækkelig mængde snedække, er det også nødvendigt at tilføje yderligere sne. Og hvis vinteren viste sig at være helt sneløs, er nåletræsgrener også velegnede som ekstra beskyttelse.
Hvis sorten af den tredje gruppe af clematis, du har valgt, har en lav frostbestandighed, eller hvis du kun har plantet clematis i denne sæson, kan du dække planten med en kasse, drys blade ovenpå og derefter pakke den ind med folie, tagmateriale eller andet lignende materiale. Således opretter du et tørt luftrum omkring planten og giver den pålidelig overvintring.
Shelter for clematis fra den første og anden beskæringsgruppe
For at bygge et pålideligt vinterskur til klematis som Patens, Florida og Lanugino, skal følgende skridt tages:
- Planten samles ved at tilføje tør jord (tørv, humus osv.). Udover klematis fra den tredje beskæringsgruppe bygger vi en slags pyramide omkring busken.
- For at undgå skader på planter fra gnavere skal du sætte fælder omkring buskens omkreds
- Vi spredte os rundt på en tør base for husly. Nåletræ eller andre grene, polystyren, et lag af blade, der er ca. 6 cm tykke, er egnede.
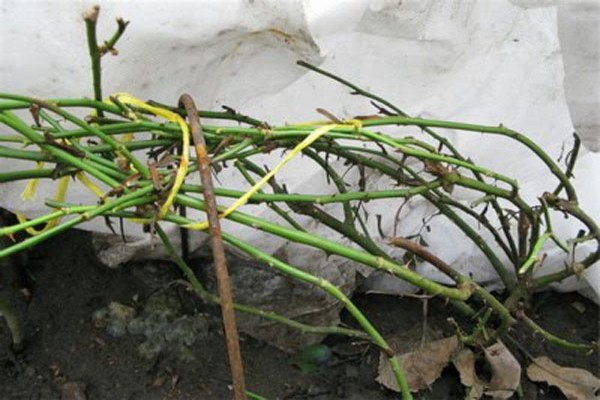
- Lianas foldes og lægges på en forberedt bund.
- Dernæst lægges træplader eller kasser på vinstokke, vinhegn, vinstokke og rørmåtter er egnede.
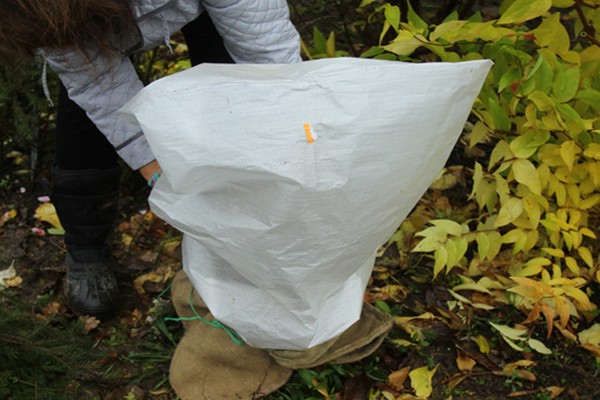
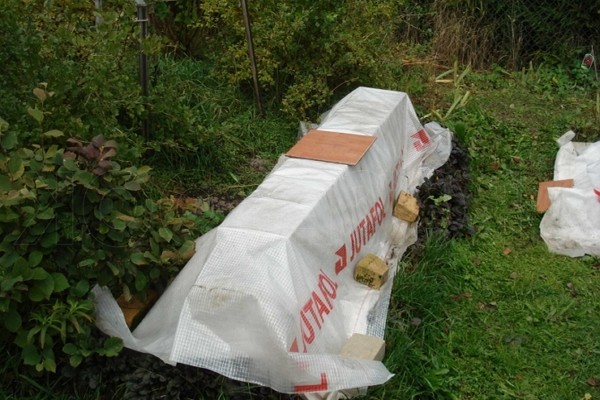
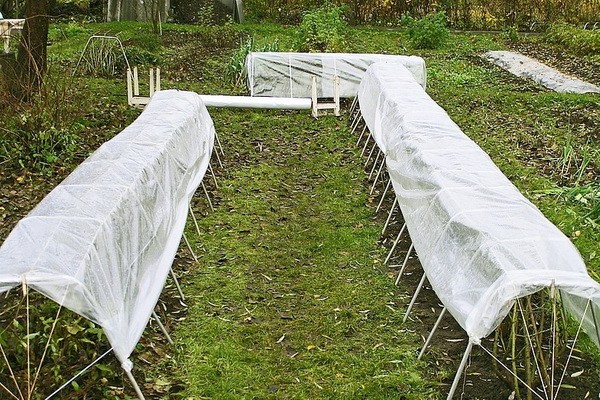
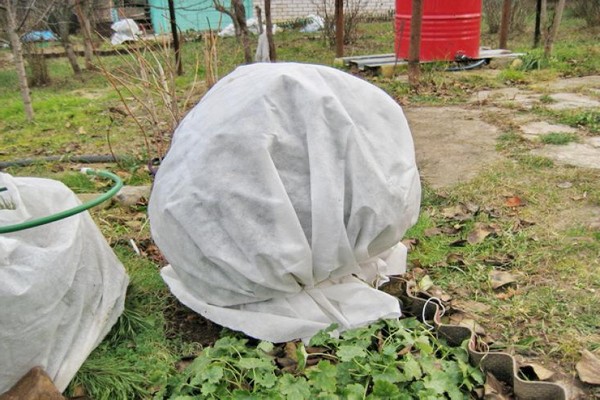
- Det næste lag er isolerende, det er skabt ved hjælp af ikke-vævet materiale, film, tagmateriale. Sørg for at forlade ventilationsåbninger, når du har forstærket materialet sikkert.
- Yderligere vil sne fungere på dig som et ekstra dæksel. Og hvis vinteren viste sig at være dårlig på sne, bliver du nødt til at lægge mere nåletræ eller andre grene, jord eller tørv oven på filmen.
En anden helt acceptabel overvintringsmulighed for clematis ser sådan ud.
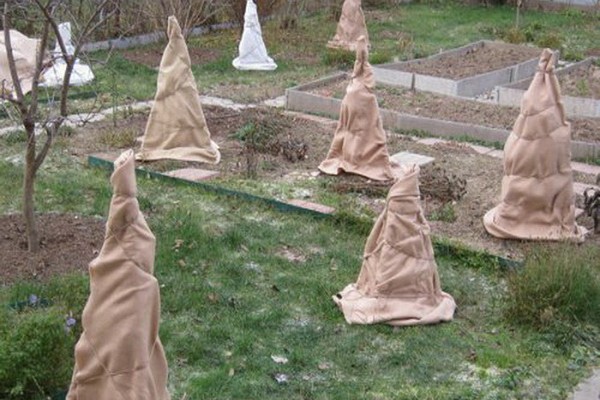
- Vinstokke er pakket ind i ikke-vævet stof
- En base er lavet af træ eller grene, og indpakket vinstokke placeres på den
- Rørmåtter, brædder, skifer eller tagmateriale placeres oven på vinstokkene
- Kasser placeres omkring buskens omkreds, eller der laves en ramme, hvorpå der kan placeres dækmateriale (f.eks. Det samme tagmateriale)
Hvis der midt på vinteren er perioder med lange temperaturer over nul, skal læ for clematis ventileres.
Hvornår og hvordan man tager ly om foråret
De begynder at befri clematiserne fra deres "vintertøj", efter at lufttemperaturmålingerne i dagtimerne er blevet positive, selvom det stadig fryser om natten. Endnu en gang vil vi tage forbehold for, at hovedfaren for clematis ikke ligger i frysning, men i den skadelige virkning af fugt, derfor er det vigtigt at etablere luftcirkulation i plantens rødder rettidigt.
De åbner huslyet i etaper, hvilket giver planten mulighed for roligt at akklimatisere sig. Denne proces begynder normalt i april. I begyndelsen frigøres ventilationshullerne, og når snedækket smelter, og nattefrosten ophører med at være stærke, fjerner de filmen og det øvre læ. Træplader fjernes efter yderligere 7 dage. Det vil sige, at i et gennemsnitligt forår slutter den komplette frigivelse af clematis omkring maj.
Jordpyramiden nær busken fjernes heller ikke umiddelbart. Lad først planten vænne sig til det fri og sollys igen, udfyld derefter 2/3 af jorden, og fjern resten, efter at sandsynligheden for tilbagevendende frost forsvinder.