Hvornår skal man plante clematis
Indhold:
Mange gartnere mener med rette, at rosen er havens ægte dronning, som ikke har nogen ligestilling. Men hvis dette er tilfældet, er clematis værdigt titlen som konge, fordi han som en rose er utrolig smuk og blid. Denne konge har mange navne: udover Clematis kaldes han Clematis eller endda prinsen. Clematis er ligesom roser temmelig let at formere. Der er måder, selv begyndere kan håndtere det på. Du kan formere det ved lagdeling, dividering og på sædvanlig måde ved stiklinger. Efter avl skal nyfremstillede frøplanter imidlertid bo et sted. Fortjener blomsterkongen ikke det bedst mulige sted i haven? I denne artikel finder vi ud af, hvor det er værd at plante clematis, plante på hvilket tidspunkt der er bedst egnet, så de er effektive og smukke.
Forhåbentlig vil disse tips virkelig hjælpe dig, og efter at have læst vil dine klematis kun vokse i de bedste områder i din have.
Clematis -plantning: hvordan man plejer en frøplante før transplantation
Inden du flytter en clematis -frøplante til sit nye hjem, skal du gemme den. Du kan jo ikke plante det umiddelbart efter at have skåret det. Derfor skal han i nogen tid bo hos dig (i et hus eller i en lejlighed), og pleje af ham skal være så forsigtig som muligt.Det er vigtigt at bemærke, at frøplanterne er forskellige, og det er meget vigtigt at finde ud af, hvilken du vil plante dig, og hvilken slags omhu der skal udvises.
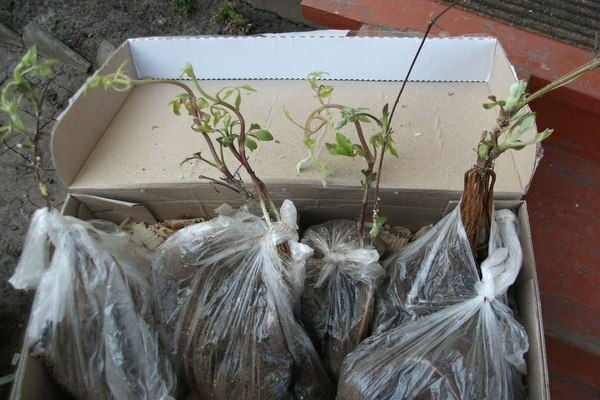
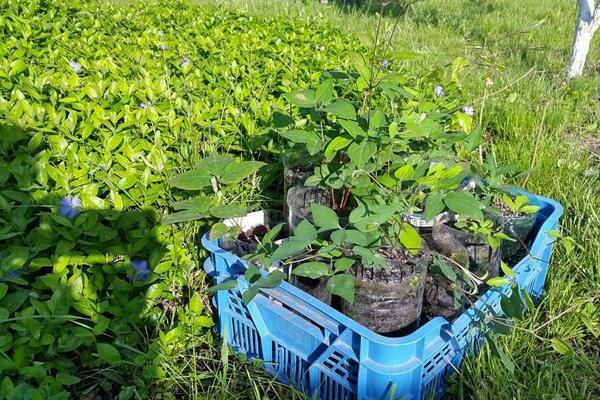
(Z.K.S.) - Denne forkortelse står for Closed Root System. Det er disse frøplanter, du oftest finder på markedet eller i butikker. Ofte sælges de i kasser, men nogle sælgere vil straks plante disse frøplanter i potter.
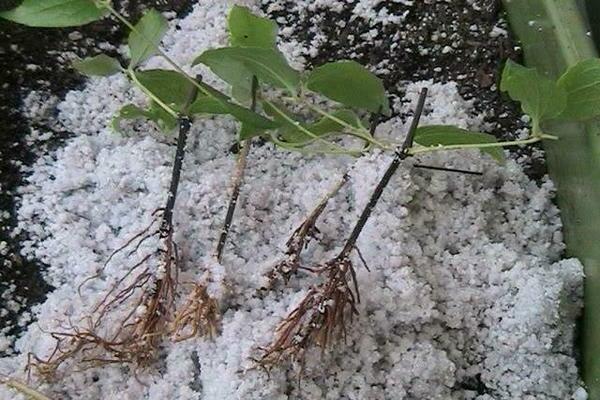
(O.K.S.) - Som du sikkert allerede har gættet, har disse klematisplanter et åbent rodsystem. De sælges udelukkende i plastposer, hvor der udover frøplanter er lidt tørvgødning.
Vi fraråder dig dog stærkt at købe den anden type frøplanter, fordi de slår rod meget værre, har meget mindre effektivitet og simpelthen vokser langsommere.
Sådan holder du en åben skæring
Når det kommer direkte til opbevaring af en frøplante før forårets plantning (hvis du selvfølgelig beslutter dig for at vælge en frøplante med et åbent rodsystem), kan selv en nybegynder klare dette, fordi reglerne er utrolig enkle.
Først skal du fjerne frøplanten fra emballagen og rengøre den fra tørven inde i den. Hvis du finder fysisk skade ved roden, er det nødvendigt at trimme de beskadigede områder, indtil der slet ikke er nogen. Imidlertid er åbne snit en god måde for svampe at komme ind i planten. For at forhindre dette er det nødvendigt at suge roden i en opløsning af noget fungicid før plantning.
Vigtig! Følg anvisningerne, når du bruger fungicider. Ellers kan du alvorligt skade planten!
Clematis - plantning af et åbent snit før den sidste transplantation
Nu hvor frøplanten er klar, kan du plante den i jorden. Vi vil bruge en almindelig plastflaske som beholder. Vi skærer det af på det sted, hvor flasken begynder at indsnævres og bliver til en hals. Derefter er det bydende nødvendigt at lave huller.De vil tjene som dræning. Nu skal du samle jorden op. Neutral, frugtbar jord er bedst.
Det er kun tilbage omhyggeligt at passe klematis og vente på, at en passende dato begynder. Oftest er denne periode forår. Så det er tid til at plante clematis. Hvordan man bedst gør disse. Faktisk praktiseres meget ofte en teknik, hvor clematis plantes direkte i flasken uden at fjerne den derfra.
Dette forenkler i høj grad processen med at passe frøplanten, men efter et år bliver du nødt til at grave den op og plante den igen. Denne tid vil være nok til at blomsten udvikler sig og vokser nok til at vokse alene i det åbne felt. I et stykke tid vil clematis føle sig meget ubehageligt under ukendte forhold, og derfor bør pleje af frøplanten være særlig forsigtig i de første to til tre uger.
Vigtig! Frøplanten kan plantes i jorden uden en flaske, men i dette tilfælde skal du passe godt på den for at forhindre alle former for infektioner, angreb og sygdomme. Og i princippet skal vanding og ukrudt være hyppigere procedurer.
Hvordan bevarer man en rodfæstet stilk?

Den første og vigtigste regel for pleje af rodfæstede stiklinger er købstidspunktet. I modsætning til en frøplante, der sælges i en plastpose, bør en udskæring serveret i krukker og kasser ikke købes tidligere end tre til fire uger før plantning. Imidlertid er denne regel, ligesom alle efterfølgende, meget enkel.
Nedenfor er alt hvad du behøver at vide for at kunne bevare en frøplante:
- Det mest ødelæggende, der kan påvirke frøplanten umiddelbart efter køb, er direkte brændende sollys. Planten på dette tidspunkt vil være meget svækket, og den brændende sol kan meget vel forårsage meget alvorlig skade på den. Derfor ville den bedste løsning være at finde et sted til frøplanten, hvor kun diffust lys vil falde. Dette betyder dog ikke, at du skal sætte det i skyggen. Et værelse med vindue mod vest er meget bedre egnet til disse formål. Men efter tre uger, når frøplanten bliver stærkere, vil det være muligt at sætte den i solen.
- Hvis der var knopper på frøplanten ved køb, skulle du slippe af med dem, uanset hvor smukke de er. Knopperne er en meget alvorlig belastning for blomsten, og hvis den bruger ekstra energi og næringsstoffer på dem, vil spiren muligvis dø efter et stykke tid og simpelthen ikke kunne modstå den. Når du kommer hjem, skal du derfor skære knopperne med en steril havekniv. Dette vil gøre livet meget lettere for den kommende konge i din have.
- Regelmæssig vanding af clematis er lige så vigtig. Husk dog, at denne plante er meget kræsen med hensyn til den fugtighed, den skal vokse i. Derfor er det vigtigste ikke at overdrive det med den mængde vand, som du vander din klematis med.
Clematis plantning - pleje af rodede stiklinger
Det anbefales dog ikke at bruge almindeligt vand som kunstvandingsvæske. I løbet af denne levetid er frøplanten ikke særlig tilpasset beskyttelse mod alle slags svampe og infektioner, og derfor er det nødvendigt at blande vand med en slags fungicid. Dette vil reducere chancerne for, at der sker noget med din frøplante, betydeligt, før du når at plante den.
Vanding bør være hyppig - mindst en gang om ugen. Præcis den samme løsning, som du bruger til vanding, kan du sprøjte rodzonen af clematis, fordi det er derigennem, at svampe oftest kommer ind i planten.
Ofte er beholderne, hvor sådanne frøplanter sælges, ikke særlig omfangsrige, og derfor, hvis du af en eller anden grund ikke kunne tage det første råd og købte en skæring for tidligt, kan du transplantere det.
En flaske med drænhuller (den samme som vi lavede til frøplanter med et åbent rodsystem) eller en ret høj gryde er velegnet som en ny beholder.En sådan transplantation vil hjælpe planten med at overleve mere behageligt i flere uger før plantning.
Vigtig! Frugtbar jord skal hældes i beholderen. Ellers vil det være sværere for frøplanten at holde ud indtil det aftalte tidspunkt.
Under dit samliv med frøplanten kan du også fodre den et par gange. Dette bør dog ikke være en almindelig procedure, der vil blive udført med og uden grund. Du bør kun ty til fodring, hvis frøplanten ikke har det godt: den visner eller ser sløv ud. I dette tilfælde kan endda en blanding af flere komplekse præparater anvendes.
Vigtig! Når du køber en frøplante, er det meget vigtigt at læse vejledningen på pakken, for det er vigtigt for os at finde ud af, hvilken beskæringsgruppe den tilhører. Dette vil blive særligt vigtigt, når vi begynder at pleje planten yderligere, nemlig beskæring.
Når clematis plantes: i efteråret eller foråret
Hvis du vil høre et kort svar - selvfølgelig er foråret en mere passende sæson til plantning af clematis, i hvert fald simpelthen fordi plantning af frøplanter om foråret er mere praktisk og praktisk.
Der er dog flere nuancer her. For eksempel bør frøplanter med et åbent rodsystem udelukkende plantes om foråret, men stiklinger med et lukket rodsystem kan plantes selv om sommeren. Det bliver dog lettere at gøre dette i foråret alligevel.
Plantning af clematis om foråret - den bedste timing
Den mest egnede tid på året til plantning af clematis er naturligvis forår. Dog hvilke måneder man skal vælge. Hvis du har standard vejrforhold, så er slutningen af april eller begyndelsen af maj selvfølgelig bedst. Vores land er imidlertid utroligt stort, og råd, der egner sig til den sydlige stribe, kan let ødelægge plantningen af clematis i den nordlige strimmel.
Så der er simpelthen ingen universelt perfekt date. Du kan dog angive de datoer, der passer til et bestemt band.
For eksempel i syd kan clematis plantes i begyndelsen af april. I den midterste bane er datoerne angivet ovenfor de mest egnede - slutningen af april, begyndelsen af maj. I nord vil clematis plantet i begyndelsen, maksimalt i midten af maj, vise sig bedst.
Clematis: landing og månekalender
Hvis du vil overholde månekalenderen, tilbyder vi dig de datoer, der vil være de mest eller mindst gunstige for plantning af kimplanter. Vi vil dog henlede din opmærksomhed på, at det kan være en farlig opgave at stole på månekalenderen.
Det vækstboost, som månen giver, er så uforholdsmæssigt lille i forhold til de effekter, som rettidig vanding og korrekt fodring har på planten, at du kan miste klematis i håb om, at månen vil gøre alt for dig.
Så hvis du har lyst, kan du holde dig til kalenderen. Kun her er det ikke værd at overveje, at en passende landingsdag allerede er halvdelen af kampen. Stol altid kun på din viden og styrke.
Datoer for 2019:
Clematis lander, Glade dage: I marts vil alle tal fra den fjortende til den tredive være egnede til plantning af clematis. Undtagelser er tal fra den enogtyvende til den fjerde og tyve. I april vil du være tilfreds med alle tal fra den syvende til den syttende og fra den fjerde og tyve til slutningen af måneden. I maj kan alle tal fra den sjette betragtes som mere end gunstige.
Clematis lander, Ugunstige dage: I marts er det det sjette, syvende og enogtyvende nummer. I april - den femte og nittende. I maj - alle de samme som i april.
Plantning af clematis i åbent terræn om foråret
Nu hvor du ved, hvordan du gemmer clematis før plantning, og hvordan du forbereder det til det, kan du gå direkte til selve plantningen. For at gøre dette skal du samt at udføre enhver procedure følge reglerne.
Heldigvis for dig, som du sikkert allerede har bemærket, er clematis ikke den mest krævende plante i verden.
Hvordan vælger man en passende placering og jord?
For at din klematis udelukkende kan vokse på det mest egnede sted til det, skal du overholde disse enkle regler:
- Stedet skal være solrigt, fordi clematis er en plante, der elsker at sole sig i lyset. Planteområdet bør dog ikke udsættes for direkte sollys hele dagen. På den anden side kan det dræbe klematis, så det er bedst at vælge et halvskraveret område. Det er især vigtigt at overholde denne regel, hvis dine klematisblomster er farvestrålende.
- De farligste eksterne faktorer, der kan svække dine clematis betydeligt, er udkast. Clematis kan ikke lide dem særlig meget, og det er vigtigt at yde en acceptabel beskyttelse mod dem.
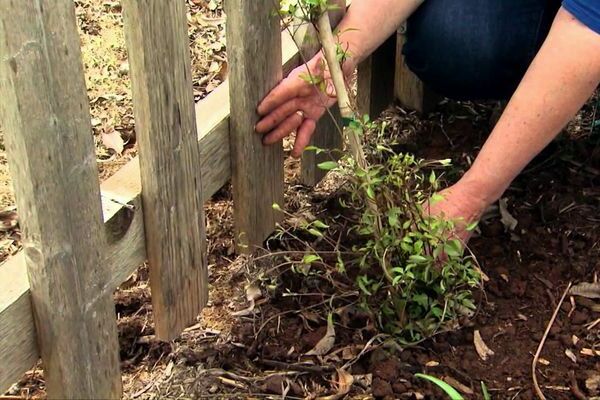
- Et lige så vigtigt tip - plant aldrig clematis tæt på bygninger, hegn og vægge. Dette begrænser ikke kun pladsen til plantens rødder betydeligt, men du tillader også vandlogning, da vand efter regn kommer til at dryppe fra tagene og overvande klematiserne. Så det er tilrådeligt at holde en afstand på mindst en og en halv meter-meter mellem den nærmeste bygning og busken.
- En vigtig faktor, der vil påvirke den fremtidige placering af clematis betydeligt, er dens fremtidige støtte. I sidste ende er clematis en klatreplante, og den har brug for støtte som vand. Og hvis du planter en frøplante tankeløst, kan støtten i fremtiden muligvis ikke kun forhindre dig på plantestedet, men kan simpelthen ikke passe der. Derfor skal du altid planlægge fremad.
- Der er også et element i landskabet, plantning af clematis, hvor det ikke kun er uønsket, men også kan koste dig en plante. Vi taler om lavlandet. De er farlige ved, at de samler en stor mængde fugt, som, som vi allerede har fundet ud af, kan være skadelig for klematis. Derfor er det bedste, du kan gøre, at oprette en lille voldgrav omkring plantestedet eller plante en frøplante på en kunstigt skabt hummock. Sammen med det er en høj seng også velegnet.
- Et endnu dårligere plantningssted end området ved siden af et almindeligt hegn er området ved siden af et metalhegn. Faktum er, at på varme sommerdage opvarmes et sådant hegn kritisk og kan i høj grad skade planten, som har besluttet at cirkle rundt om den.
Som vi noterede et par afsnit ovenfor, skal jorden, hvor du skal plante clematis, være neutral, tilstrækkeligt løsnet og meget frugtbar. Den værste jord, hvor du kan plante en spire, er sur, da det netop er et sådant miljø, som clematis slet ikke tåler.
Råd! Hvis du vil have din klematis ikke kun til at se smuk ud alene, men også i harmoni med miljøet, kan du plante den ved siden af et lysthus eller et hegn i træ. Denne vinstok vil se meget stilfuld og hyggelig ud.
Clematis, der planter en frøplante: hvordan man forbereder jorden og plantningshullet
Som med enhver plante skal clematisgraven og jorden forberedes på forhånd. Dette gøres, så jorden når at lægge sig inden plantning. Den mest passende tid er halvanden måned før plantning. Selvom du i princippet kan gøre dette senere. Dog ikke en uge før landing.
Hvordan det præcist skal gøres, er nedenfor.
Naturligvis, som alt andet arbejde, skal dette gøres rent. Derfor, før du begynder at grave et hul og fylde det med næringsstoffer, er det nødvendigt at rydde arbejdsstedet for sten og ukrudt.
Hvis sur jord hersker på dit websted, skal du helt sikkert gøre noget ved dette, fordi clematis under ingen omstændigheder vil vokse i det. Og hvis han vil, vil han gøre det meget trægt og modvilligt. Derfor skal du bare på en eller anden måde deoxidere jorden. Der er et stort antal præparater til dette, men træaske kan også bruges.
For at tilføje stoffet til jorden skal du først grave det op. Efter at "medicinen" er tilføjet, er det nødvendigt at løsne jorden, så det aktive stof spredes jævnt over det.
Jordens neutralitet er imidlertid ikke nok til, at clematis kan slå rod i den. Du skal også passe på, at jorden ikke er for tung. For at gøre dette skal du fortynde det med tørv og sand. For en kvadratmeter jord skal du bruge omkring en spand af hvert af disse to stoffer.
Det kan dog vise sig at være omvendt, og jorden på dit websted vil være for let til klematis. I dette tilfælde er det nødvendigt at gøre det tungere. Med denne opgave klarer for eksempel tørt land, der blev lagt direkte på bunden af gruben, godt.
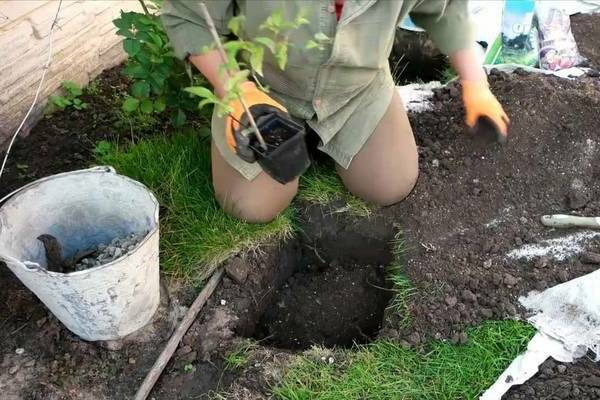
Clematis lander, graver et hul
Nu hvor din jord er ideel til klematis at bosætte sig i, kan du starte grave et hul.
Dens dimensioner er længe blevet fastlagt af erfarne gartnere og bør være omkring 70 centimeter i højde, bredde og dybde. Selvom du gør gruben lidt mindre, vil den ikke være kritisk
Den første ting, du tilføjer til hullet, skal være et drænlag. Det er nødvendigt, for som allerede nævnt tolererer clematis absolut ikke overdreven vandlogning. Derudover kan det ikke udelukkes, at underjordiske farvande ligger under gruben. Et lag dræning, der er cirka 15 centimeter tykt, hjælper med at beskytte spiren mod dem.
Som materiale kan du bruge småsten eller endda fint mishandlet mursten. Selvom det sidste ikke anbefales at blive brugt, fordi det falder sammen over tid under påvirkning af fugt.
Nu skal hullet fyldes med næringsstof. For at gøre dette har vi brug for flere ingredienser, som inkluderer: almindeligt fint sand, tørv til plantning af planter, forberedt humus på forhånd samt frugtbart sodmark. Alle disse ingredienser skal blandes godt sammen, før du hælder dem i graven som en homogen blanding.
Når alle ingredienserne er i hullet, er der kun tilbage at tilføje lidt mineralsk gødning. Et hundrede og halvtreds gram burde være nok. Du kan også tilføje et glas træaske. Nu hvor proceduren er fuldført, er det nødvendigt at vande den resulterende mineralblanding rigeligt, så du ikke behøver at plante clematis i tør, livløs jord.
Vigtig! Hvis du vil plante flere klematisbuske på én gang, skal du holde afstand mellem dem. Den mest optimale afstand er en meter. Dette gøres, så buskene ikke kæmper indbyrdes om vand, næringsstoffer og mineraler. Men hvis du vil se flere klematis i et trangt rum (for eksempel i et blomsterbed), kan du opretholde en afstand på kun tredive centimeter.
Clematis plantning - hvordan man forbereder en frøplante
Inden han planter en frøplante i et helt nyt og ukendt miljø for ham, hvor han stadig skal vænne sig til, er det nødvendigt at forberede det grundigt. Denne procedure gælder dog specifikt for selve skæringen. Det er ikke nødvendigt at forny jorden i opbevaringsbeholderen.
For at udføre forberedelsen korrekt og kompetent skal du udføre følgende trin:
- Dagen før direkte plantning er det nødvendigt at suge alle plantens rødder i en opløsning, der stimulerer vækst og udvikling. Hvordan det fortyndes korrekt, vil blive skrevet på emballagen med den aktive ingrediens, så følg instruktionerne omhyggeligt.
- Hvis der pludselig forekommer skimmelsvamp eller råd på rygsøjlen, skal de beskadigede områder fjernes, indtil der kun er sundt væv tilbage.
- Derefter skal du ty til en slags fungicid, der hjælper planten med ikke at blive inficeret gennem det udsatte væv. Hvis rødderne er vokset for længe, skal de skæres af. Normalt er en tredjedel af denne længde nok.
- Over rodhalsbåndet, mens planten fik styrke inden plantning, kunne der komme små blade. Vi bliver helt sikkert nødt til at slippe af med dem, da vi bliver nødt til at uddybe bladstilken, og bladene vil i høj grad forstyrre dette.
Clematis plantede en frøplante
Nu hvor plantehullet er helt klar, kan du begynde at plante frøplanten direkte. For at din klematis skal være den mest effektive og producere flest blomster, skal du følge instruktionerne herunder:
- Først og fremmest skal gruben, før du planter en spire i den, komprimeres.
- Nu, hvis du købte en clematis -frøplante med et åbent rodsystem, skal du danne et dias fra gødningen i gruben. Det er på denne bakke, at vi vil plante rødderne til den fremtidige klematis.
- For at gøre dette skal du tage en forberedt frøplante, sprede dens rødder og plante dem på et jordskred på en sådan måde, at de alle er jævnt fordelt i forskellige retninger. Derudover er det meget vigtigt at sikre, at rødderne ikke bøjer eller knækker.
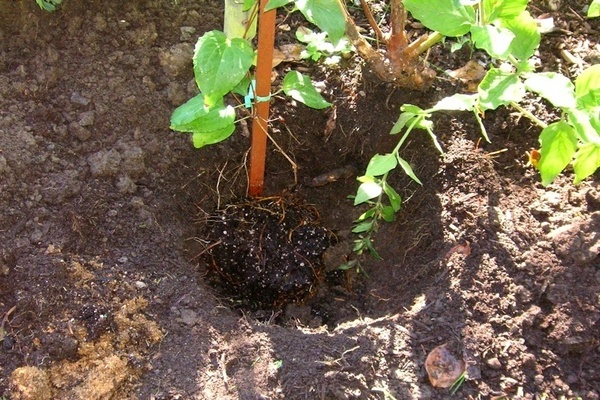
- Hvis du har købt en frøplante med et lukket rodsystem, skal du handle med præcision og omvendt. I midten af hullet trækkes endnu et lavt hul ud, i hvilket du indsætter en jordklump dannet omkring frøplanternes rødder.
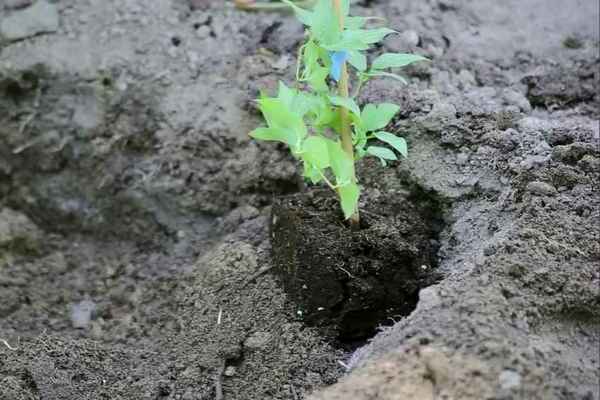
Lad os nu tale om uddybning. Dette er en meget vigtig procedure. Det udføres for at styrke plantens immunitet og bidrager til dets sikkerhed under frost. For at udføre denne procedure korrekt er det nødvendigt at drysse lidt jord på rodhalsen. I vores tilfælde vil otte til tolv centimeter være mere end nok. Ud over rodhalsbåndet bør vores uddybning også påvirke flere knopper i den fremtidige klematis. Dette vil hjælpe dem med at vokse og udvikle sig hurtigere.
Nu skal du dække hele den resulterende struktur med jord. Det er taget fra det yderste lag af gruben. Når det falder i søvn, skal jorden gradvist komprimeres, så frøplanten holdes fast og fast i jorden. Der laves et lille hul omkring stammen, hvilket vil gøre det meget lettere at vande planten i fremtiden. Hvis kanterne på hullet er lidt hævet op, vil dette også tjene som en primitiv beskyttelse mod vandlogning under regn.
Clematis plantning af en plante - hvilke handlinger udfører vi umiddelbart efter plantning
Straks behov til vand clematis, for øjeblikkeligt at give ham et løft i væksten. Du skal hælde omkring tre til fire spande i et hul.
For første gang, mens der stadig ikke er nogen støtte ved siden af clematis, en ekstra forstærke den ved hjælp af en træpind placeret ved siden af den. En plante bundet til den vil vokse mere selvsikkert og hurtigt tilpasse sig et nyt habitat.
Det tilrådes at udføre en procedure kaldet mulching... Det består i, at du dækker jorden omkring plantens stamme med savsmuld, nåle eller faldne blade. Denne procedure er slet ikke nødvendig, men den er utrolig nyttig, da den ikke kun tillader at bevare fugt og forhindre fordampning, men også beskytter klematis mod ukrudt, der konstant stræber efter at stjæle mad fra ham.
Efter plantning anbefales det også stærkt at dække planten med et specielt filmmateriale i et stykke tid. Det er ikke svært at gøre dette, men i tilfælde af at frost kommer tilbage, eller pludselig en kraftig vind stiger, vil din clematis være helt sikker.
Vigtig! I første omgang vil jorden omkring rodkraven ikke være tæt nok, og under vanding vil den blive stærkt eroderet af vand. For at forhindre dette er det nødvendigt at tilføje lidt jord tilbage efter de første par vandinger.
Clematis: plantning og pleje efter plantning
Som du sikkert allerede har bemærket, er omsorg for klematis en ret simpel opgave, som enhver amatørgartner let kan klare. Ikke desto mindre burde det første år med pleje af klematis være det sværeste, for på dette tidspunkt skal du være så følsom og opmærksom på planten som muligt. Så du kan give ham en god fremtid og den nuværende titel af konge på dit websted.
Som allerede nævnt vil clematis i første omgang føle sig meget ubehageligt et nyt sted.Derfor bliver de første par uger nødt til det skyggesåledes at planten på baggrund af generel stress ikke modtager flere solskoldninger.
Dette bør gøres, indtil clematis mister alle tegn på sløvhed. Den bedste måde at skygge på er med buer, hvorigennem du kan strække en speciel agrofiber, som perfekt beskytter klematis mod solen. Det vil også hjælpe planten med ikke at blive offer for stærk vind.
Det mest sarte emne for clematis er imidlertid vanding... I det første år efter plantning skal de overvåges særligt tæt, så der ikke er for mange af dem, men samtidig ikke for få. Det betyder, at dens overdrevne vandlogning sammen med udtørringen af jorden ikke bør være tilladt. Som de siger, skal du holde dig til den gyldne middelvej.
I gennemsnit vandes planten kun en gang om ugen, men hvis vejret er varmt udenfor, og hvis du ikke har mulket, skal antallet af vandinger øges til to eller tre gange om ugen. Tværtimod, når efteråret kommer, skal du reducere vanding.
Som vi allerede har nævnt mere end én gang, ikke mindre vigtig end vanding, er proceduren mulching... Denne nemme proces udfører mange nyttige funktioner, og derfor kan det varmt anbefales at udføre det.
Fordelen ved mulching er, at det på varme dage forhindrer fugt i at forlade jorden for hurtigt omkring planten. Lad os også gentage, at mulching er den bedste ukrudtsbekæmpelse, der er tilgængelig i øjeblikket, så hvis du ikke mulker endnu, er det ikke klart, hvad du venter på?
Også inden for havearbejde skal du være meget opmærksom nabolaget forskellige planter, fordi naboerne ikke kun kan se meget smukke ud sammen med din plante, men kan også hjælpe ham med at klare nogle vanskeligheder.
For eksempel er blomster som morgenfruer og morgenfruer blandt de bedste naboer til klematis, da de giver fantastisk beskyttelse mod mange insekter. Sammen med vanding og mulching er det nødvendigt regelmæssigt at udføre løsner sig jord.
Det er især vigtigt at gøre dette efter vanding eller efter kraftig regn. Med denne procedure vil ilt strømme meget bedre til rødderne og fremskynde væksten af din klematis.
Selvom du har et lag mulch, skal du ikke antage, at ukrudtet bare vil tage op og forsvinde. Desværre vil de stadig vises, og din direkte opgave er at udrydde dem så hurtigt som muligt.
Og det er selvfølgelig nødvendigt at nævne beskæring, fordi dette i princippet er en af de vigtigste procedurer. Det er hende, der direkte bestemmer, hvordan din klematis vil vokse i fremtiden.
I det allerførste år efter plantning sker beskæring i henhold til en meget enkel ordning: du skærer simpelthen skuddene af i niveauet tyve til tredive centimeter over jorden. I alle efterfølgende år udføres beskæring efter en mere kompleks ordning, som bestemmes af din klematis beskæringsgruppe.
Der er tre af disse grupper, og det er utrolig vigtigt at vide, hvilken af dem din klematis tilhører.
Den sidste procedure - ly clematis til vinteren. Clematis er ikke en plante, der tåler kulde særlig godt, og derfor er det simpelthen nødvendigt at passe på beskyttelsen. Denne procedure er især vigtig i de nordlige regioner. I øvrigt er det også meget bedre for dem at købe clematis fra den tredje beskæringsgruppe, fordi det er så enkelt at dække dem til vinteren, at det bare er en fornøjelse.
Clematis plantning ved frø
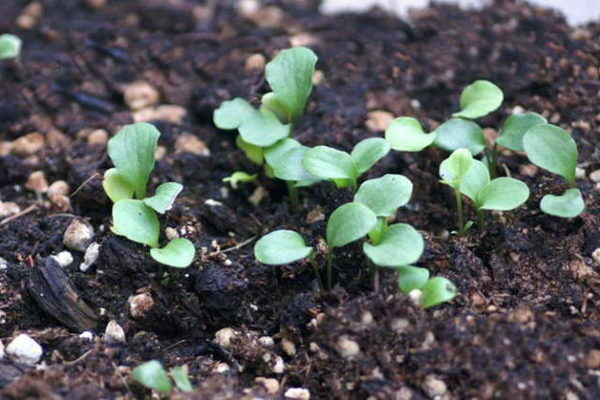
Ja, det er rigtigt, clematis kan også dyrkes af frø. Alt, hvad der er nødvendigt for dette, er at plante frø til frøplanter. Denne avlsmetode har imidlertid én fangst: den tillader ikke hybridsorter at formeres. Deres afkom vil simpelthen ikke have de samme hybridkvaliteter. Men for artsorter er denne metode ganske effektiv og kan bruges.
Inden plantning af frø til frøplanter skal de desinficeres og beskyttes mod alle slags vira og bakterier.Til dette kan du bruge kokossubstrat. Du kan også bruge almindelig frøplantejord i stedet. Frøene skal presses lidt ind i det, og al denne "tærte" skal sættes i køleskabet i halvanden måned.
Omsorg for frøplanter opnået fra sådanne frø er ikke anderledes end at pleje andre.
Konklusion
Clematis er en utrolig uhøjtidelig konge, og selv en nybegynder i havearbejde kan sagtens klare ham. Alle de procedurer, som vi beskrev ovenfor, er faktisk utroligt enkle i forhold til mange andre planter, der kræver næsten daglig opmærksomhed. Og hvordan man planter clematis: plantning med stiklinger eller frø vælges af dig - det er ikke så vigtigt.
Ikke desto mindre er det stadig utroligt vigtigt at passe ordentligt på klematis: vanding, fodring og ukrudt til tiden. Vi håber, at vi har afklaret spørgsmålet om, hvordan du gør dette, og du vil aldrig mere have spørgsmål om, hvordan, hvor og hvornår du skal plante clematis. Og efter at have besvaret alle disse spørgsmål, kan du let forvandle din have til ukendelighed. Held og lykke med det.