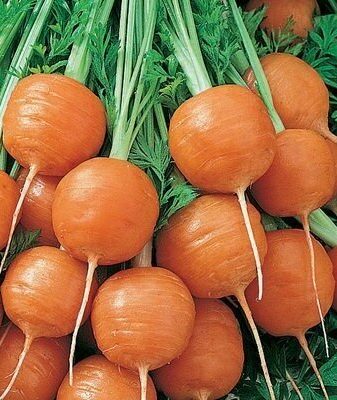
Gulerødder på et bånd: hvordan man planter korrekt
Indhold:
I processen med at dyrke gulerødder er der normalt ingen problemer, da denne kultur er ret uhøjtidelig. Men ikke desto mindre, for at få en rig høst af velsmagende og smukke rodafgrøder, er det nødvendigt at følge en række regler, når man plejer afgrøden, vander og luger den, og ikke glemmer at løsne jorden og spude rodafgrøderne lidt på det rigtige tidspunkt. Og frem for alt er du nødt til korrekt at plante gulerodsfrø, det meste af succesen afhænger af dette. Derfor vil vi yderligere tale om: gulerødder på et bånd, korrekt plantning.
Gulerødder på et bånd: regler for plantning af frø

For at få store rødder med den korrekte form er det vigtigt at observere den krævede afstand mellem planter, som normalt er lig med 4-5 centimeter. Gulerodsfrø er meget små, så når man planter dem i hånden, er det ekstremt svært at holde sig til den ønskede afstand, næsten umulig. Derudover er gulerodsfrø ganske lette og kan efter plantning og vanding flyde til overfladen eller bevæge sig sidelæns. Og hvis der passerer et kraftigt regnskyl, så kan du glemme det verificerede landingsmønster, alt vil blande sig. Og hvis frøene plantes for ofte, betyder det, at det i fremtiden vil være nødvendigt at tynde frøplanterne ud, og ved udtynding er der altid en chance for at beskadige de sarte og skrøbelige gulerodsspirer.
Derfor blev en landbrugsteknik opfundet - gulerødder på et bånd, hvilket i høj grad letter processen med plantning og yderligere pleje af gulerødder. Dette er en plantemetode, der giver dig mulighed for at fikse frøene ét sted og ikke være bange for vanding og regn. Og også metoden med gulerodsfrø på båndet tillader, når man planter, at observere afstanden mellem planterne, hvilket er nødvendigt for behagelig vækst og korrekt dannelse. Essensen af metoden er, at frøene fastgøres til et specielt tape i en bestemt afstand, og sammen med dette tape går de dybere ned i jorden. Du kan selv forberede frøene til at plante gulerødder på tapen eller købe en færdiglavet tape med frø i landbrugsbutikken i frøafdelingen.
Gulerødder på et bånd: forbereder plantemateriale med egne hænder
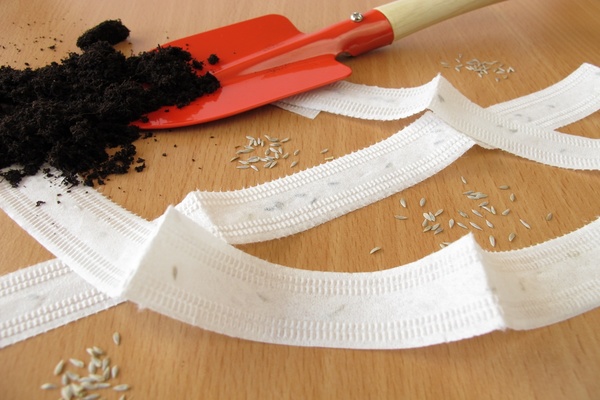
Gulerodsfrø på båndet: foto
Hvis du beslutter dig for at prøve at plante gulerødder på et bånd, er der flere måder at forberede plantemateriale på. Den enkleste af dem er at købe færdige frø, der allerede er limet til båndet, som ikke kræver yderligere behandling og er helt klar til plantning. Hvis du selv vil forberede frøene, kan du som basis bruge specielle klæbebånd, papirservietter eller håndklæder samt toiletpapir - det mest almindelige og egnede materiale til dette. Limen, der bruges på købte bånd, skader ikke planten; nogle nyttige stoffer tilføjes endda der. Og hvis du selv klistrer det, skal du tilberede en pasta fra mel eller stivelse, som også er helt ufarlig for frø. Ved at købe et færdigt bånd forenkler du i høj grad hele plantningsprocessen. I dette tilfælde er du heller ikke begrænset til valget af en sort, da moderne producenter producerer frø i forskellige former: den samme sort kan købes i form af almindelige frø, piller, på tape. Gulerodsfrøene på båndet er fastgjort i samme afstand fra hinanden, du skal bare lave riller i den forberedte jord, vand dem og sænke båndet med frø, der drysses med jord. Frøene vil spire, og tapen vil gradvist gå i opløsning ved udsættelse for fugt og vil på ingen måde forhindre spirerne i at bevæge sig til overfladen og udvikle sig fuldstændigt.
Som vi sagde tidligere, har frøene på bæltet allerede bestået den nødvendige forsåning, som omfatter desinfektion og behandling med forbindelser, der fremskynder spiring af frø. Nogle mener, at ulempen ved denne tilgang kan betragtes som de højere omkostninger ved sådanne frø, i modsætning til konventionelle eller dem, der sælges i form af piller. Men du kan kun argumentere om prisen her, hvis du planlægger at plante en hel mark med gulerodsbånd. Og hvis vi taler om en eller to senge, så er prisen efter min mening ikke særlig høj. En anden ting er, når det kommer til kvaliteten af materialet. Flere og flere gartnere hvert år klager over den dårlige spiring af butiksfrø. Derfor, hvis du har et godt og gennemprøvet plantemateriale, kan du selv forberede sådanne planteseler, især da det slet ikke er svært. Hvis du har et godt øje og en stabil hånd, er du velkommen til at begynde at forberede frøene. Denne metode er især passende, hvis du er blevet den lykkelige ejer af en lille mængde frø af en elite sort af gulerødder, og du skal plante på en sådan måde, at ikke et eneste frø går tabt.
Inden du begynder at lime frøene, skal du udføre en række forberedende arbejde. Sørg først for at dine frø er egnede til plantning og test deres spiring. For at gøre dette skal du lægge et dusin frø på en bomuldsklud eller vatrondel og våd. Pak derefter alt i en pose eller plastfolie og sørg for, at stoffet ikke tørrer ud. Efter cirka 10 dage kan du se, hvor mange frø der er begyndt at spire ved at estimere procentdelen. I betragtning af at du skal udføre et ret omhyggeligt arbejde, behøver du kun at bruge plantemateriale af høj kvalitet, hvis spiring er tæt på eller lig med 100%. For det andet forbereder du basen ved at skære toiletpapiret i strimler på cirka 2,5 cm. For det tredje tilbereder du en pasta fra mel eller stivelse efter en velkendt opskrift. For at forberede pastaen skal du koge 200 ml vand, og mens det koger, hældes det langsomt i det og blandes to spiseskefulde mel grundigt. Når stoffet bliver tykt, skal du vente, indtil det er helt afkølet, og du kan starte limningsprocessen. Du skal bruge en tandstikker eller tændstik, som du vil anvende små dråber pasta til på den tilberedte papirstrimmel i en afstand på ca. 4-4,5 cm fra hinanden. Og derefter, ved hjælp af en fugtig nål eller en tynd strikkepind, skal du placere frøene i disse dråber. Når arbejdet udføres, behøver du ikke først at påføre al pastaen og derefter gå videre til frøene, da de første dråber på det tidspunkt allerede kan tørre ud. Skift mellem de to for de bedste resultater. Efter afslutningen af processen, lad strimlerne med frø foldes ud til tørre, dette vil tage mindst en dag. Rul dem derefter forsigtigt sammen og opbevar dem et tørt og køligt sted, indtil du går i gang med havearbejde.
Plantning af gulerødder på et bånd med egne hænder
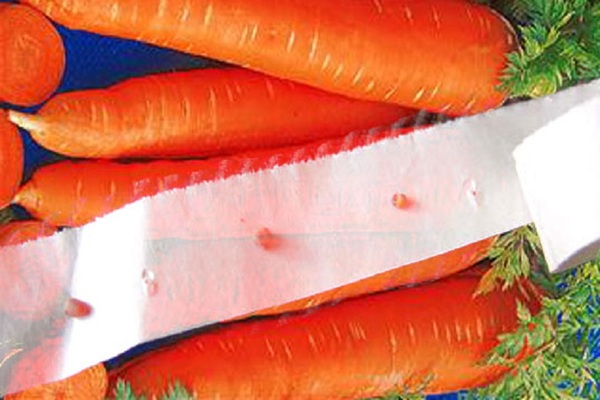
Gulerodsfrø på båndet: foto
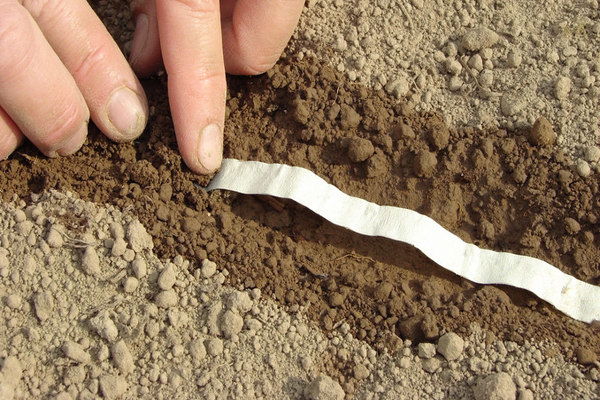
Inden du starter processen med at plante gulerødder på båndet, skal du omhyggeligt forberede jorden, og det anbefales at starte dette præparat i efteråret. Bestem præcis, hvor gulerødderne vil vokse, da det ikke anbefales at plante dem to år i træk på samme sted (og også efter selleri, dild, persille). Det menes, at de bedste forstadier til gulerødder er natskygger (tomater, kartofler) eller bælgfrugter (bønner, ærter, bønner). Efter at have valgt et sted, skal du grave dybt ned i haven og fjerne alle ukrudtsrødder, dette vil gøre din ukrudtsproces meget lettere for den næste sæson. I foråret skal denne procedure gentages og umiddelbart før plantning skal jorden løsnes og derefter jævnes med en rive. Lav målantallet af furer og vand dem rigeligt med varmt vand, afstanden mellem furer skal være mindst 10-12 cm.Til sidst lægges dine papirstrimler forsigtigt langs rillerne og placeres med den limede frøside nedad. Gulerodsfrø spire i meget lang tid, så for at skabe ekstra komfort efter plantning kan du dække bedet med en uigennemsigtig film eller fiberdækkende belægningsmateriale. Denne teknik hjælper med at bevare varme og fugtighed samt bremse væksten af ukrudt, som normalt vises i haven meget tidligere end gulerodskud. Kanterne på dækmaterialet skal være godt fastgjort ved at trykke dem til jorden med sten eller brædder, så det ikke blæses af af vinden. Efter 14-17 dage kan læet fjernes, give adgang til sollys og forvente en venlig fremkomst af frøplanter i den nærmeste fremtid.
Konklusion
Gulerodsfrø på båndet: foto
Gulerodpleje på båndet ender naturligvis ikke der. Du bliver nødt til regelmæssigt at luge bedene indtil midten af sommeren (på dette tidspunkt vil toppen vokse og blokere sollysets adgang til ukrudtet), forsigtigt løsne jorden, så der ikke dannes en skorpe på overfladen. Efter at rødderne, når de vokser, begynder at kravle lidt op af jorden, skal de klemmes sammen, så de ikke bliver grønne nær basen. Alt dette er nødvendigt for en god høst. Men ved at plante gulerødder med tape sparer du dig selv for at tynde plantagerne ud på et tidspunkt, hvor planterne stadig er skrøbelige og sarte, og de let bliver beskadiget. Forberedelse af båndet til plantning er en omhyggelig og ansvarlig proces. Men med korrekt frøforberedelse og planteareal vil yderligere plantepleje være meget lettere. Og resultatet, det vil sige høsten, bliver meget mere imponerende.