Sådan plantes en hortensia i efteråret
Indhold:
Hortensia er en uhøjtidelig buskplante, og her vil vi fortælle dig om de små hemmeligheder om, hvordan man planter en hortensia i efteråret for at få smuk blomstring i fremtiden.
Er det muligt at plante en hortensia i efteråret
Alle sorter af hortensia er meget populære i vores land. De kan lide meget lys og meget fugt i jorden. Oversat fra det latinske sprog betyder et fartøj med vand. Det er sandsynligvis derfor blomsten er værst af alt underfyldning end overløb.
Blomstringen begynder for det meste midt i sommersæsonen og slutter sidst på efteråret. De har en stærk immunitet, så de bliver sjældent syge og lider af skadelige insekter.
Hortensia sorter af hvide og blå nuancer relateret til storbladede arter er i stand til at ændre deres farver, hertil er det nok at ændre jordens sammensætning på stedet. Panikulære og bunddækkende arter er meget modstandsdygtige over for koldt vejr, de trælignende kompakte arter kan dyrkes selv under de mest alvorlige klimatiske forhold, da det føles godt selv ved -40 grader.
Planten kan formeres uafhængigt ved at dele busken. Hvis du køber frøplanter, skal du kun gøre dette i specialforretninger eller planteskoler. Når du køber frøplanter, skal du spørge sælgerne, hvilke sorter der er bedre at vælge, så de slår rod i dit klima, og om de er tilpasset det. Dem, der ikke er hærdet, vil sandsynligvis ikke kunne overleve.
Et glimrende tidspunkt at plante en plante i haven på er juli, hvor skuddene endnu ikke er blevet træagtige. For at gøre dette skal du opdele den voksne busk i dele.
Hvis plantning er planlagt på territoriet i den centrale stribe i landet, skal den udføres i begyndelsen af efteråret, men hvis dette er det sydlige Rusland, kan denne procedure vare indtil slutningen af efterårssæsonen.
Bemærk, at planter skal have et veludviklet rodsystem, ellers vil det ganske enkelt ikke have tid nok til at tilpasse sig før de første frost. Foråret er at foretrække for at plante unge frøplanter.
I efteråret plantes der som regel panikulær og trælignende hortensia. Storbladede arter i maj og i den sydlige del af landet vil september være en passende måned for hende.
Plantning af en hortensia i efteråret - fordele og ulemper
 Efterårsplantning af en plante i haven har mange fordele, i modsætning til forårsplantning. Når alt kommer til alt, hvis alt er gjort korrekt og til tiden, så planten kan slå rod, vil du være i stand til at observere en smuk blomstring allerede næste sommer. Den anden grund til fordel for en sådan plantning ligger i de forberedende foranstaltninger, de er meget lettere at udføre, da jorden opvarmes, og det sparer en betydelig mængde tid. Et andet plus er, at det bliver meget lettere at beskytte en ung frøplante mod skadedyr, og det kræver ikke meget ernæring. Om vinteren øger planten ikke sin masse, men skal kun rodfæstes.
Ulemperne omfatter behovet for ordentlig husly til vinterkulden. En ung frøplante vil ikke kunne modstå frost uden hjælp.
Det kan også tilskrives regnvejr, som kan fremkalde svampesygdomme. Men hvis du tager forebyggende foranstaltninger ved at bruge en svag manganopløsning ved vanding, kan sygdommen undgås.
Det er vigtigt at vide, at bladene og blomster af hortensia er ret giftige og kan forårsage forgiftning og allergiske reaktioner, så du bør tænke på, om det er hensigtsmæssigt at plante disse planter i nærværelse af små børn og kæledyr.Det er også nødvendigt at udføre alt vedligeholdelsesarbejde med handsker.
Hvor skal man plante hortensia om efteråret
YdHortensia er en varmeglad plante, så du bør vælge åbne solrige områder eller delvis skygge. Et sted ved siden af hegnet er perfekt, hvor en stilfuld ensom beplantning kan organiseres lige midt på plænen. Du kan dekorere mixbordeos og alpine dias ved at placere buske i baggrunden. Du bør ikke plante dem nær træer, da sidstnævnte har et kraftfuldt rodsystem og vil tage det meste af fugtigheden for sig selv.
Ikke egnet som naboer: plettet loosestrife, bregne, rajgræs eller bulbonos, da de er meget aggressive. Men syrener, jasmin, spirea kan blive fremragende naboer, selvom erfarne gartnere siger, at den bedste mulighed er en enkelt plantning.
Kan du plante hortensiabuske i nærheden af dit hjem?
Selvfølgelig kan dette gøres, det vigtigste er at tage hensyn til plantens vækst og efterlade nok plads til det, når de plantes. Som voksen kan buskene nå tre meter eller mere, og deres bredde bliver omkring halvanden meter. Af denne grund bør du ikke plante planten ved siden af en veranda eller et vindue.
Stedet skal vælges med let, nærende, veldrænet og sur jord. Hvis jorden ikke opfylder plantens krav, kan du ved forberedelse af plantningshullene tilføje bladjord, humus, muldjord og sand til dem og blande dem i forhold 2/2/1/1. Du skal også tilføje urinstof - 1, 5 spsk. skeer, fosfat - 4 spsk. skeer, kaliumsulfat - 2 spsk. skeer. Efter at have gjort alt dette, vil du give planterne alle de nødvendige stoffer, og det vil vokse og udvikle sig godt.
Jord med alkaliindhold er ikke egnet til hortensia, da en sygdom som chlorose hurtigt udvikler sig på den. Neutral jord vil bremse plantens vækst og vil påvirke lysstyrken af blomsterne negativt. Af denne grund bør dolomitmel, kalk eller træaske aldrig tilsættes jorden, hvor hortensiaen plantes.
Plantning af hortensiaer
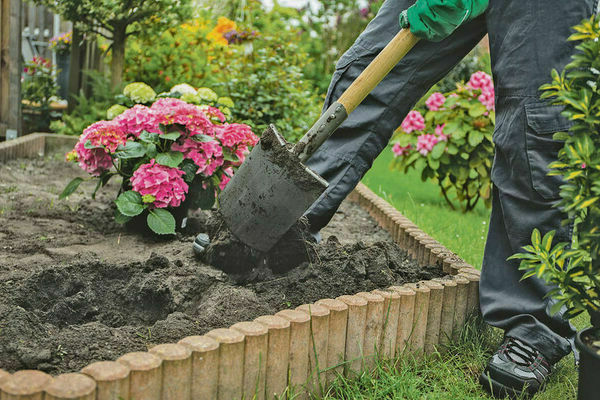
Forberedelsen af landingshullet finder sted tre uger før plantning. Hullet skal have samme størrelse som rodsystemet på den unge plante. Typisk en meter dyb og 70 centimeter bred. Når du planter flere planter, skal du observere afstanden mellem hullerne i størrelsesordenen halvanden meter. Hvis du planlægger at oprette en hæk, derefter 70 centimeter.
Når hullerne er gravet, skal de fyldes med en næringsblanding, vandes og efterlades i flere dage, så jorden kan bundfælde sig.
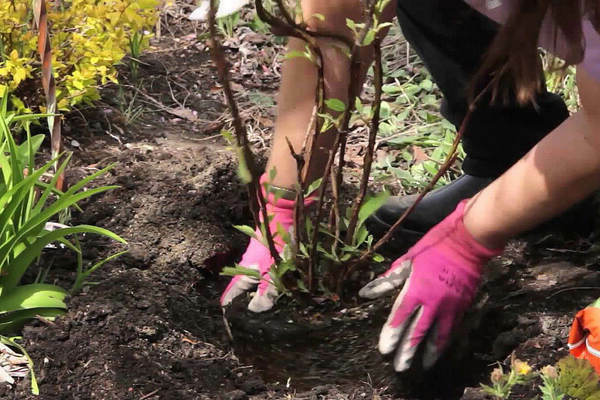
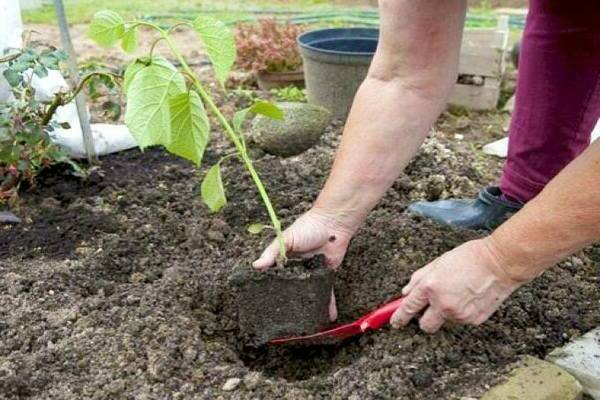
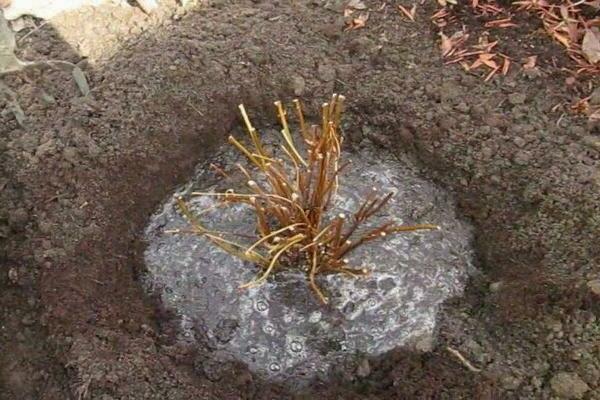
 Så snart tiden kommer til plantning i haven, skal du hente frøplanten fra den midlertidige bolig og plante den i hullet uden at fjerne jordklumpen fra dens rødder. Hvis frøplanten ikke var i jorden før, er det nødvendigt meget omhyggeligt og godt at sprede sine rødder og plante den. Vær opmærksom på, at rodkraven forbliver på overfladen af jorden, når du fylder hullet. Efter at planten er plantet, er det nødvendigt at komprimere jorden og vandet rigeligt ved hjælp af ca. 12 liter væske til dette og derefter dække jorden rundt om planten med et lag tørv eller fyrrenåle. Dette vil hjælpe med at beskytte planten mod hurtigt fugttab og ukrudtsvækst.
For at planten hurtigt kan tilpasse sig nye forhold, og rødderne skal slå godt rod, er det nødvendigt at passe godt på den i første fase. Til kunstvanding bør regnvand eller bundfældet i 5 dage bruges. For at øge surheden i jorden kan du tilføje citronsyre til vandet med en hastighed på 25 gram. 10 eller eddike i hastigheden 1 spsk. for 1 spand. Det er bydende nødvendigt at løsne jorden omkring den unge plante, efter vanding åbner dette iltadgang til rødderne og hjælper dem med at slå rod. For at gøre skuddene stærkere og beskytte mod svamp er det nødvendigt at bruge en svag opløsning af kaliumpermanganat til vanding.
Så snart udseendet af nye skud er bemærket, vil det være nødvendigt at forberede frøplanterne til vinterperioden. Dette er særlig vigtigt for dem, der købes i butikker og ikke hærdes.
Når du forbereder en hortensia, skal du fjerne alle blade og blomsterstande, så de ikke begynder at rådne. Hvis busken allerede har nået en alder af tre, skal planten skæres. Vi fortæller dig, hvordan du gør det korrekt.
Forbereder planten til vinterperioden
For at beskytte nyplantede buske mod frysning skal du dække det i midten med tør mos 30 centimeter op. Hvis dette ikke er muligt, kan savsmuld, jord, halm, bark bruges som et læ. Derudover er det nødvendigt at dække nærstammejorden med mulch og ikke være bange for at overdrive det med et lag. Dernæst bruges en garn til at binde busken, viklet rundt med en spunbond og dækket med gran- eller fyrretræsgrene ovenpå.
Så snart frosten begynder at aftage, er det nødvendigt at fjerne mulch, så planten ikke kvæler og lægger frisk mulch i stedet. Da planten i de første leveår vokser grøn masse, bør blomsterstandene afskæres.
Hortensia kræver ikke særlig pleje, og det er ganske enkelt at gøre det i haven, så det kan være værd at se nærmere på det og plante det.