Plantning af kål i åbent terræn med frøplanter
Indhold:
Plantning af kål: kort om kål
I naturen er der flere typer kål, der plantes som frøplanter. Repræsentanter for disse arter er broccoli, rosenkål, pekingkål, hvidkål, blomkål, rødkål. På vores lands område dyrkes kål i nord og i den centrale del er dyrkning og pleje teknikker de samme. Plantning af kål bør udføres i overensstemmelse med vejrforholdene i den fremtidige voksende region.
Kål er en koldresistent plante, unge plantager kan modstå et lille minus, især Savoyard-arten. Hvidkål tåler også lette frost normalt. Til mad om sommeren dyrkes de tidlige arter normalt, de senere er velegnede til saltning og lang opbevaring.
Plantning af kål: plantning i jorden
Som enhver plante har kål brug for en forberedt jord. På det fremtidige plantningssted skulle ingen korsblomstplanter have vokset i mindst tre år. Korsblomster er ikke kun kål, men også forskellige slags radiser. Denne familie er mest modtagelig for jordinsekter; det er nødvendigt at luge bedene. Det er nødvendigt at forhindre stagnation af vand og vælge veloplyste områder.
Forskellige sporstoffer er vigtige for kål, det vil være bedre, hvis de er placeret direkte i jorden, de kan erstattes med organisk gødning. Hvis jorden ikke er frugtbar nok, påføres et mineral, der indeholder gødning, med fosfor, nitrogen og kalium. Løse jordarter, neutrale i syreindhold, er bedst egnede; sådan jord kan forberedes ved tilsætning af kalksten.
Nysgerrig! Det er godt at plante kål efter at have dyrket bælgfrugter, løg eller agurker.
For at ødelægge den faldne jord skal jorden løsnes og jævnes.
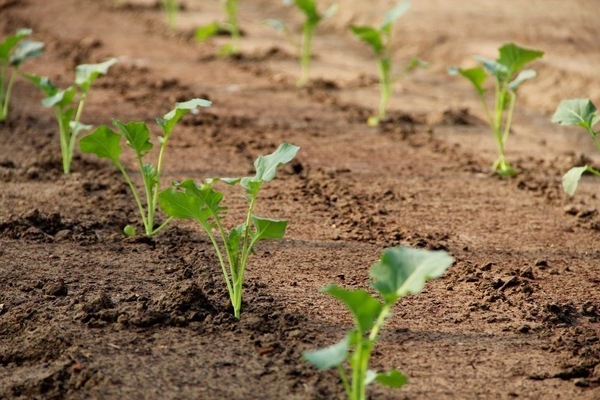
Hullerne laves på forhånd i et skakbrætmønster, så planten får mere plads. Mellem plantager bør ikke være mindre end en halv meter, men plantning for langt anbefales heller ikke.
Hvis du planter en Peking -art, bør afstanden mellem planterne ikke overstige tredive centimeter.
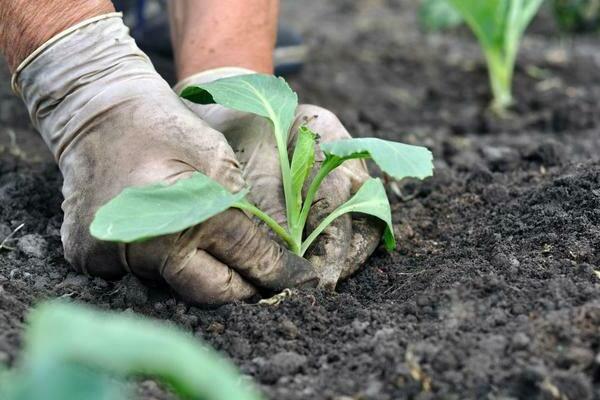
Hullerne forberedes individuelt for hver spire, vandes og plantes. Derefter dækker de det med jord og stamper det.
Bestemmelse af den korrekte afstigningsperiode
Det hele afhænger af kåltypen. Som regel varierer tiden til plantning i haven mellem tredive og femogfyrre dage og er angivet på frøpakken. Frøplanter sås i midten af foråret (tidlige sorter) og i slutningen af april (sent). Plantning af voksne frøplanter i jorden udføres, når jorden allerede er opvarmet, normalt i midten af maj, men det hele afhænger af miljøforholdene.
I nogle regioner kan mindre frost vende tilbage i maj, det ville være bedre at forberede sig på forhånd og bygge et særligt husly. Dette kan gøres fra jernbuer og vævet materiale. Denne struktur vil være nyttig ikke kun til beskyttelse mod naturlige forhold, men vil også hjælpe med angreb af nogle skadedyr.
Plantning af kål: dyrkning af frøplanter derhjemme
Frø af forskellige typer kål sælges i specialforretninger. Hvis frøene har en produktions flerfarvet skal, indeholder de allerede de nødvendige sporstoffer, og jorden behøver ikke yderligere befrugtning før plantning. Sådanne frø er ikke gennemblødte.
De sælger også almindelige frø, der har en brun nuance, sådanne og hjemmelavede frø skal desinficeres inden plantning. Dette vil hjælpe med at forhindre nogle sygdomme, nogle gange kan patogenet forblive inde i frøet. Det anbefales at suge frøene i en opløsning af kirsebærfarvet kaliumpermanganat - beskyttelse mod sort ben, en farlig sygdom, der kan ødelægge alle frøplanter.
En anden løsning af permanganat hjælper med at undgå vaskulær bakteriose. Det er nødvendigt at blande kaliumpermanganat med vand, hvis temperatur ikke overstiger halvtreds grader (du kan holde din hånd i det i et par sekunder). Derefter skal frøene vaskes og eventuelt efterlades i et stykke tid i en opløsning indeholdende nitrogen / fosfor / kalium.
Der er en anden måde at vække frøene på - inde i en gasbindepose skal de nedsænkes i varmt vand i femten minutter, derefter i tre eller fire i køligt.
Inden frø plantes i frøplantebeholdere, skal de dyrkes i en fugtig klud et varmt sted. Når skuddene vises, kan de transplanteres til særlige steder til dette.
Spirede frø plantes strengt en ad gangen på det angivne sted!
Egnet jordblanding
Jorden beregnet til frøplanter skal være neutral og frugtbar. Den ideelle jord består af træaske, frugtbar jord og tørv i et et-til-en-til-et-forhold. Gartnere tilføjer aske selv til specielt købt jord; tørv kan erstattes med humus. En halv liter aske blandes med jordblandingen. Kål har brug for dræning, sand kan spille sin rolle. Det er også nødvendigt at befrugte jorden og planten med mineraler, det er vigtigt at observere den korrekte dosering, så planterne ikke dør.
Inden jorden befrugtes og plantes frø, skal jorden desinficeres. Dette kan gøres med en varm opløsning af kaliumpermanganat eller phytosporin.
Det er bedre at dykke kålfrø, men det er ikke nødvendigt.
Jord- og frøstratificering
Inden frø plantes, jævnes og trampes jorden i beholderen. Til såning er det nødvendigt at lave riller på halv centimeter i en afstand på mindst tre centimeter. det anbefales blot at fordele frøene på stierne og drysse med jord uden at trykke dem indad. Hvis du planter kål i en stor kasse, bør du ikke plante frøene for tæt. Hvis plantning finder sted i separate krukker, kan der placeres flere frø i hullet. Jorden skal altid fugtes ved plantning af frø; når den er tør, kan du sprøjte fra en sprøjte.
Når du har sået frøene, er det bedre at dække dem med polyethylen, de lukkede krukker efterlades på varme steder og ventileres periodisk. I gennemsnit skal frøene spire efter fire dage efter såning, så snart spirerne dukker op, skal filmen fjernes, og frøplanterne skal overføres til et godt oplyst sted. Hvis frøplanterne er overophedede, vokser de hurtigt, men i fremtiden vil frøplanterne ikke være af særlig høj kvalitet.
Plukker
Kål dykker i det øjeblik, bladbladet vises. Plukningen bidrager til den korrekte og gode vækst af rodsystemet, på trods af denne procedure vil kun de stærkeste skud være i stand til at overføre transplantationen.
De fleste kåltyper vokser udover blomkål godt ved lave temperaturer, cirka syv grader. Når spirerne begynder at rette sig, er det bedre at overføre frøplanterne til et køligt rum. Det er bedre at vande kål ovenfra og ikke kun nær rødderne.
Syv dage før plantning i jorden skal frøplanterne hærdes. Du bør udsætte planten for lyset, bringe den til ilt og periodisk ændre temperaturen på det omgivende skift, det vil sige at efterligne reelle naturlige forhold.
Transplantation til bedene udføres, efter at fem til seks fuldgyldige blade er vokset, nogle gange med begyndelsen af ægte varmt vejr, normalt i slutningen af maj.
Korrekt afstigning og pleje
Kål dyrkes næsten altid fra frøplanter. Ved såning af forskellige kåltyper er det bedst at mærke kimplanterne for at forhindre forvirring.Visse kåltyper kræver forskellige væksttemperaturer. Hvidkål vil ikke kunne vokse ved normal stuetemperatur, i modsætning til blomkål, som disse er ideelle betingelser for.
Ved transplantation af kål skal frøplanterne fjernes sammen med en klump jord på dem, hjælp dig selv med en skovl for at gøre det lettere. Som nævnt ovenfor er transplantation ret traumatisk, jo bedre rødderne bevares, jo hurtigere vil planten slå rod. Du skal være forsigtig, planter kan dø.
Det er muligt at så frø direkte i jorden, dette skal gøres i krydset mellem april og maj. I hele vækstsæsonen vil planten være ét sted, dette er et klart plus ved denne metode. Når der sås direkte på bedene, slår kål rod og hærder bedre. Flere frø placeres i hvert hul; kun den stærkeste spir skal være tilbage. Af sikkerhedsmæssige årsager kan frøene lukkes ovenfra med toppen af flaskerne eller dåser, derefter er bedene dækket med mini drivhuse lavet af buer og stof.
Vigtig! Ved plantning af kimplanter kender gartneren procentdelen af frøspiring, dette er en mere rentabel måde.
Plantning af kål: forebyggende foranstaltninger i kampen mod skadedyr
For at forhindre angreb af skadedyr skal jorden behandles ordentligt, og planterne skal sprøjtes regelmæssigt. Tidlige sorter af kål sprøjtes hovedsageligt med folkelige blandinger, for eksempel opløsninger af tobaksstøv, træaske, undertiden peber, blandinger ved hjælp af ammoniak. Disse handlinger udføres i de tidlige morgentimer. For at forhindre, at vingede skadedyr flyver mellem kålene, kan du plante stærkt ildelugtende planter (hvidløg, salvie og så videre). For at beskytte mod sommerfugle kan du hænge æggeskaller mellem sengenes rækker.
For at beskytte sene sorter bruges insekticider.
Tre uger efter plantning er det nødvendigt at spudde kålen. De tager sig af de løsne beplantninger og vander dem i den korrekte tilstand. Overskydende fugt bør ikke tillades, dette kan påvirke planter negativt.
Blomkål skal plantes i et lille skyggefuldt område for at danne blomkålens karakteristiske hvide hoveder. Hvis du planter den under solen, kan farven skifte til lilla eller gul. Du kan oprette en skygge ved hjælp af de tilsluttede blade af selve planten.
En måde at vokse godt på er med sidets og rodklipning. Inden opvarmningen påbegyndes plantes sidetter på bedene, før kål plantes, græsset plantes og et hul graves. Med denne plantemetode er det ikke nødvendigt at løsne jorden og putte planten.
Tidlige sorter modnes normalt i juni, senere op til begyndelsen af kolde snaps. Det er vigtigt at grave kålen op umiddelbart efter den er moden, den overmodne frugt kan revne eller nogle arter skifter farve.
Konklusion
Som et resultat kan vi sige, at kålens kvalitet og sundhed afhænger af et tilstrækkeligt antal faktorer, men hvis du bruger meget energi under dyrkningen, vil du ikke fortryde det.