Lily forplantning og pleje
Indhold:
Liljer er luksuriøse flerårige blomster, der forbløffer med en række nuancer og pragt af blomstring, de har en kæmpe hær af fans rundt om i verden og mange drømmer om at dyrke disse fantastisk smukke blomster i deres sommerhus. Den nemmeste måde at plante en lilje på er naturligvis at købe et løg fra en blomsterbutik eller havecenter og dyrke det i dit landsted. Men hvad nu hvis du vil have et stort blomsterbed med liljer? Eller er der mulighed for at udveksle plantemateriale med naboer i landet? Hvordan får man dette plantemateriale? Du vil sandsynligvis blive overrasket, men ud over den traditionelle reproduktion med datterløg eller "babyer" er der flere flere måder at yngle liljer på, de er ret forskellige, så du kan sikkert vælge den, der er mere bekvem for dig.
Reproduktion af liljer: deling af busken
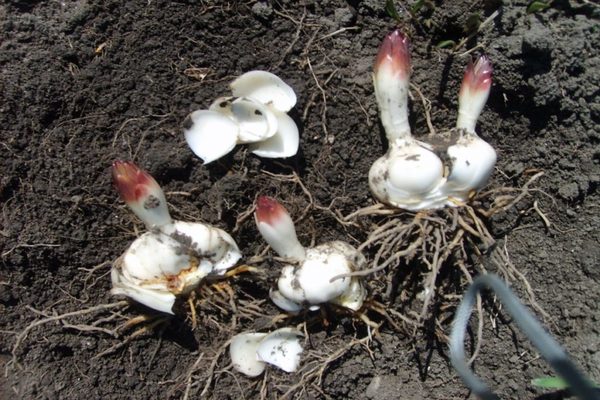
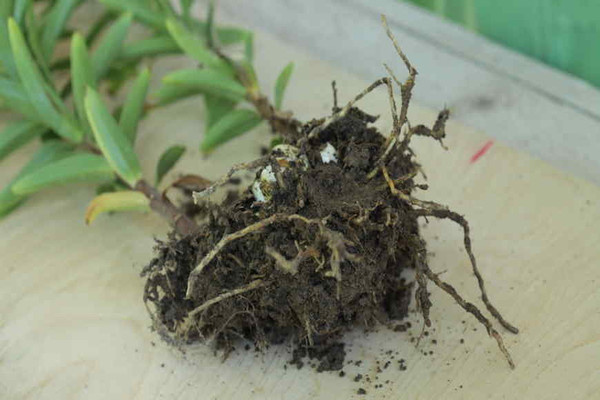
Denne metode er god til hurtigt voksende sorter af liljer, der danner et stort antal løg og skal plantes hvert tredje år. Enhver, selv en ny blomsterhandler, kan klare en sådan procedure, det vigtigste er at forberede sig godt og handle omhyggeligt. Kan du huske, at du voksede en stilk i det første år efter at du havde plantet en lilje pære? Hvor mange af dem er der nu? Det er netop i så mange dele, at du skal dele busken. Forbered brøndene på forhånd til nye planter. Meget omhyggeligt (helst med en hønse, ikke en skovl), grave busken ud, adskil forsigtigt løgene og stilkene og plant hver på sit nye sted. Jeg gentager, at hvis du handler omhyggeligt og omhyggeligt, vil stressen for planterne være minimal, og det næste år vil de blomstre fuldt ud. Det er muligt at udføre proceduren for opdeling af busken om sommeren, efter blomstringens slutning, når planterne forbereder sig på en hviletid. Der er ingen kontraindikationer mod forårstransplantationen, men i dette tilfælde vil liljer sandsynligvis ikke blomstre i den nuværende sæson, da alle kræfter vil blive rettet mod rodfæstelse og tilpasning på et nyt sted. Ved at dele busken får du ikke en hel liljehave natten over, men disse planter blomstrer så hurtigt som muligt.
Lily forplantning: datterløg
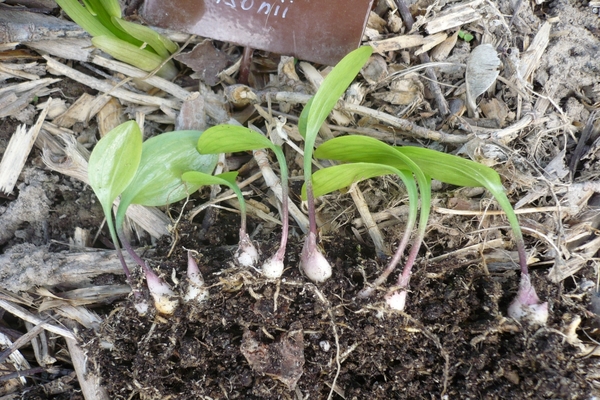
Driftsprincippet er det samme som i den tidligere metode - grave en busk op og adskille de nydannede datterløg eller "babyer". Forskellen er, at dette skal gøres, når planten er færdig med sin vækstsæson, akkumulerer næringsstoffer og går i dvale. Dette sker cirka en måned efter blomstringens slutning, og den sidste visning af stammen kan tjene som et signal for handling. Brug også forsigtigt en hønse til at grave moderplanten ud, inspicere den del af stammen, der var under jorden - det er på den, datterløgene vokser. Mest sandsynligt vil de være små og ude af stand til at blomstre i den næste sæson, så de skal omhyggeligt adskilles og placeres på et specielt forberedt bed med frugtbar jord, hvor de forbliver, indtil de er fuldt dannede. Til vinteren anbefales det at klippe jordoverfladen med halm eller tørre faldne blade for at beskytte unge løg mod frost.
Hvis du næste år opdager, at nogle af dem har dannet knopper, er det bedre at afskære dem, da blomstring vil tage meget energi og ikke vil tillade unge løg at vokse stærkt nok. Efter proceduren for adskillelse af børnene skal morplanten returneres eller transplanteres, det udførte arbejde vil ikke blive reflekteret over det, og blomstringen kommer på det sædvanlige tidspunkt.Efter et år dannes børnene, og de kan transplanteres i blomsterbed til et permanent sted (det er bedre at gøre dette i efteråret). Således får vi blomstrende liljer to år efter adskillelsen af datterløg. Mest velegnet til reproduktion på denne måde er sorterne af liljer, der danner mange datterløg: "canadiske", "gyldne", langblomstrede sorter samt "rovdyr" - "Tigrovaya" og "Leopardovaya".
Bobler
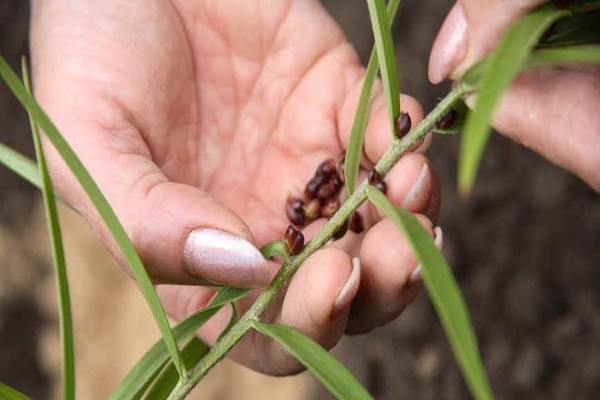
Som vi allerede sagde, er liljer alle meget forskellige, og deres udviklingsproces kan være lidt anderledes. Ikke alle danner udskiftningspærer, ikke alle sorter vokser "babyer" på den underjordiske del af stammen. Der er også sådanne sorter af liljer, hvor børn dannes på luftdelen, i bladpladernes akser og kaldes luftpærer. På den ene lilje kan der dannes flere dusin sådanne luftige løg eller "løg", som så bare falder af, slår rod og derefter udvikler sig som en selvstændig plante. For at undgå fortykkelse af plantagerne er det nødvendigt at kontrollere denne proces og have tid til at samle løgene, før de falder af og begynder at spire. Så snart du bemærker, at der er rødder på dem, skal du prøve at adskille en luftpære fra stammen - hvis det lykkedes let, så er tiden kommet, og du kan samle alle løgene. Deres størrelse overstiger normalt ikke 1 cm i diameter, fra 4 til 8-9 mm, og de er arrangeret i par eller trillinger. Forbered på forhånd det sted, hvor dine liljer vil få styrke i de næste år, for fuldt ud at blive til fuldgyldige blomstrende planter har de brug for tre til fire år, men du vil straks modtage en stor mængde sund, stærk plantning materiale.
Når du har samlet luftpærerne, skal du lægge dem i blød i et par timer i fundamentet, og derefter plante dem i en dybde på 1-1,5 cm, og holde en afstand på omkring 9-11 cm mellem dem. Afstanden mellem rækker af løg skal være mindst 20 centimeter. Ja, nu er de meget små, men glem ikke, at de om tre år bliver til voksne løg, og hvis de er meget tæt plantet, har de ikke nok plads og næringsstoffer. Når du har plantet alt, skal du vande jorden og mulch den ved hjælp af tørv, halm eller grangrene. Som sådan vil dine pærer overvintre. Det næste år, om foråret, skal du rydde mulden af og give let adgang til liljer og pleje dem som sædvanligt - vand og ukrudt rettidigt. I løbet af dette år vises kun blade på jordens overflade, sandsynligvis vil stammen ikke blive dannet, og pæren vokser i diameter til omkring 11-13 mm.
I et andet år vil løgene allerede kunne vokse en lille stilk, ikke mere end 30 cm høj, men i det tredje år kan knopperne allerede begynde at binde. Og fra den fjerde har du et bestemt antal fuldgyldige voksne løg, der er i stand til at blomstre voldsomt og i lang tid. Hvis du på forhånd har planlagt for den nuværende sæson at reproducere liljer ved hjælp af luftpærer og ønsker at få så meget plantemateriale som muligt, anbefaler erfarne blomsteravlere at fjerne liljeknopperne, før de begynder at blomstre. I dette tilfælde danner blomsten et større antal luftpærer, og de vokser mærkbart større, hvilket betyder, at de vil have mere styrke til yderligere rodfæstning og vækst. Men der er sorter, der i princippet ikke danner løg, så denne avlsmetode er ikke egnet til dem, det er asiatiske typer liljer, rørformede sorter samt "Tiger Lily" og "Sargent".
Lodret rodning af skæringen
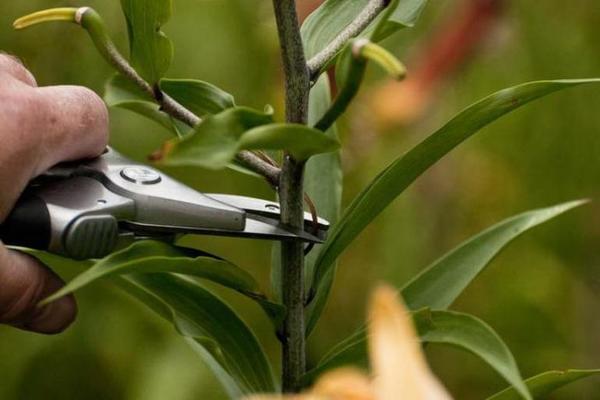
Skæring er en kendt metode til formering, der bruges til både indendørs planter og haveblomster. Det er nødvendigt at gøre dette om foråret. Adskil en blomsterskud 10-14 centimeter lang fra planten, ikke mere. Brug kun meget skarpe og desinficerede værktøjer, plantens sundhed afhænger stort set af dette.Forbered en blomsterpotte på forhånd med nærende jord og et lag ekspanderet ler (dræning er altid en forudsætning for dyrkning af løgplanter). Dyp stilken i roden og plant i jorden. I tilfælde af at det allerede er anden halvdel af maj i gården, og det er varmt nok udenfor, kan du plante skåret direkte i det åbne terræn. Under alle omstændigheder, efter plantning, vand skærebrønden og dæk med en hætte fra en skåret plastflaske - i et sådant "drivhus" skabes et ideelt mikroklima til forankring. Glem ikke at bevare jordens fugtindhold, og efter et par uger vil skuddet slå rod, du vil lære om dette ved fremkomsten af nye unge blade. Og efter et stykke tid vil datterløg begynde at danne sig nær bunden af skæringen, på dette tidspunkt anbefales det at spudde planten for at øge deres antal. I sensommeren - det tidlige efterår skal de dannede løg adskilles og plantes, så de dannes og vokser. Blomstringen i dette tilfælde vil sandsynligvis være i det andet år.
Horisontal rodning af skæringen
En meget bekvem reproduktionsmåde, hvor du ikke kan ofre blomstring i indeværende år, men udføre alt arbejdet efter afslutningen. Og du kan også bruge liljen fra buketten, der blev præsenteret for dig, hvis du kunne lide blomstens skygge så meget, at du ville dyrke den på dit websted (godt eller af eksperimentets skyld). Du skal bruge en stængel af en plante, men hvis du tager den fra et blomsterbed, skal du ikke skære den ved roden, efterlade en del af skuddet med blade, så fotosynteseprocessen ikke stopper, og løget kan forberede sig på vinter. Vælg et skyggefuldt sted, forbered jorden ved at grave den op og rydde den for ukrudt, lav en fure på ikke mere end 3 cm dyb, læg skæringen vandret der og dæk den med jorden. Derefter skal du vande rigeligt, og du kan bruge et af de lægemidler, der fremskynder forankringsprocessen: "Epin", "Zircon", "HB-101". Derefter dækkes jorden med folie eller geotekstiler et stykke tid for at forhindre fordampning af fugt og opretholde en optimal temperatur. Efter cirka et par måneder dannes der løg på håndtaget, som kan plantes næste forår.
Og om vinteren skal du ikke glemme at klippe jorden for at beskytte planterne mod frysning. På samme måde kan du få plantemateriale i en lejlighed. For at gøre dette har du brug for en kasse til blomster, udvidet ler og nærende jordblanding. Til vinteren flyttes kassen med stiklinger og løg bedst til en glaseret altan, forudsat at temperaturen der er over nul (ellers fryser planten i kassen). Efter et år kan løgene transplanteres i jord eller plantes i forskellige beholdere, så de vokser til den ønskede størrelse.
Lily forplantning: blad rodfæstning
Liljer er virkelig alsidige planter, når det kommer til avlsmetoder! Lad os diskutere, hvordan du kan rodfinde et blad og få en løg fra det. Denne metode er bedst egnet til følgende sorter: "Snehvide", "Tiger", "Regale", "Maksimovicha lilje", "Thunberg lilje" samt til svovlfarvede og langblomstrede liljer. Det er nødvendigt at plukke (bare plukke, ikke afskære) bladene fra den øverste halvdel af stammen i den periode, hvor planten danner knopper. Plant derefter bladene i en nærende jord, men ikke lige, men ved en lille hældning (halvdelen af bladet skal være i jorden). Plantning foretages bedst ikke i åbent terræn, men i beholdere med et drænlag, frugtbar jord og et øverste lag flodsand. Dæk planterne med en pose eller en plastflaske, byg et drivhus, ventiler hver dag, og efter 3-4 uger vil du bemærke, at små løg vises ved bunden af bladene. Fra dette tidspunkt kan dækslet fjernes. I vinterperioden skal beholderen placeres i et koldt, men ikke frysende rum. Eller alternativt begrave den i din have og klippe den ovenpå.Om et år er løgene klar til transplantation, men det vil tage yderligere 2-3 år for dem at få styrke og forberede sig til blomstring.
Reproduktion ved hjælp af skalaer

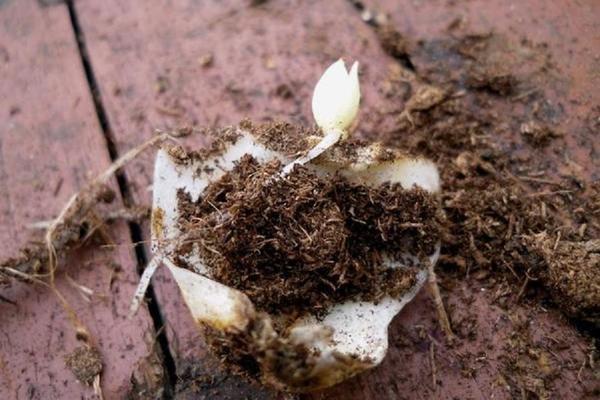
En vidunderlig måde at opdrætte liljer på, som er velegnet til alle liliesorter, uden undtagelse, påvirker ikke moderpærens sundhed og giver dig mulighed for at få en god mængde materiale til plantning. Du kan arbejde når som helst på året, hvilket også er meget bekvemt. Hvis løg af påskeliljer eller tulipaner er hele, består løken af en lilje af skæl. Normalt er de ydre skalaer let bøjet udad, så det vil være meget let at adskille dem. Og du kan adskille cirka en tredjedel af det samlede beløb uden at skade hovedpæren. Men det er bedre ikke at lade sig rive med og begrænse dig til det ydre lag, da det er dette materiale, der i sidste ende vil være det mest produktive - takket være en sådan skala vil du modtage omkring 6 løg inden for en periode, men de blomstrer først efter 2-3 år.
Så snart salget af plantemateriale begynder i butikkerne (ofte sker dette allerede i slutningen af vinteren), kan du shoppe. Med den nødvendige viden kan du nu kun købe et løg af hver sort, du kan lide, og dermed spare meget. Forbered en tæt pose og fyld den med tørv, kokos, sphagnum eller bare en nærende tørvblanding efter eget valg, stans små huller i den for at give ventilation. Adskil den ydre række flager fra løgene, læg dem i en pose fyldstof, og dæk også med fugtet fyldstof. Bind posen og sæt den et varmt sted, hvor den vil blive i en måned ved en temperatur på omkring 22-25 grader Celsius. Efter denne tid, gennem posen, vil du se, at løg er begyndt at danne på skalaerne. Om et par måneder vil de tage form så meget, at de kan plantes i separate beholdere og transplanteres i et blomsterbed i slutningen af august eller i september. Blomstringen kommer om et par år. Hvis du planlægger at formere ikke købt materiale, men liljer, der vokser i dit blomsterbed, så vil det være mest praktisk at gøre dette i efteråret. På dette tidspunkt går pæren i dvale, den kan graves ud for at flytte til et nyt sted uden frygt for at skade planten. Fortsæt derefter på samme måde, men når løgene vises på vægten og planter dem i forskellige beholdere, skal du placere dem i et rum med en lavere temperatur (ca. 15-16 grader Celsius) for at observere plantens naturlige årlige cyklus. .
Forplantning af liljer: såning af frø
Ikke den mest populære avlsmetode for løgplanter, men da der er et sted at være, vil vi også diskutere det. Formering ved at så frø er kun mulig for artsorter, denne metode er ikke egnet til hybrider. Dette er en meget omhyggelig og lang proces, og oftest bruges den kun af specialister, der skaber nye arter. Men det betyder slet ikke, at du ikke kan prøve at dyrke liljer fra frø. Men nogle typer liljer skal kunstigt bestøves, det er den eneste måde at få et fuldgyldigt plantemateriale på. Og uafhængigt kan frø af høj kvalitet fås fra følgende liliesorter: "Lily Henry", "tibetansk lilje", "Lily Uiolmotta", "Shaffrannaya", "Daurskaya", "Regale", "Martagon", "Lilia Maksimovich "," Hængende lilje ". Lily frø kan opdeles i to typer: over jorden og under jorden. De første udvikler sig som de fleste planter - bladene kommer ud til overfladen og vokser. Det andet - bladbladet forbliver i jorden, og det første rigtige blad kravler ud af jorden. Frøkasserne skal opsamles, så snart de bliver mørkere, for hvis du venter længere, er det meget let at gå glip af øjeblikket og miste frøene. Hvis du har et stort antal frø til rådighed, kan du så dem direkte i blomsterbedet.Hvis mængden er begrænset, anbefales det at for-vokse frøplanter derhjemme (så, pluk derefter i separate potter), og når det bliver stærkere, transplanter det i haven.
I tilfælde af reproduktion af liljer ved frø af blomstring skal du vente længst - mindst fem år og muligvis mere.
Dissektion af bunden
Og afslutningsvis en mere, meget usædvanlig måde at yngle liljer på. Dens åbenlyse ulempe er, at moderpæren dør, men antallet af dannede datterpærer vil være meget større end i noget andet tilfælde. Brug derfor kun denne metode, hvis du er klar til at donere en af de voksne liljer. I foråret tager du en voksenpære og skærer forsigtigt bunden (bunden af pæren, hvor rødderne vokser). Derefter plantes det, men ikke som normalt, men tværtimod - på hovedet. Derefter skal du bare vande og fjerne ukrudt, mulch til vinteren. Og i foråret, efter at have gravet pæren op, finder du mange "babyer", der skal placeres i blomsterbedet for yderligere vækst.
Opsummerende
Vi diskuterede ni forskellige måder at yngle liljer på, takket være hvilken du kan øge antallet af smukke liljer i dit sommerhus. Nogle metoder er mere besværlige, andre tværtimod er meget enkle. Ja, i de fleste tilfælde bliver blomstringen nødt til at vente i flere år, men når den kommer, vil du modtage stor tilfredshed og glæde fra det udførte arbejde. Vælg den mest bekvemme måde for dig, og gå efter det!