Reproduktion af roser
Indhold:
Kort om forplantning af roser
Denne vidunderlige og sarte plante kan formeres på flere måder. Enhver blomsterelsker bør vide, hvordan man formerer en rose. Traditionelt bruges kun et par metoder: 1) Ved hjælp af frø; 2) Ved hjælp af en vegetativ metode. Formering af roser ved hjælp af frø bruges hovedsageligt af dem, der er involveret i valg af arter. På en vegetativ måde bruger alle det. Når du bruger det, kan du bevare egenskaberne af forælderplanten.
Formering af roser ved hjælp af frø
Du kan købe frømateriale i en specialiseret haveforretning, eller du kan samle det direkte fra dine planter. Du skal begynde at samle frø, så snart frøpladen begynder at blive rød. Spiringsprocenten af sådanne frø er højere.
Procedure
1) Du skal skære rosenfrugten og forsigtigt fjerne frøene derfra;
2) Skyl dem i en opløsning, der skal tilberedes på forhånd. Sådan tilberedes: Bland et glas rent, varmt vand med to teskefulde blegemiddel;
3) Skyl derefter frøene så grundigt som muligt fra blegemiddelopløsningen;
4) Forbered en opløsning af hydrogenperoxid med en koncentration på tre procent. Du skal suge frøet i det;
5) Kontroller frøene fra tid til anden. Fjern dem, der flyder til overfladen, de kan ikke bruges.
Reproduktion af roser: stratificeringsregler
Stratificering udføres for at øge andelen af kimplanter. Du skal grundigt suge en ren klud eller en ren vatrondel i hydrogenperoxid. Pak frøene der. Derefter skal det lægges i en plastikpose. Dernæst skal du sørge for et køligt sted med en temperatur på tre til fem grader. Denne kølighed vil stimulere frøets frøplante. De skal af og til kontrolleres for skimmelsvamp. Hvis der forekommer skimmelsvamp på frø, skal de kasseres. Du kan gøre og meget lettere: så frøene direkte i beholderen. Dæk med et låg, sæt på et køligt sted. Den ideelle jord ville være en blanding af perlit eller vermiculit og næringsjord.
Reproduktion af roser: hvordan man sår frø
Frøene klækkes om cirka femogfyrre til tres dage. De kan plantes direkte i jorden, der fylder den valgte beholder. Under plantningen skal du drysse frøene med midler fra at rådne rodsystemet, for eksempel kan du bruge et lægemiddel kaldet captan.
Hvis et sådant værktøj ikke var til stede, eller hvis du ikke havde tid til at købe det, kan frøplanterne sprøjtes fra tid til anden med en opløsning af hydrogenperoxid. Det anbefales også at klippe hullerne med perlit.
Beholderne, hvor du plantede frøene, skal du lægge dem væk fra direkte sollys, ved standard stuetemperatur og stabilisere vandingsregimet. Planter begynder at spire om tyve til tredive dage. Og form de første knopper på omkring halvtreds til tres dage.
Såning af frø foretages bedst midt på foråret. Men det skal huskes, at rosenfrø spirer meget dårligt, så du bør fylde op med en stor forsyning af frømateriale. De frøplanter, der er opstået, skal opdeles i stærke og svage. Stærke frøplanter skal transplanteres i individuelle krukker, hvor de kan blomstre efter et bestemt stykke tid.
Reproduktion af roser på en vegetativ måde
I sig selv betyder vegetativ formering plantens evne til at regenerere fra sin separate del. For eksempel fra løv, rod eller stamme.
Grundlaget for denne metode er, at planteorganismer kan komme sig gennem celledeling. Planter opnået på denne måde vil have de samme egenskaber og egenskaber som deres forældre plante.
Med disse metoder kan alle kendte dyrkede sortroser formeres. Der er flere muligheder for dette: 1) Brug af lagdeling; 2) Ved hjælp af afkom; 3) Brug af stiklinger; 4) Ved at dele busken; 5) Ved vaccination.
De planter, der dyrkes ved hjælp af den vegetative metode, kvalificeres som rodfæstede. Sådanne planter vil, selv efter døden af al deres grønne masse, frigive skud fra rodkraven. De vil udvikle sig lidt langsommere end dem, der er vaccineret. Overvintring tolereres ikke særlig godt. Men det er meget lettere at dyrke dem.
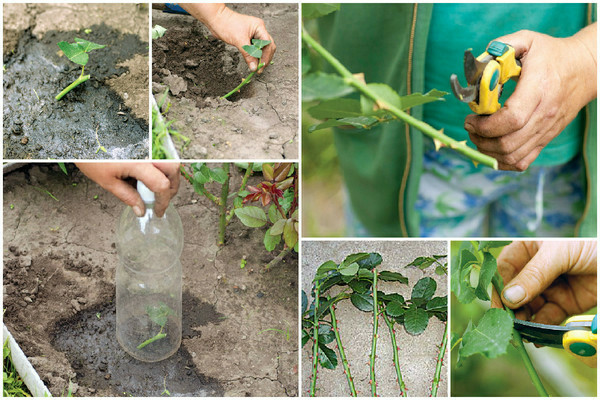
Sådan rodes med lagdeling
Denne metode kræver stærke og lange skud. Roser går: 1) Klatretype; 2) Jordblodstype; 3) Buskarter. Det er bedst at starte denne proces i begyndelsen af sommerperioden. Det anbefales, at du vælger skud, der ikke er placeret meget dybt under jorden. For deres chance for at danne rodsystemer er højere. Det er meget vigtigt: 1) Befri jorden for ukrudt; 2) Udfør en dyb grave; 3) Tilsæt tørv; 4) Påfør groft sand.
Traditionel metode til formering af roser
Alt løv skal fjernes fra et passende skud. På den nederste del af skuddet skal du lave et snit på den valgte knop og derefter placere en ren chip der. Dette vil hjælpe med at stimulere dannelsen af rodsystemet. Ved siden af hullet, hvor busken vokser, skal du grave en lille rille, dybden skal være omkring ti centimeter. Hvis skuddet ikke bøjer, kan du styrke det med metal- eller træbuer.
Drys skuddet med jord, let tamp og vand. Vanding skal være stabil. Hvis sommervarmen er på gaden, skal du gøre dette flere gange om dagen.
I begyndelsen af efterårsperioden skal skuddet skilles fra forældereksemplaret. Og efter femten til tyve dage kan toppen skæres af. Efter et stykke tid skal du transplantere til et permanent habitat. Men hvis rodsystemet ikke er tilstrækkeligt udviklet, skal transplantationen udskydes til næste forår.
Formering af roser efter metoden med lodrette lag
Disse metoder bruges kun i tilfælde: 1) Hvis sorten, som planten tilhører, tolererer beskæring godt; 2) Hvis planten skal formeres til efterfølgende salg.
Procedure
1) Inden overvintringen skal du skære rosen, så der kun er en fem til syv centimeter lang spire tilbage af den; 2) Om foråret, når skuddene allerede er vokset til ti til femten centimeter, skal der foretages hilling, så kulturen er fuldstændig dækket af jord. Du er nødt til at kramme under hele vækst- og udviklingsvarigheden.Jorden skal være varm og let fugtig; 3) Mod slutningen af efterårsperioden, når løvet allerede er faldet af, og planten vil forberede en hviletid, skal jorden barberes let af kulturen. De skud, der formåede at slå rod, skal meget omhyggeligt afskæres fra forælderprøven og transplanteres til et nyt sted.
Formering af roser efter metoden med rodsystemets afkom
Denne metode bruges oftest til formering af parker af roser. Det er jo disse roser, der producerer et stort antal afkom. Dette er den nemmeste, men den mindst produktive, i betragtning af mængderne.
Hvad er afkom
Rodudløbere er de skud, der vokser lige og dannes ved afgrødekanten. Det største antal genereres af den sydlige del af busken. Du kan simpelthen afskære deres morprøve, og du får allerede en ny plante.
Sådan håndteres afkom af rodsystemet
De afkom, der lige er kravlet op til jordoverfladen og endnu ikke har dannet deres rodsystem, modtager mad fra moderprøven. Rotsystemet begynder først at danne sig efter ti til tolv måneder, lige efter dette tidspunkt kan du begynde at adskille afkommet. Du kan begynde at holde denne begivenhed i begyndelsen af foråret, det vil sige når jorden allerede er optøet. På tidspunktet for transplantation skal en tredjedel af dens længde afskæres fra stammen, dette vil stimulere kulturen til at danne et rodsystem og rigelig buskethed.
Formering af roser ved stiklinger
Dette er en ret let proces og kan udføres af enhver planteelsker. Ved hjælp af denne metode kan selv blomster fra en buket formeres. Denne metode er mest velegnet til roser som: 1) Klatrerose; 2) Miniaturerose; 3) Polyanthus rose; 4) Nogle af floribunda -sorten.
Fordelene ved denne metode er, at: 1) Der er meget materiale til plantning; 2) Du skal ikke bruge økonomisk; 3) Ingen grund til at vente længe. Den anbefalede tid for denne begivenhed er slutningen af den første måned, begyndelsen af den anden måned i sommerperioden.
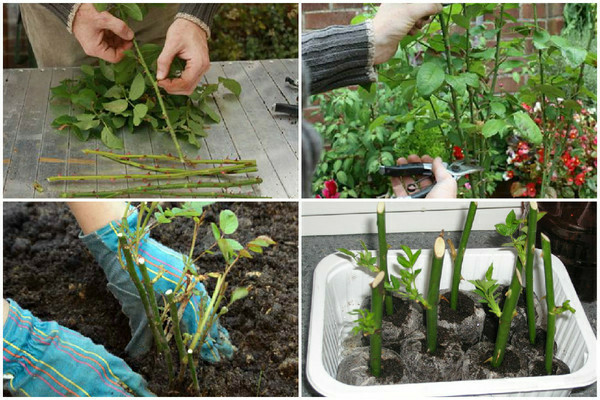
Sådan tilberedes stiklinger
For at gøre dette skal du flygte, som allerede er et år gammel. Skær toppen af den, for den er ikke nødvendig. Kun midten af optagelsen bruges. Skuddet skal være fem til seks millimeter tykt. Skær unødvendige dele af, det anbefales lige før plantning. Der skal være to eller tre knopper på håndtaget. Det øverste snit skal være to centimeter over selve nyren, og det nederste snit lige under selve nyren. Til skæringsformål skal der bruges et rent og skarpt instrument. De nederste par blade skal fjernes, kun to eller tre blade kan efterlades, tornerne skal også fjernes. Bundsnittet på planten skal behandles med et middel for at stimulere vækst og udvikling. Du skal lande i en vinkel på femogfyrre grader. Hvis antallet af egnede stiklinger er meget stort, kan du rode dem i rent, varmt vand.
Reproduktion af roser i drivhusforhold
Hvis der er mange stiklinger, ville rodfæstning i et drivhus være en rimelig mulighed. Det anbefales at montere den yderligere tyve til tredive dage før den planlagte afstigning.
Drivhusplads
Et let skraveret, åbent område bør vælges som et sted til at bygge et drivhus. På katten bør underjordiske farvande ligge i hundrede halvtreds eller to hundrede centimeter.
Drivhusjord
Du skal grave et hul, den længde du har brug for, bredden skal være hundrede til hundrede og halvtreds centimeter. Dernæst skal den fyldes tres procent med flydende husdyrgødning og dækkes med en film, så alt er ordentligt spolet tilbage. Det vil tage omkring ti til fjorten dage for drivhuset at varme op og krympe jorden. Efter denne tid kan filmen fjernes. Og hæld en blanding af spadestik og bladjord i kuldet i et to-til-et-forhold. Eller bland næringsjord og tørvejord i et et-til-et-forhold.På toppen skal du lægge et lag på tre til fem centimeter groft sand.
Reproduktion af roser: hvordan man planter
Inden plantning skal jorden skurres grundigt. Du skal ikke plante dybere end femten til tyve millimeter. Afstanden mellem kimplanterne skal holdes på fem centimeter, og afstanden mellem rækkerne skal være mindst otte til ti centimeter. Samtidig er det meget vigtigt at sikre, at snittet på den nederste del var helt i jorden, og ikke kun i et lag sand. Umiddelbart efter plantning skal du spilde frøplanterne med vand og dække drivhuset med en gennemsigtig film.
I de første ti til fjorten dage efter transplantation skal du være særlig opmærksom på frøplanterne, du skal sprøjte det dagligt, cirka fem til syv gange. Og overvåg jordens fugtindhold. Hvis det er sommervarme udenfor, skal du ventilere drivhuset, for cirkulation af frisk luft er også meget vigtig. Efter femten til tyve dage kan sprøjtningen reduceres til tre gange om dagen. Procentdelen af luftfugtighed skal være på halvfems. På omtrent samme tid begynder de plantede stiklinger at danne hård hud, og efter yderligere femten til tyve dage begynder de at danne et rodsystem, og blomsterknopper vil vokse. Så snart dette begynder at ske, skal filmskuret demonteres. Knopperne skal også klemmes af, så de ikke fjerner de kræfter, der skal gå til vækst og udvikling. Det er dog for tidligt at transplantere til et fast sted. De skal stå i drivhusforhold til næste forår.
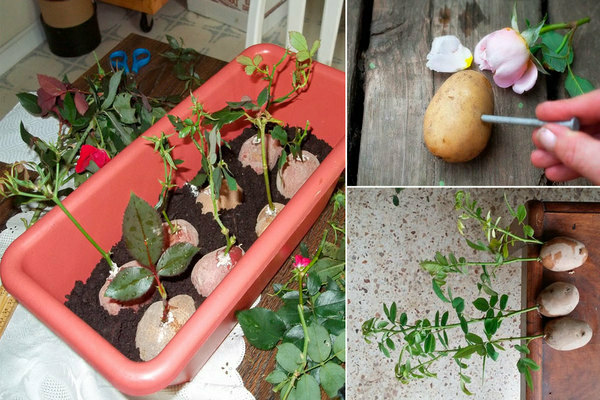
Sådan formeres stiklinger fra en buket
Til en sådan proces er det påkrævet at skære midten af stilken i separate stiklinger på op til tolv til femten centimeter i længden. De skal have to eller tre blomsterknopper. Det øverste snit skal laves femten millimeter fra nyren. Snittet af den nederste type skal udføres i en vinkel på femogfyrre grader og derefter cauteriseres med strålende grønt eller kaliumpermanganat. Alle torner og lavere blade skal fjernes. Og det øverste løv skal reduceres med en tredjedel. Inden plantning anbefales det at lægge fremtidige frøplanter i en opløsning med en vækststimulator i tolv timer. Aloe juice betragtes som meget produktiv. Delen i bunden af skæringen skal rulles i vækstpulver og plantes i jorden, der er dækket med et lag groft sand, til en dybde på femten til tyve millimeter. Hver stilk skal plantes i en separat kop og dækkes med en plastflaske ovenpå uden hals. Således vil frøplanten have drivhusbetingelser for vækst og udvikling. Dette er en enkel, men ikke særlig produktiv måde.
Af ti frøplanter vil kun tre give rødder.
Mest af alt er denne metode velegnet til roser med mørke farver, for eksempel: 1) Mørk pink; 2) rød; 3) Maroon og så videre. Planter med lyse toner er de mindst bøjelige til denne metode: 1) Delikat orange; 2) Lyserød; 3) gulagtig; 4) Hvid.
Sådan formeres stiklinger under en krukke
Dette er ikke en vanskelig, men endda praktisk metode til avl. Stiklinger skal som altid stratificeres. Det valgte sted skal være lidt i skyggen, det vil sige uden direkte sollys. Plantning skal udføres midt i efteråret, det vil sige tredive til fyrre dage før vinterperioden. Det er nødvendigt at uddybe stiklinger med en lille hældning, cirka til de nederste knopper. Under en krukke kan to eller tre frøplanter være nok. Efter plantning har de brug for rigelig vanding. Hvis der ikke er regn, skal du fugte jorden selv. Og efter cirka tredive til fyrre dage vil du være i stand til at observere, hvordan løv dannes på håndtaget. I vinterperioden skal du dække glassene meget godt med faldne blade. Allerede i foråret, med stabilt varmt vejr, omkring slutningen af maj, kan dåsehuset demonteres.
Reproduktion af roser: metode til opdeling af busken
Dette vil kræve voksne prøver med flere skud.Selv i begyndelsen af forårsperioden er det nødvendigt at grave dem helt ud, rødderne med skud skal afskæres med en tredjedel af deres længde. Hvis du skal udføre denne procedure lige om foråret, skal du forkorte skuddene med to tredjedele. Det bedste tidspunkt for en sådan begivenhed anses for at være aften. Hver separat del af busken skal have et stykke af rodsystemet og et skud, der vil have to eller tre knopper. Skæreværktøjet skal være rent og skarpt, inden det skæres, anbefales det at desinficere objektet.
Efter frøpladernes rødder skal du dyppe i syv af ler og mullein (i lige store mængder) og plante. Plantedybden skal være cirka fem centimeter. Efter afstigning skal du kaste og løsne alt godt. Efter tolv til tyve måneder vil frøplanterne blive stærkere og vil kræve titlen på en voksen prøve.
Reproduktion af roser: formeringsmetode ved hjælp af podning
Grafting af en plante kan man sige en metode på kunstigt grundlag, fordi stilken simpelthen er klemt. Denne metode vil forårsage meget mindre sundhedsskade for sorter af roser. Det bedste tidspunkt for en sådan procedure anses for at være vinter og perioden fra april til august, fordi det er i disse sæsoner, at saftstrømmen aktiveres. Eventets succes vil afhænge af kvaliteten af selve anlægget. Visne eller forfrysede stiklinger virker ikke. Men hvis stiklinger begyndte at tørre for ikke så længe siden, kan du prøve at genoplive dem.
Det er nødvendigt at putte i vand og observere i flere dage.
Til podning til en rose kan du bruge hybenkviste. Men ikke fra alle. Da rosen elsker varme, kan den acceptere: 1) fugtresistente arter af hyben; 2) Frostresistente hyben; 3) Tørkebestandige hybenarter. Hybener skal kunne have et stærkt, sundt og kraftfuldt rodsystem i deres arsenal. Roser kan være: 1) Rynket rose; 2) Kanelrose; 3) Needle Rose; 4) Hunderose.
Reproduktion af roser: podningsmetoder
Der er to måder at plante en plante på.
Sommervaccinationsmetode
Dette er den mest populære og succesrige måde. Det kaldes også spirende og kighul. Anbefales at udføres fra tiendedele juli til tiendedele august.
Hvordan skal man opføre sig
Der er flere obligatoriske trin: 1) Hybenrodens hals skal renses godt for det jordiske koma, og sideskuddene skal skæres af; 2) På samme hals skal du lave snit i form af bogstavet "T" med følgende parametre: 1) En vandret linje inden for to til fem centimeter; 2) En lodret linje inden for en centimeter. Barkbeklædningen skal skubbes forsigtigt fra hinanden; 3) Fra stiklinger til podning er det nødvendigt at fjerne den øvre del og alt løvet. Du skal også fjerne et kighul ved hjælp af en bevægelse nedefra og op. Hvis der er et ekstra træ, skal du også slette det; 4) Det fjernede kighul skal placeres omhyggeligt i snittet. De dele, der vil stikke frem, skal skæres af. Det inokulerede område skal være tæt forbundet med spirende tape; 5) Efter femten til tyve dage skal du kontrollere, hvor vellykket vaccinationen var. Hvis snittet med øjet bevarede sin grønne nuance og steg lidt i størrelse, så var alt korrekt, og vaccinationen lykkedes.
Før vinterperioden skal roserne uden tvivl spydes, men dette skal gøres, så jorden hylder højere end selve spirende med fem centimeter. I det tidlige forår skal frøplanterne fortrydes lige under podningsstedet. Fjern selve filmen, afskær den øverste del i en afstand af en centimeter fra det spirende sted. Efter ti til femten dage vil knoppen gradvist vokse og med tiden give anledning til et ungt skud. Hvis du vil danne en busk, skal du knibe unge skud under det fjerde par løv.
Vinterpodningsmetode
Den anbefalede tid for det er slutningen af vinterperioden, cirka i februar måned. Det er nødvendigt at begynde at forberede stiklinger til podning siden sidste efterårsperiode.De kan opbevares i kælderen i en fugtig blanding af groft sand og savsmuld. Fra midten af vinteren skal skuddet flyttes til et lidt varmere sted, hvor det også skal graves ind og få lov at ligge i syv dage. På håndtaget skal du lave et snit skråt og kombinere det med det andet snit. Derefter skal du spole stiklingerne tilbage med en film og straks behandle dem med en haveblast.
Planter podet ved denne metode skal foldes med en lille hældning og begraves i en blanding af våd mos og savsmuld. Efter et par dage kan de transplanteres i et separat kar og opbevares et varmt sted. Og med forårets ankomst kan du lande i haveforhold.
Reproduktion af roser: tips fra erfarne blomsterhandlere
Første tip
De ideelle podestiklinger bør være dem, der har vokset i to til tre år og har en veludviklet hals af rodsystemet, tykkelsen skal være omkring otte til ti millimeter. Barkdækslet skal også være modent, hvilket betyder, at det let kan komme af, når det skæres.
Andet tip
Hvis du laver sommerpodning, skal du gøre dette med planter, der allerede er falmet. Skuddene, som øjnene tages fra, skal være stærke og sunde. Dens tykkelse skal være cirka fem til syv millimeter.
Tredje tip
Skær skuddene af efter vandingsproceduren. Inden podningsprocessen skal den opbevares i et vådt væv. Hvis vejret er regnfuldt, er det bedre at nægte vaccination.
Reproduktion af roser: konklusion
Med korrekt udførelse af procedurer og korrekt pleje vil smukke, sunde og frodige blomstrende buske altid glæde dig. Det er værd at huske, at rosen er en temmelig skrøbelig og sart plante, selvom den har skarpe torner på stænglerne. Det er bydende nødvendigt at give hende omsorg og opmærksomhed.