Hindbær espalier
Indhold:
Kort om hindbær
Hindbær er en vanvittig sød og elsket bær, der er elsket af både børn og voksne. Disse bær modnes hurtigt, har en smuk lugt og god smag. Hindbærbuske formerer sig ganske let og hurtigt; pasning af hindbær kræver ikke megen indsats. Og hvis du planter en ny busk, vil det næste år allerede glæde dig med sine søde frugter. For at forenkle den allerede simple pleje af bær, hjælper en hindbærspalje, som vi vil tale om i denne tekst.
Trellis til hindbær: plantning og pleje af dine yndlingsbær
Hindbærbuske er uhøjtidelige, men de giver samtidig god smag og febernedsættende medicin. Fra hindbær opnås en meget velsmagende og sund syltetøj, som ikke skader at lukke den til vinteren. De tætte buske af disse bær adskiller sig ikke kun i smag, men også i skønhed, sådanne buske kan fylde dit websted, og det vil se meget gavnligt ud.Du kan plante hindbær både i efteråret og foråret. Hvis processen med at dyrke hindbær virker vanskelig, så er det ikke. Hvis du giver hindbær den rigtige pleje, så slår det meget hurtigt rod og begynder at glæde sig over et rigt afkom. Nu må vi forstå, hvordan vi alligevel skal binde hindbær til espalierne?!
Familie, blomstring, frugt
Hindbærbusken tilhører Pink -familien. Det er normalt en lige, lille busk med ret små torne. Blomsterne af denne plante er meget små. Der er mange blomster i hindbær, fra lyserød til næsten sort. Bærene er også gule i farven.
Andet leveår
I det andet år af buskens eksistens vises grene på den, hvorpå bær vil vokse. I nogle regioner i Rusland sker dette allerede i det første år. I øjeblikket er der opdrættet remontant sorter af disse bær, som bærer frugt selv ved lave grader.
Trellis til hindbær: muligheder for plantning og fodring af hindbær
Det er værd at plante bær på neutral eller let sur jord. Du skal finde et sted til en busk, der er solrig og skjult for vindstødene. Du skal også tage højde for, at før det vokser planter, der er tilbøjelige til de samme sår som i hindbær, ikke i dette område: tomater, jordbær, kartofler og andre.
Hvornår skal man plante
De bedste årstider til plantning af bær er forår og efterår. Det tilrådes at forberede jorden til plantning på forhånd, hvis du planter om efteråret, derefter tredive dage før plantning. Hvis i foråret, så fjorten til tyve dage før afstigning.
Hindbær espalier: Plantning Site Stratification
Inden afstigning skal det fremtidige sted for hindbær beskyttes med skifer og grave det ned i en dybde på tredive til fyrre centimeter. Denne procedure udføres, så rhizomerne i vores buske ikke bevæger sig til uønskede landområder. Afstanden mellem busken og hegnet skal være omkring hundrede centimeter. Der er et par måder at dyrke bær på.
Separate buske
Separate buske - omkring ti til tolv grene efterlades på busken og plantes i forskellige huller.
Til plantning i separate buske skal du grave huller med en diameter på omkring fyrre centimeter med halvtreds centimeter. I hvert hul er det nødvendigt at fylde planteblandingen med en lille bakke. Før du planter buskens jordstængler, skal du fugtige mulleinen lidt i en næringsopløsning. Derefter sænkes buskene ned i hullet, og buskens jordstængler er dækket med et frugtbart jordlag.
Det er nødvendigt, at afstanden mellem buskene er omkring hundrede centimeter, og mellem rækkerne omkring to hundrede centimeter. Rhizoms hals skal se tre til fire centimeter ud over jorden, så den efter plantning og kunstvanding vil være i samme højde med jorden. Det er umuligt at sænke buskens jordstængler for lavt, så basalknoppen ikke begynder at rådne. En høj plantning er heller ikke egnet til buske.
Grøftemåde
Grøftemetode - buskene plantes i en enkelt række i skyttegravene.
I varianten af rendegravning skal du grave et hul med en diameter på omkring femogfyrre centimeter med halvtreds centimeter. Antallet af skyttegrave afhænger af antallet af rækker hindbær. Afstanden mellem rækkerne skal være omkring hundrede centimeter, og mellemrummet mellem buskene skal være omkring femogfyrre centimeter.
Hvad kan du fodre
Gødning af skyttegraven er værd at en næringsrig planteblanding. Komponenter:
1. rådnet komøg;
2. det øverste lag af frugtbar jord;
3. mineral dressing.
Disse stoffer anbringes i en grøft, lægges i lag, eller alle komponenter blandes.
Efter plantning skal buskene vandes og derefter befrugte jorden med humus eller tør jord. Hvis buskens knopper er korrekt udviklet, skal de skæres ud og efterlade cirka tredive centimeter.
Vigtig!
Brug ikke gødning indeholdende nitrogenkomponenter under plantning. Hindbær vil ikke være i stand til at styrke deres jordstængler. Det er bedre at fodre med lidt træaske.
Korrekt strømpebånd, beskæring og kunstvanding af buske.
Vandingsregler
Det er nødvendigt at skylle buskene rigeligt, men overdriv det ikke med doseringen for ikke at oversvømme buskernes rhizomer. Hindbær kræver tilstrækkelig fugtforsyning i foråret og sommersæsonen.
Trellis til hindbær: beskæringsregler
Beskæring til buske er nødvendig for at reducere frugtbare stængler og fjerne tætte skud fra jordstænglerne. I forårssæsonen beskæres frugtbærende kviste med tyve centimeter. Fra det andet år af buskens eksistens bliver stænglerne kortere årligt efter høst af frugterne. Efter vinteren skæres kviste femten centimeter til en stærk knop.
Mulching
For sjældent at grave jorden op skal du dække jorden med halm mellem rækkerne. For at hindbæret ikke bliver beskadiget af frost, skal du binde buskene til hinanden.
Strømpebånd
For at buskene ikke bøjer under massen af bær, skal de bindes. Den ventilatorformede metode fungerer bedst. I dette tilfælde er det værd at indsætte et par pinde mellem buskene - hvorefter hindbær er bundet til dem: flere skud fra en busk og flere stilke fra en anden. Således opnås en ventilator.
I tilfælde af en skyttegravsmetode ville den bedste måde være at binde espalieret, du vil lære dette mere detaljeret fra denne artikel.
Hvorfor er det værd at bruge en espalier til at passe buske?
Binding til hindbærbuske er vigtig, da buskene vokser til en højde på omkring hundrede og halvtreds til hundrede og halvfems centimeter, men samtidig er stilkene tynde og fleksible, så busken ofte bøjer og kan holde sin masse, og takket være dette synker nogle af bærene til jorden og rådner.
Der er sådanne busketyper, der ikke behøver at binde underdimensionerede. For høje buske er et strømpebånd vigtigt. Trellis har mange fordele. For at alle disse punkter er sande, er det vigtigste at installere espalieret korrekt.
Trellis til hindbær: fordelene ved espalier
Første fortjeneste
Takket være espalierne kan smukke rækker buske grupperes sammen.
Anden fortjeneste
Buskens grene er ikke udtværede, fordi de ikke når jorden. Takket være dette er blade og bær ikke bange for skadedyr: snegle og padder.
Tredje fortjeneste
Hindbær er rene i al slags vejr.
Fjerde fortjeneste
Bagved espalierne står buskene i træk og viser et godt sted imellem dem.
Femte fortjeneste
Takket være espalierne opnås en mere ensartet plantning af buskene, hver gren modtager den nødvendige andel belysning. På grund af dette modnes bærene på samme tid.
Sjette fortjeneste
Det er lettere at passe på planterne, da buskene er adskilt fra hinanden, kan du rettidigt lægge mærke til de områder, der er værd at afskære, og vanding vil sikre, at det er lettere.
Syvende fortjeneste
Let kuld med høst og klargøring af buske til overvintring.
Ottende fortjeneste
At bevæge sig mellem buskene er ikke svært.
Hindbær espalier: hvordan man installerer en espalier
Bunden af espalierne skal begraves femogfirs til hundrede og fem centimeter i jorden, så den samlede højde skal være omkring to hundrede toogfyrre hundrede og halvfjerds centimeter: femogfirs til hundrede og fem centimeter i jorden, resten over jorden.
Hindbær espalier: funktioner
Hindbær er en fleksibel og ustabil plante, da vægten af sine egne frugter ikke tillader den at stå oprejst, kan stilkene på nogle buske endda ligge på jorden. Derfor er en hindbær espalier meget nødvendig. Mest af alt er dette sandt i den frugtbare periode.
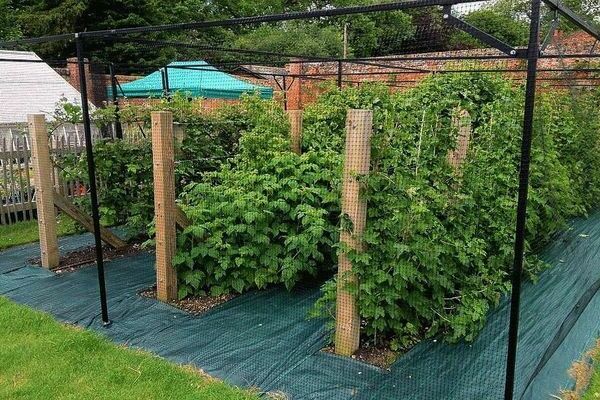
Designet af espalierne er ganske enkelt: på begge sider af rækken med buske er det nødvendigt at sætte understøttende vandrette pinde fastgjort til stolperne. Bærstænglerne er bundet til understøtningerne med garn.
Trellis er let at lave, og hver erfaren gartner kender til det, espalierens design kan gøres lidt mere kompliceret og få en fordel ud af det. Støtten placeres på den ene side med et interval på fyrre centimeter fra begyndelsen af rækken. Fertile kviste vippes til espalieret og fikseres. Modne stængler forstyrrer således ikke væksten af unge stængler.
Ydermere vil vi forstå, hvordan man binder buske i forårssæsonen. Strukturen skal installeres før dannelsen af nyrer. Når stilkene vippes, vokser alle knopperne opad, og bærene er på solsiden. Nye stængler forstyrrer ikke modne og forstyrrer ikke indsamlingen af bær.
Efter plukningen af bærene skæres de to-årige stilke af. De skæres af helt til enden uden at efterlade en stub. Så er det værd at afskære nye svage eller tynde stængler. De stærkeste og længste stilke skal være tilbage. Jorden under buskene skal løsnes med en havehøjde for at fjerne ukrudtet og derefter vande buskene.
Trellis til hindbær: espalier og deres typer
Fastgørelse af buskene til espalieret er den bedste måde for gartnere at øge mængden af afgrøden. Tapisserier er fremstillet af forskellige materialer: træer, rør, pinde og stolper. Konstruktionernes dimensioner er hovedsageligt i højden fra to hundrede og tyve centimeter til to hundrede og halvtreds centimeter.
Hvis du vil bruge et træ som en støtte, skal det behandles med jernvitriol i tre dage før installationen. For at oprette en sådan løsning skal du fortynde to kilo kemisk vitriol i hundrede liter vand.
Trellis til hindbær: klassificering af espalier til buske, der krøller
Single-strip trellis
Single-strip espalier er små borde med strakt fiskelinje, hvortil grene af bær er fastgjort. Hver gren er fastgjort til ledningen separat. Denne metode er mere fordelagtig for små områder af hindbærtræet.
To-felts espalier
En trelåns espalier er to rækker af tråd strakt parallelt over et halvt meters interval. Takket være dette er buskene formet korrekt, plantagerne tykner ikke. Velegnet til terræn i forskellige størrelser.
To-lane support der er forskellige muligheder
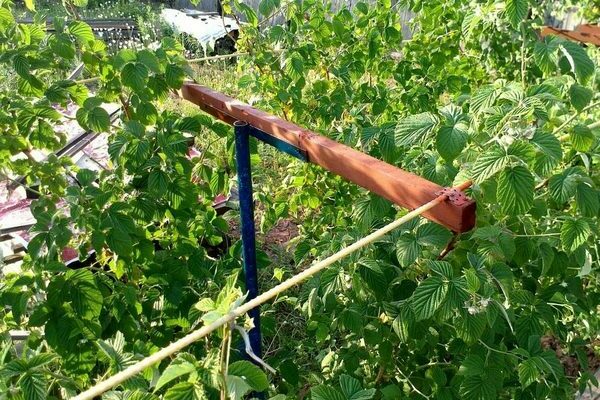
T-formet
I form af T. Således placeres to søjler den ene modsat den anden, og vandrette matricer fastgøres til dem, hvorpå tråden er fastgjort og buskene er fastgjort;
V-formet
I form af V. Grenene er i en vinkel og holdes på begge sider, så buskene er bedre ventileret;
Y-formet
I form af Y. Ved hjælp af en sådan espalier er det muligt at styre hældningsvinklen for denne struktur.
Vigtig! Brugen af en ventilator espalier gør det lettere at binde. Det eneste er, at denne metode giver et dårligere udbytte end med andre metoder. Den forbedrede ensidige espalier gør det muligt at samle flere gange flere bær.
Trellis til hindbær: gør-det-selv espalier

Det næste år efter plantning har hindbær brug for støtte. Derfor er det nødvendigt at sætte espalierne til stilkene i løbet af de første par år. Umiddelbart efter landing er det værd at opsætte stolper og ankre. Efter at sneen ikke er helt smeltet, er det allerede værd at fastgøre tråden. Armerede betonkonstruktioner med et tværsnit på ti centimeter med ti centimeter kan bruges som søjler til støtte. Alle rør med en diameter fra syv centimeter til ti centimeter er også egnede til dette. Du kan bruge pinde.
Stolpernes længde skal være omkring to hundrede og halvtreds centimeter, halvanden meter over jorden. Metalpæle behandles med antikorrosionsmidler, så bærene ikke gør ondt, og træpæle behandles med antiseptika. Afstanden mellem stolperne skal være omkring femten til femogtyve meter.
I udkanten af rækken skal stolperne fastgøres med ankre. Til spænding mellem espalierne er rustfri tråd velegnet, men den bedste løsning ville være produkter med en polyethylenoverflade.
Hver bærstængel bindes separat. Stilkene er fastgjort til hovedtråden med en tråd, og fletter hovedtråden sammen med stilkene. Enderne af garnet er fastgjort i enden af stolperne.
Vigtigt! Når du laver en dobbeltsidet espalier, vil prisen være femogtredive procent mere end at binde på en ensidig.
Sådan bindes bær korrekt.
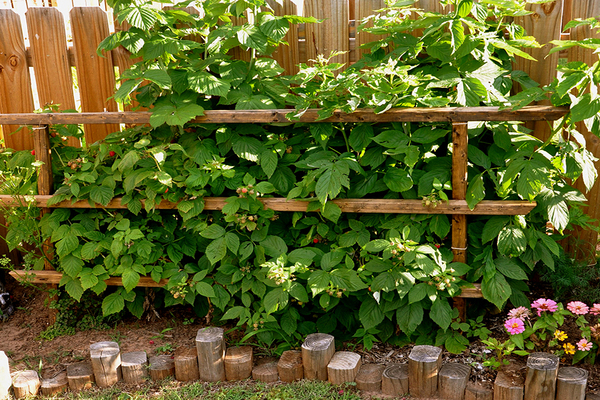
Den letteste espalier er lodret. Konstruktionen er ikke kompliceret nok: to rækker tråd, der er fastgjort i forskellige højder fra jorden på det samme lodrette plan. Grundlæggende er den første ledning i en meters højde og den anden halvanden meter. Hindbærkviste er fastgjort til dem med et interval på femten centimeter fra hinanden. Således vokser unge stængler uden begrænsning.
Hvis buskene er placeret et sted, der er skjult for et vindstød, trækkes tråden på samme niveau. Gabet mellem espalierne er omkring en halv meter. Derefter placeres alle stilkene mellem ledningerne uden at fastgøre dem. Dette reducerer omkostningerne ved at binde meget.
Rummet mellem ledningerne kan hæves op til hundrede centimeter. Stilkene er bundet under et lille hjørne, hvilket gør en dobbeltsidet espalier. Unge stængler er i midten af rækken og forstyrrer ikke udviklingen af frugtbærende grene. Denne placering hjælper med en kvalitetshøst.
Brugen af en skrå espalier giver dig mulighed for ikke at sno stænglerne, men klemme dem mellem ledningerne.
Det er svært for en person at udføre arbejdet med at binde planter, så det er bedre at gøre det sammen. Den ene trækker stilkene op, den anden fastgør dem til tråden. Det er nødvendigt at lave en sløjfe på mellemposten. Dette vil hjælpe med at forhindre grenene i at falde i vinden. Dette vil reducere omkostningerne ved at binde og beskære gamle stilke.
Hindbær espalier: enkle gør-det-selv espalier metoder
Selvfølgelig er det muligt at købe et gobelin i en butik, men det er billigere at oprette det med dine egne håndtag. For at gøre dette skal du læse instruktionerne, som fortæller dig, hvordan du opretter en espalier.
Til basen bruges pinde fra træ, beslag og forskellige værktøjer, der kan være ved hånden. Materialet bør ikke bøje og knække under en tung masse. Sørg for at trække tråden mellem espalieret.
Den første række rummer unge kviste, og de andre to-årige stængler. Den nederste ledning trækkes i en afstand af fyrre centimeter fra jorden, den øverste halvanden meter. Den bedste afstand mellem stolperne er ti meter.
Trellis til hindbær: trin-for-trin instruktioner til oprettelse af en espalier
1.Vi behandler basen til espalierne med specielle stoffer. Vi dækker træet med en beskyttende lak. Dette bremser væsentligt nedbrydningen af træ i jorden. Vi gør det samme med jernpinde for ikke at tære.
2. For at opnå en T-formet espalier, er strimlerne gennemboret med studs.
3. for søjlerne graver de huller i jorden. Dette gøres med en havebor, men du kan også gøre det med dine hænder.
4. Tråden er fastgjort med studs. Det er nødvendigt, at de køres ind i lige stor afstand fra jorden, ellers glider buskens grene til jorden.
5. Mellem baserne trækkes tråden elastisk og fastgøres på tappene.
Hindbær espalier: konklusion
Brugen af et design til fremragende bærplukning gør opgaven lettere. Hindbær espalier er en god mulighed for praktisk plukning af bær på enhver størrelse på stedet.
Er der en mere praktisk måde at øge udbyttet af hindbær og reducere den tid, der bruges på at passe dem, bortset fra at binde hindbærene?
Lad dine bær være de lækreste og mest duftende.