Stikkelsbærpleje, plantning, beskyttelse
Indhold:
Artiklen beskriver detaljeret pleje af stikkelsbær, reglerne for plantning af det, beskyttelse mod sygdomme, skadedyr.
Stikkelsbærpleje: grundlæggende oplysninger
Stikkelsbærpleje: grundlæggende oplysninger
Hvis stikkelsbæret bliver passet ordentligt, vil det bære frugt i 20-25 år, og det er ikke grænsen. Nogle gange bærer stikkelsbær frugt i 40 år. For at gøre dette til en realitet skal du selvfølgelig passe på ham, du kan ikke bare plante et stikkelsbær og glemme det.
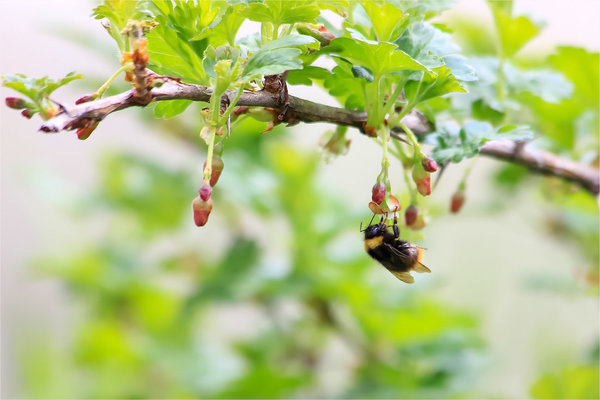
Stikkelsbær er en kort busk. Den vokser til cirka 120 cm i højden. Stikkelsbærkviste er dækket med brun eller grå skrællende bark og små grønne blade. Grenene har små tornede torner.
Denne busk blomstrer i maj. Dens aksillære blomster er grønne eller røde. Stikkelsbærfrugter er små, de kan nå cirka 1-1,5 cm i diameter. Men der er sorter af stikkelsbær, hvis frugter er meget større. Stikkelsbærfrugter kan være røde, grønne, sorte, gule. De er meget nyttige for kroppen, fordi de indeholder en stor mængde vitaminer og organiske syrer.
Stikkelsbæret er en god honningplante, så det ville være rart for biavlere at have det i deres område, så planten kunne have en dobbelt fordel. Stikkelsbæret er en selvfrugtbar afgrøde. Det betyder, at selvom der kun vokser en stikkelsbærbusk i haven, vil den bære stor frugt.
Stikkelsbær kan plantes om foråret eller efteråret. Erfarne gartnere foretrækker at gøre dette i efteråret, omkring anden halvdel af september eller begyndelsen af oktober. Hvis du planter stikkelsbærene senere, når de måske ikke at slå rod, inden frosten begynder. Selvfølgelig kan du plante stikkelsbær om foråret, men det kan have en dårlig effekt på dets vækst og frugt.
Inden du planter stikkelsbær, skal du vælge et passende sted til dette. Du skal også lære mere om denne plante, du skal vide, hvornår du skal skære den, hvordan du beskytter den mod sygdomme og skadedyr. At passe ordentligt på dit stikkelsbær er meget vigtigt.
Stikkelsbærpleje: hvor man skal plante stikkelsbær
Stikkelsbærpleje: hvor man skal plante stikkelsbær
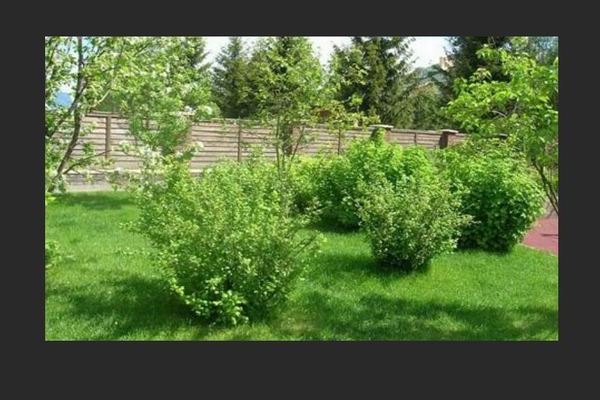
Stikkelsbær er meget letkrævende. Hvis du planter det i skyggen, kan du ikke forvente en rig høst. Planten vil visne og krympe hvert år og give færre og mindre bær. Stikkelsbær kan heller ikke lide overskydende fugtighed; vand bør ikke blive hængende i stedet for plantningen. Hvis du planter et stikkelsbær på et sted, hvor jorden er for fugtig, kan dens rødder rådne. Stikkelsbærplantningsstedet skal være godt oplyst af solen, og grundvandet på dette sted bør ikke være placeret tæt på overfladen. Plant ikke stikkelsbær i lerjord.
Voksende stikkelsbær: hvordan man vælger de rigtige frøplanter
Voksende stikkelsbær: hvordan man vælger de rigtige frøplanter
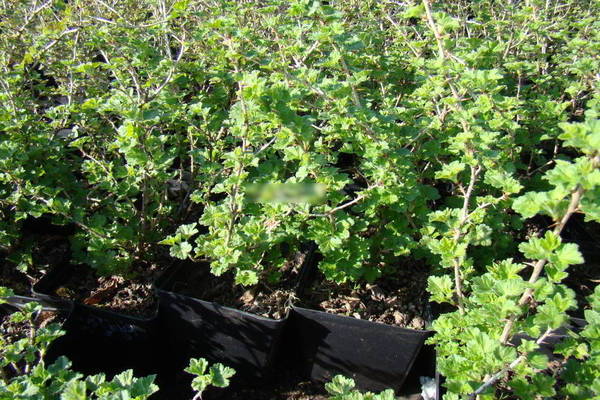
Det er meget vigtigt at vælge en god stikkelsbærfrøplante til plantning. Markedet sælger hovedsageligt stikkelsbærplanter, der er et år gamle. De har et åbent rodsystem og en lille jorddel. Roden er den vigtigste del af frøplanten, så den skal være i god stand. Den skal være tilstrækkeligt veludviklet, og den må under ingen omstændigheder overtørres. Jorddelen skal se godt ud og ikke have nogen skader. Efter at gode frøplanter er blevet udvalgt, og det sted, hvor de vil vokse, er blevet bestemt, begynder næste trin - plantning.
Sådan plantes stikkelsbær
Det er let at plante stikkelsbær. Gartnere, der allerede har dyrket denne plante, vil klare dette uden problemer. De, der planter stikkelsbær for første gang, også underlagt visse regler, vil være i stand til at gøre dette.
Hvis der plantes flere planter, skal markeringerne først foretages. For at gøre dette placeres en stang på jorden, og pinde sidder fast i jorden i en afstand på 1,1-1,3 m langs den. I deres sted skal du derefter grave huller. Hvis dette er mere praktisk, kan du i stedet for en bar tage et reb, det er ikke vigtigt, det vigtigste er at lave en markering. Derefter skal du grave huller, deres antal skal svare til antallet af frøplanter. Grav ikke dybe huller, nok huller 25-30 cm dybe. Denne dybde er egnet til størrelsen på stikkelsbærrødderne.
For at sikre, at planten har levende rødder, skal du trimme dem lidt med beskæresaks, hvis snittet er hvidt, så er de i live. Dagen før plantning skal frøplanterne gennemblødes i vand.
Inden plantning skal du placere omkring 200 gram mineralsk gødning i hvert hul. Du kan også lægge et par skovle gødning der. Det skal være rådnet gødning. Gødning skal blandes godt med jorden. Derefter placeres frøplanter i hullet og dækkes med jord. Hullet skal ikke kun indeholde stikkelsbærroden, men også et par centimeter af stammen. Når hullet er fyldt op, skal du let tørre jorden og vande kimplanterne. En frøplante har brug for en spand vand. Vanding af frøplanter er nødvendig umiddelbart efter plantning.
Stikkelsbærpleje: regler
For at et stikkelsbær skal producere en god høst, har det brug for ordentlig pleje, som omfatter mere end bare vanding. For at busken kan vokse godt og aktivt bære frugt, skal jorden løsnes regelmæssigt. Med hvilken intensitet jorden løsnes afhænger af jordtypen. Hvis jorden er meget tæt, skal du løsne den med en skovl; for løs jord er overfladeløsning med en pitchfork nok.
Stikkelsbærrødder er tæt på jordoverfladen, så når du løsner jorden nær stammen og under kronen, skal du prøve ikke at røre dem. Værktøjet skal uddybes i jorden ikke mere end 6-8 cm. Med omhu bør kun jorden under kronen behandles, andre zoner kan arbejdes mere selvsikkert og intensivt.
Derudover har stikkelsbær brug for obligatorisk ukrudt. Ukrudtsbekæmpelse bør ikke negligeres. De kan forårsage overdreven fugt, hvilket kan gøre stikkelsbær syge.
I det første år efter plantning behøver stikkelsbær ikke befrugtning. Og næste år kan den allerede befrugtes. Den optimale gødning vil være gylle blandet med ammoniumnitrat. Gødning kan erstattes med fuglesand. Den resulterende opløsning skal hældes under busken; det er ikke nødvendigt at hælde den på busken selv. En spand mørtel er normen for hver busk. I plantelivets tredje år er det på mode at bruge en blanding af gødning, superfosfat og kaliumsulfat som gødning. Derefter skal du fodre stikkelsbær to gange om året. Organisk mineralsk gødning kan bruges til dette formål. Mange gartnere taler godt om "Sinata", "Bioprotect". Topdressing skal udføres i overensstemmelse med vejledningen til gødning.
Et meget vigtigt punkt i plejen af stikkelsbær er beskæring af dem. I de første år er beskæring nødvendig for at danne en busk. Hele hoveddelen af rodvæksten skal fjernes, skeletgrene forkortes til det halve. Når stikkelsbær er fire år, ændres beskæringsprincipperne. Derefter begynder de først og fremmest at fjerne tørrede grene og svage skud. En beskærer bruges til at fjerne dem. Dannelsen af en busk skal startes, før knopperne begynder at blomstre på den om foråret, og når alle blade falder af om efteråret. For at øge udbyttet af stikkelsbær forkorter gartnere de grønne skud om sommeren. Toppen af grenene skæres, så der forbliver 6-7 blade på hver gren. Dette hjælper med at øge frugtens størrelse.
Stikkelsbærdyrkning og pleje, skadedyrsbekæmpelse og sygdomsbekæmpelse
Enhver haveafgrøde kan blive offer for sygdomme og skadedyr. Stikkelsbær er ingen undtagelse i denne henseende. Det kan blive skadet af møl, sav, osv. Du kan bekæmpe disse skadedyr ved hjælp af en infusion lavet af træaske og vand. Hvis der ikke er mulighed eller ønske om at forberede denne infusion, kan du købe et skadedyrsbekæmpelsesmiddel, du kan finde det i enhver specialbutik. Det er bedst at forarbejde stikkelsbærene om foråret, men hvis behovet opstår, kan behandlingen gentages, efter at stikkelsbærene er færdige med at blomstre.
Stikkelsbær er mere tilbøjelige til at blive syge og blive angrebet af skadedyr om foråret og i begyndelsen af sommeren, derfor skal du i denne periode omhyggeligt overvåge planten, undersøge den for tilstedeværelse af skadedyr og sygdomme og overvåge dens udvikling. Hvis planten i det mindste har nogle tegn på sygdom, behøver du ikke vente, du skal straks behandle stikkelsbæret med passende præparater.
For at forebygge svampesygdomme i marts skal stikkelsbær dryppes med kogende vand. For at bekæmpe sådanne farlige skadedyr som bladlus og nyremider er askeopløsningen ikke nok, mere alvorlige foranstaltninger er nødvendige. Inden stikkelsbæret begynder at blomstre, skal det behandles med en mulleinopløsning. Det tilberedes af komøg og vand.
En knoppemide lever inde i knopperne på en plante, som den modtog dette navn for. Dette skadedyr er farligst for ribs, men det kan også skade stikkelsbær. De knopper, der blev beskadiget af denne mide i foråret, vil ikke være i stand til at blomstre og vil dø. Om sommeren flytter skadedyret til andre knopper. Det er meget let at forstå, at en plante er inficeret. De knopper, hvor flåten har sat sig, er forstørrede, visuelt ser de ud til at være mere hævede og runde. En frøplante, der er forberedt til plantning, kan inficeres med en nyremide, og dette skadedyr kan også overføres af fugle, insekter og mennesker. For at forhindre det bør der lægges stor vægt på plantematerialet. Til høst af stiklinger skal du vælge sunde planter. For at desinficere stiklinger dyppes de før plantning og opbevares i 12-15 minutter i vand opvarmet til 45 grader. Hvis planterne har inficerede knopper, skal de fjernes med det samme. Også til profylakse under blomstringen sprøjtes stikkelsbær med infusion af hvidløg.
Edderkoppemider skader stikkelsbærblade ved at suge saft ud af dem. Bladene begynder at falde af, og planten visner væk. Edderkoppemider angriber planter i maj og kan skade dem hele sommeren. Den bedste forebyggelse for edderkoppemider er ordentlig stikkelsbærpleje. Det er bydende nødvendigt at grave jorden op om efteråret og luge ukrudtet ud. Men hvis det viste sig at være ubrugeligt, og miden stadig dukkede op, vil infusioner af hvidløg, løgskaller eller tobak hjælpe i kampen mod det.
Et skadedyr som en savflue er meget farligt for stikkelsbær. Dens larver er i stand til at ødelægge næsten alle bladene på busken på få dage. Kokoner af denne parasit dvale i jorden, og om foråret fødes voksne insekter, som ikke spilder tid og lægger deres æg på indersiden af bladene. Efter et stykke tid fjernes larverne fra dem. Du kan bekæmpe dem ved at ryste plantens blade af og ødelægge det. Efter blomstring skal busken behandles med en opløsning af 10% karbofos. For at forhindre skadedyr i efteråret graves jorden op. Du kan også plante tomatbuske ved siden af stikkelsbær, tomater skræmmer savfluen.
Efter sneen falder, skal stikkelsbærene dækkes med en slags tæt materiale. På denne måde kan du ødelægge alle skadedyr den vinter i jorden.
Almindelige fejl ved dyrkning af stikkelsbær
Mange spirende gartnere laver fejl, når de dyrker stikkelsbær. Disse fejl er alle meget ens.
Vand ikke stikkelsbærbuske ovenfra, det er skadeligt for ham. Fra sådan vanding kan planten blive syg og begynde at rådne.Du kan bruge et tykt lag mulch til at reducere antallet af vandinger og genere dig mindre med dem. Da stikkelsbærens rødder er tæt på jordens overflade, for ikke at skade dem, er det bedre at bruge en hakke eller rive, når den løsnes. Inden du begynder at fodre stikkelsbær, skal du tage hensyn til den gødning, der blev brugt under plantningen. Hvis der blev plantet både mineralsk og organisk gødning under plantningen, behøver planten ikke fodring i flere år. Moderation bør også observeres ved beskæring. Hvis stikkelsbærbusken kører, behøver du ikke forsøge at forme den i en beskæring. Hvis du overdriver det, kan planten simpelthen dø.
Stikkelsbærpleje